Last updated: September 04, 2024
Lexmark - CPA 2.0
Complete the requirements and follow the steps below to install the second-generation Control Panel Application (CPA) on Lexmark printers. For a list of supported devices, see PrinterLogic CPA.
Installation Requirements
Ensure all of the universal requirements are completed and functional prior to CPA setup. In addition, Lexmark also requires the following.
- eSF6.0 firmware or higher is required. eSF version 5 is deprecated and must NOT be used. As a reference to help you determine if you are running compatible firmware:
- Firmware xx.07y.zzz is running framework version 6.3.
- Firmware xx.05y.zzz is running framework version 6.2.
- Firmware xx.04y.zzz is running framework version 6.1.
- Firmware xx.03y.zzz is running framework version 6.0.
Additional Port Information
CPA installation and uninstallation occur from the Service Client object to the printer over TCP 443.
CPA operation requires two main communication paths:
- From the printer to the Service Client object over TCP 31988.
- From the printer to the Virtual Appliance instance (cpp-ui.FQDN_of_Virtual Appliance and cpa-api.FQDN_of_Virtual Appliance) over TCP 443.
Everyday printing communication occurs from the workstation to the printer over TCP 9100 (or TCP 515 for LPR queues).
By default, Certificate Revocation List (CRL) checks occur over TCP 80 from the Service Client. The installation may fail if the CRL check cannot complete over Port 80.
Card Reader Information
If you use badge readers the following is required.
- Badge readers must be uniformly configured on the Multifunction Printer (MFP) prior to installing the CPA.
- The Badge Reader Driver and Keyboard Emulation Driver must be installed on the printer.
General Authentication Options
What the CPA displays to the end user at the printer is determined by the authentication options on the TCP / IP printer. If you are using the same authentication options for all printers you can use the default settings. If you want to be able to set specific methods on a per-printer basis, you can choose which printer-specific options you want available to set up on individual printers.
Default Settings
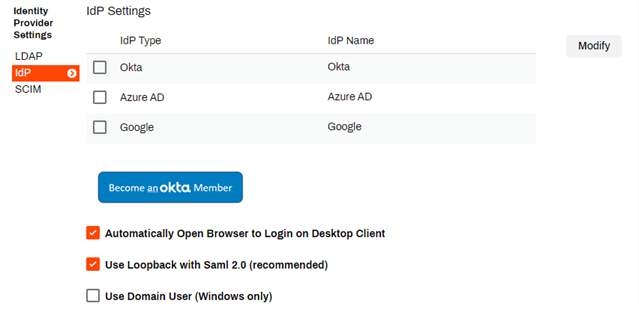
Be aware that default authentication settings vary depending on the identity provider. The LDAP settings differ from settings available for an IdP such as Okta or Entra ID (Azure AD).
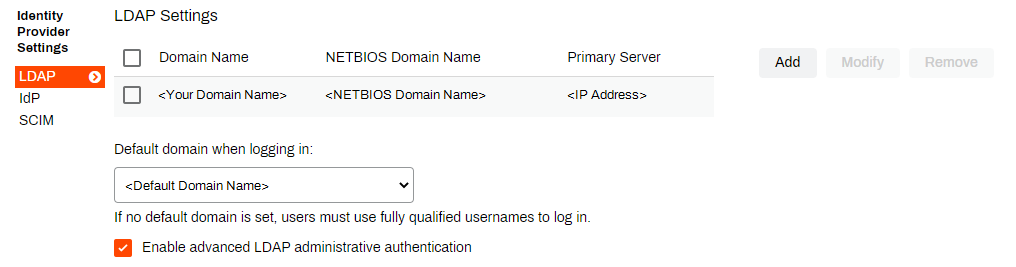
LDAP
-
In the Identity Provider Settings section, ensure that LDAP is selected and that your LDAP credentials are configured correctly.

-
Scroll down to the CPA Specific Settings section and select the options that you want available on the Printer Apps tab.
Not all the options seen here may be available. The printer's Apps tab displays the manufacturer supported options.
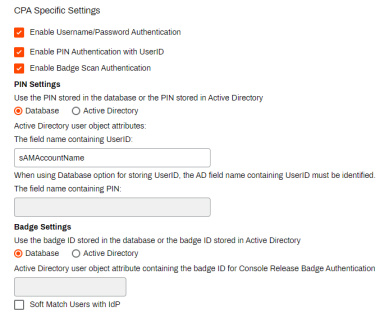
- To set PIN Settings do the following:
- Set PINs to store in either the Virtual Appliance or Active Directory databases. Depending on your selection, enter the field names for the following:
- The field name containing User ID
The field name containing PIN.
If the Database option is selected, the end-user must set the PIN within the Self-service Portal. See User ID and Pin
- To set the Badge Settings do the following:
- Set badges to store in the Virtual Appliance or Active Directory databases.
For Active Directory provide the field name that contains the badge ID attribute.
The Database option makes badge registration mandatory. Administrators can manage badges individually through the badge management screen or in bulk by CSV. End-users also can set up their badge within the Self-service Portal. See Badge Self Registration Options.
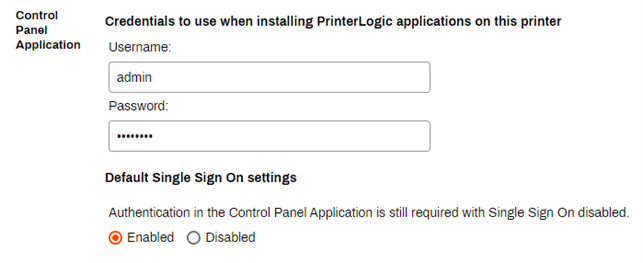
- Scroll down to the Control Panel Application section. The configuration of these settings is optional.
You can set a default Username and Password to access the printer's web interface on all printers where you're installing the CPA.
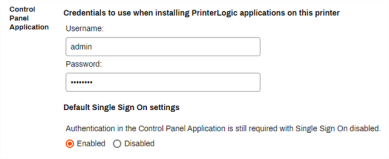
The credentials used MUST have administrative rights for the printer.
- Default Single Sign On settings — select from the following options:
Enabled — the default option. This option requires users authenticate to gain access to the printer's control panel.
- Disabled — with this option selected, the users are only asked to authenticate when they select the PrinterLogic from the device's control panel.
- Scroll back to the top and select Save.
IdP
-
In the Identity Provider Settings section, ensure that IdP is selected and that the credentials are configured correctly for your IdP.

-
Scroll down to the CPA Specific Settings section.
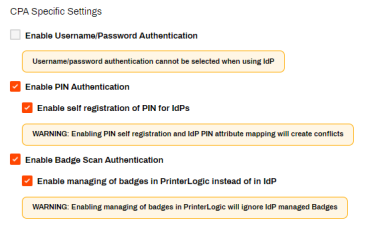
Not all the options seen here may be available. The printer's Apps tab displays the manufacturer supported options.
-
Select the options you want available on the Printer Apps tab.
If you use an IdP, the Control Panel Application (CPA) only supports badge and PIN authentication.
-
Enable PIN Authentication — use this option to enable the PIN authentication at the printer level. the PIN gets stored in the IdP database and mapping to a PIN attribute gets completed within the IdPs admin console. If you do not use your IdP to manage PINs, you can select the following option.
-
Enable self registration of PIN for IdPs — enable this option to allow end users to register their PIN using the Self-service Portal. The PIN is stored in the Virtual Appliance database. See User ID and Pin for end user instructions.
Do not enable Enable self registration of PIN for IdPs, if you have a PIN attribute mapped through your IdP.
-
-
Enable Badge Scan Authentication — use this option to enable badge authentication at the printer level. The badge number and associated user ID get stored in the IdP database. In this case, mapping to a badge attribute and user ID attribute is completed within the IdPs admin console. If you do not use your IdP to manage PINs, you can select the following option.
-
Enable managing of badges in Virtual Appliance instead of in IdP — enable this option to manage the badge numbers in the Virtual Appliance database. You can register each badge on the badge management page or in bulk by CSV. End users can also register their badge within the Self-service Portal. Reference Badge Self-Registration Options for steps.
If you Enable managing of badges in PrinterLogic instead of in IdP,Virtual Appliance ignores any badge mapping configured in the IdP admin console.
-
-
- Scroll down to the Control Panel Application section. The configuration of these settings is optional.
You can set a default Username and Password to access the printer's web interface on all printers where you're installing the CPA.
The credentials used MUST have administrative rights for the printer.
- Default Single Sign On settings — select from the following options:
Enabled — selected by default, this option requires users authenticate to gain access to the printer's control panel.
- Disabled — with this option selected, the users are only asked to authenticate when they select the PrinterLogic from the device's control panel.
- Scroll back to the top and select Save.
Install the CPA
These steps are to install the CPA on a single printer using the printer's Apps tab. To install the CPA on multiple printers in bulk, reference CPA Manager for steps.
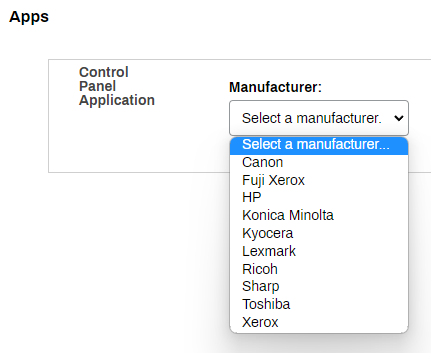
- In the Admin Console tree structure, select the printer where you want to install the CPA.
- Select the Apps tab.
-
In the Manufacturer field, select the printer manufacturer.
- Select the Service Client you want to use to install the CPA.
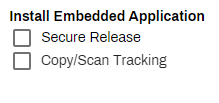
- Check the box for Install Application.
- Check the boxes for any additional apps you wish to install.
For Lexmark devices, the CPA must be installed on the printer in order for Copy/Scan Tracking to work correctly.
CPA Authentication Options
The options presented in this section are based on what was selected in the identity provider settings above. Please note that authentication features may vary depending on the printer manufacturer.
Installation Credentials
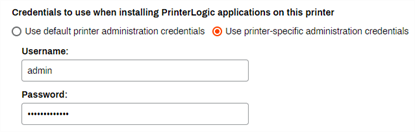
- For the Credentials to use when installing PrinterLogic applications on this printer options select from the following:
- Use default printer administration credentials — with this option you can use the default name and password to access the printer's web interface for all printers See the identity provider instructions above for more details.
Use printer-specific administrator credentials — with this option you can use the administrator credentials set on each printer.
The credentials used MUST have administrative rights for the printer.
End User Credentials
If you use an IdP, the Control Panel Application (CPA) only supports badge and PIN authentication.
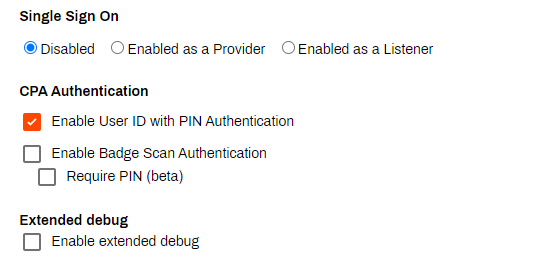
- Single Sign On — use this option to lock down the printer so that end users must authenticate before accessing the device's control panel. Select from the following options:
- Disabled — the device does not require authentication.
- Enabled as a Provider — the device displays the default Virtual Appliance CPA screen requiring users to authenticate to use the device.
- Enabled as a Listener — the CPA runs in the background and when users authenticate using another device application, they can select the PrinterLogic option from the devices application panel.
-
In the CPA Authentication section, select from the following:
-
Enable User ID with PIN Authentication — with this option enabled, users enter their User Id and PIN.
-
Enable Badge Scan Authentication — with this option enabled, users must scan their badge, card, or dongle.
The user is prompted for their network credentials upon first scan to validate the badge.
-
Require PIN (beta) — with this option enabled, end users are prompted to enter their PIN after scanning a badge.
This feature is incompatible if the SSO option enabled.
-
-
-
Extended debug — this is an optional setting. When enabled, the following options become available:
- Certificates — link to download the Virtual Appliance certificate for CA.
- PrinterLogic Control Panel Application manual install URL
-
Select Save to start the installation.
During the installation process, it is normal for the printer to undergo multiple reboots. Rebooting is an expected behavior as part of the installation procedure.
Uninstall the CPA
- Open the Apps tab for the printer where you want to uninstall the CPA.
-
Uncheck the features you want to uninstall from the printer.

- Select Save.
Troubleshooting Help
Is an Identity Provider Configured?
The CPA requires the use of an IdP. This can be LDAP or another IdP such as Entra ID (Azure AD), Okta, etc.
Check the Default Printer Admin Credentials
Are the default printer admin credentials correct?CPA installations can fail if the admin username and password are incorrect. You can resolve this issue by modifying the credentials used for CPA installation. With the Modify option in the CPA Manager, update the credentials for multiple printers as long as they are the same brand. Often, the default admin name and password are the same multiple manufacturers.
Is There a Self-signed Certificate?
At a minimum, the printer requires a self-signed certificate. If an Amazon Root CA 1 certificate is not installed, follow this link to see the steps to obtain the certificate so you can manually install it on the printer.
Is There a Time Difference Between the Service Client and the Printer?
If a certificate did not authorize, it could be because a printer is in a different time zone than the Service Client hosting the Printer Apps. When the Service Client pushes out the CPA application with the certificate, due to the time difference, the certificate may be expired.
You can reach the info page to check the timezone in two ways:
- Log in to the CPA, then tap on the PrinterLogic logo at the top.
- Install the CPA with Extended Debug mode enabled, then tap on the PrinterLogic logo at the top (without the need to log in first).

Check the Network Settings
- Verify that the IP Address assigned to the printer is accurate within the Admin Console.
- Ensure that you can successfully ping the printer from the Service Client machine.
Are You Using a Universal Print Driver?
Sometimes printer-specific drivers can cause installation issues for the CPA. Use a universal print driver to ensure a smooth and successful installation.
This is a generic communication error. A few things to check are:
- The Service Client is not listening over port 31988. Update the configuration to allow listening over port 31988.
- The printer does not trust the Virtual Appliance certificate. Register or upload a new certificate.
Fuji Xerox Specific
In the printer settings, configure the Domain Name within the DNS Configuration settings to see if it resolves.
The CPA requires a Service Client to install apps to the printer. Check that the Service Client machine is not shut down or in an error state.
On the machine, open the Task Manager and select the details tab. In the Search field, type "printer" to locate the Client processes.
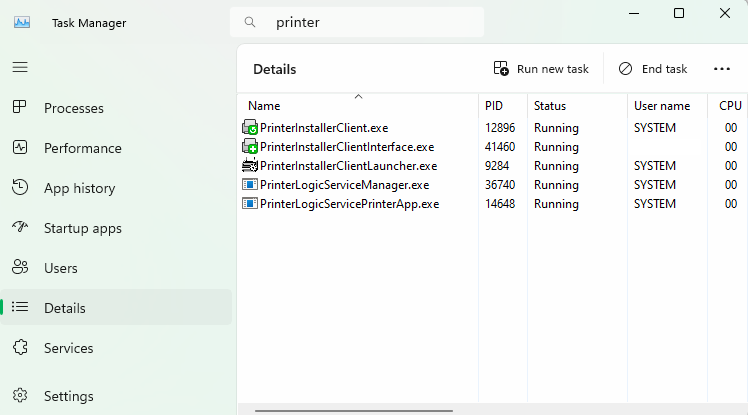
If neither the PrinterLogicServiceManager.exe or PrinterLogicServicePrinterApp.exe processes are running on the Service Client device, verify the Client installation and / or check the Service Client was installed properly.
Verify the Client Installation
Verify the Client is installed, authorized and pointing to the correct instance. A quick test is to click the system tray icon to open the Self-service Portal. If it opens to the correct URL, you can sign in, and see / install printers from the portal, then the client is authorized.
If you're prompted for an authorization code in the Self-service Portal, see Device Authorization for steps on how to create one.
If the Self-service Portal opens to an incorrect URL, you'll need to set the home URL. See Update the Client Home URL.
Verify the Service Client Configuration
Navigate to C:\Program Files (x86)\Printer Properties Pro\Printer Installer Client\ServiceHost. and check the following:
If the Service Host folder is not created, check the machine's hostname or IP address and compare with what you entered for the Service Client in the Admin Console.
If the folder is created, check the config folder in it. A token.json file is saved here when the Service Client is authorized.
If the folder is created, but the token.json file is not there, you need to reauthorize the Service Client, see Reauthorization Steps. Please note that the Service Client authorization is different from the Client authorization.
By default, the Visual C++ Redistributable for Visual Studio 2015 (32-bit/64-bit) or newer is typically already installed. However, both the x86 and x64 redistributable packages must be installed on the Service Client to generate the items required for a successful installation. Without the packages, the Service Client cannot initiate the app service. You can find these packages in the Microsoft Download Center.
The CPA requires an email address associated with each IdP user, which it uses as the username when logging in. This scenario occurs when an email address has not been associated with the user within the IdP.
You can find the log file on the Service Client machine at the following path:
Windows:
C:\Program Files (x86)\Printer Properties Pro\Printer Installer Client\service-printer-app\log\PrinterLogicServicePrinterApp.log
Mac/Linux:
/opt/printerinstallerclient/log/printerlogicserviceprinterapp.log
If the installation fails with an InvalidSolutionsKeyError, update the printer's region in the firmware settings.
-
New Mobile App Release
iOS: November 11th, 2024 -
Released: November 11th, 2024
-
Released: October 22nd, 2024
Updated Application Version Included
The Control Panel Application (CPA) displays text in the following languages. For more information see Virtual Appliance Supported Languages.
- Dutch - 0413
- English - 0409
- French - 040C
- German - 0407
- Italian - 0410
- Japanese - 0411
- Polish - 0415
- Portuguese - 0416
- Simplified Chinese - 0404
- Spanish - 040A
- Swedish - 0409
- Thai - 041E
- Turkish - 041F