Virtual Appliance Troubleshooting
Below are some common troubleshooting tips organized by product / feature. If you still require assistance to resolve your issue please contact Product Support.
Control Panel Application (CPA)
Are the default printer admin credentials correct?
CPA installations can fail if the admin username and password are incorrect. You can resolve this issue by modifying the credentials used for CPA installation. With the Modify option in the CPA Manager, update the credentials for multiple printers as long as they are the same brand. Often, the default admin name and password are the same multiple manufacturers.
Is the Service Client running?
The CPA requires a Service Client to install apps to the printer. Check that the Service Client machine is not shut down or in an error state.
Is the PrinterLogicServicePrinterApp.exe running?
On the machine, open the Task Manager and select the details tab. In the Search field, type "printer" to locate the Client processes.
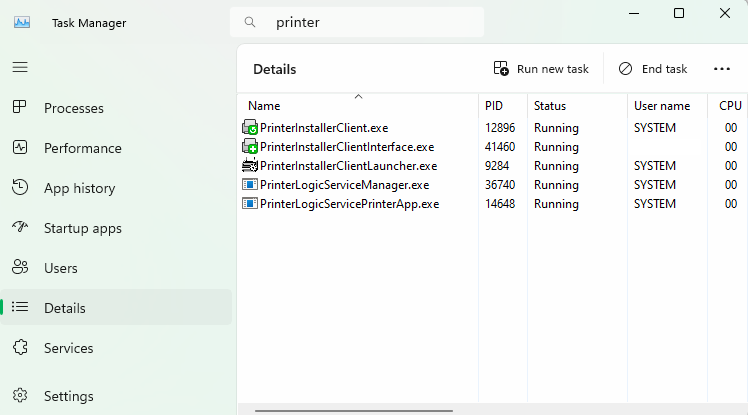
If neither the PrinterLogicServiceManager.exe or PrinterLogicServicePrinterApp.exe processes are running on the Service Client device, verify the Client installation and / or check the Service Client was installed properly.
What can I do if the PrinterLogicServiceManager.exe or the PrinterLogicServicePrinterApp.exe is not running?
Verify the Client is installed, authorized and pointing to the correct instance. A quick test is to click the system tray icon to open the Self-service Portal. If it opens to the correct URL, you can sign in, and see / install printers from the portal, then the client is authorized.
If you're prompted for an authorization code in the Self-service Portal, see Device Authorization for steps on how to create one.
If the Self-service Portal opens to an incorrect URL, you'll need to set the home URL. See Update the Client Home URL.
How do I check if the Service Client was configured properly?
Navigate to C:\Program Files (x86)\Printer Properties Pro\Printer Installer Client\ServiceHost. and check the following:
If the Service Host folder is not created, check the machine's hostname or IP address and compare with what you entered for the Service Client in the Admin Console.
If the folder is created, check the config folder in it. A token.json file is saved here when the Service Client is authorized.
If the folder is created, but the token.json file is not there, you need to reauthorize the Service Client, see Reauthorization Steps. Please note that the Service Client authorization is different from the Client authorization.
How do I reauthorize a Service Client?
Use the following steps to generate a new authorization token for a Service Client if it's missing, or if the PrinterLogicServiceManager.exe service is crashing.
Reauthorize the Service Client only if you've checked the URL, client authorization, and folders first. Complete the steps below within two minutes or the reauthorization fails.
- On the machine set up as the Service Client, navigate to C:\Program Files (x86)\Printer Properties Pro\Printer Installer Client\ServiceHost/Config.
- Verify if there is an existing token.json file. If there is, delete the file.
- Open the Task Manager.
- Select the Details tab.
- Right-click on PrinterInstallerClientLauncher.exe and select End Process Tree. There are three PrinterInstallerClient processes running for the Client. If the other two services don't close, then close them individually.
- In the Virtual Appliance Admin Console, navigate to the Service Client object.
- Select the Service Client and in the General tab, select Reauthorize.
- Select Okay to close the message.
- Back on the Service Client machine, select the Services tab in the Task Manager.
- Right-click on PrinterInstallerLauncher service and select Start.
Once the services start, the machine pulls down a fresh token.
Why am I getting a "Login Service Unavailable" error on the printer?
This is a generic communication error. A few things to check are:
- The Service Client is not listening over port 31988. Update the configuration to allow listening over port 31988.
- The printer does not trust the Virtual Appliance certificate. Register or upload a new certificate.
Fuji Xerox Specific
In the printer settings, configure the Domain Name within the DNS Configuration settings to see if it resolves.
Is there a self-signed certificate installed on the printer?
At a minimum, the printer requires a self-signed certificate. If an Amazon Root CA 1 certificate is not installed, follow this link to see the steps to obtain the certificate so you can manually install it on the printer.
Is there a time difference between the Service Client and the device?
If a certificate did not authorize, it could be because a printer is in a different time zone than the Service Client hosting the Printer Apps. When the Service Client pushes out the CPA application with the certificate, due to the time difference, the certificate may be expired.
You can reach the info page to check the timezone in two ways:
- Log in to the CPA, then tap on the PrinterLogic logo at the top.
- Install the CPA with Extended Debug mode enabled, then tap on the PrinterLogic logo at the top (without the need to log in first).

For Service Client on Windows, do you have the correct Visual C++ redistributable version?
By default, the Visual C++ Redistributable for Visual Studio 2015 (32-bit/64-bit) or newer is typically already installed. However, both the x86 and x64 redistributable packages must be installed on the Service Client to generate the items required for a successful installation. Without the packages, the Service Client cannot initiate the app service. You can find these packages in the Microsoft Download Center.
Have you refreshed the Client on the Service Client machine?
A quick way to do this is to right-click the Client icon in the system tray of the Service Client machine and select Refresh Configurations.
Is an identity provider configured?
The CPA requires the use of an IdP. This can be LDAP or another IdP such as Entra ID (Azure AD), Okta, etc.
Why am I getting a "Login Successful" message, but not being logged in?
The CPA requires an email address associated with each IdP user, which it uses as the username when logging in. This scenario occurs when an email address has not been associated with the user within the IdP.
Are you using a universal print driver?
Sometimes printer-specific drivers can cause installation issues for the CPA. Use a universal print driver to ensure a smooth and successful installation.
Are the network settings configured correctly?
Check the following:
- Verify that the IP Address assigned to the printer is accurate within the Admin Console.
- Ensure that you can successfully ping the printer from the Service Client machine.
If I get an error, where can I find the log files?
You can find the log file on the Service Client machine at the following path:
Windows:
C:\Program Files (x86)\Printer Properties Pro\Printer Installer Client\service-printer-app\log\PrinterLogicServicePrinterApp.log
Mac/Linux:
/opt/printerinstallerclient/log/printerlogicserviceprinterapp.log
When swiping my badge, why does the CPA freeze on "Badge Authenticating?"
This issue likely stems from incorrect Authentication / Accounting Type settings located at Permissions ![]() Authentication and Accounting
Authentication and Accounting ![]() Authentication / Accounting Type. When using badging, ensure the setting is configured to Custom and restart the device.
Authentication / Accounting Type. When using badging, ensure the setting is configured to Custom and restart the device.
Did the Amazon Root CA and PrinterLogic CA get installed?
At a minimum, the printer requires a self-signed certificate. If an Amazon Root CA 1 certificate is not installed, follow this link to see the steps to obtain the certificate so you can manually install it on the printer.
Why is my badge reader not working?
Some Ricoh models may require specific card reader settings.
Before you follow the steps below, if the CPA is installed in SSO provider mode you will need to uninstall the CPA first.
- Ensure the USB card reader is connected to the device's panel and NOT the back of the device.
- From the device's panel, log in as Machine Administrator.
- Navigate to User Tools
 Screen Features Screen Device Settings IC Card/Bluetook Software Settings Select IC Card Reader and set to Proximity Card Reader.
 - Select Proximity Card Reader Settings.
- Empty the list.
- Return to the Select IC Card Reader settings accessed in step 3, and set to Do not use.
- Reboot the device.
What if my CPA install fails with an InvalidSolutionsKeyError
If the installation fails with an InvalidSolutionsKeyError, update the printer's region in the firmware settings.
What if there isn't a Customized Login option in the Login Types on my FujiXerox printer?
The Fuji Xerox CPA requires the Customized Login option set and enabled. Normally this happens during the CPA installation. If the option is not visible on the printer, enable the Customized Login option using the printer's Service Mode.
- Log in to Service Mode from the panel on the device.
- Select Tools.
- Select Common Service Settings.
- Select Maintenance / Diagnostics.
- Select the NVM Read / Write option.
- Set the chain-link to 700-497.
- Set the New Value to 0.
- Exit Service Mode and reboot the device.
Once the device reboots:
- Log in to the printer's control panel.
- Navigate to the Login Types settings. The path to these settings may vary by model.
- Select the Customized Login option.
CPA Manager
Are the default printer admin credentials correct?
CPA installations can fail if the admin username and password are incorrect. You can resolve this issue by modifying the credentials used for CPA installation. With the Modify option in the CPA Manager, update the credentials for multiple printers as long as they are the same brand. Often, the default admin name and password are the same multiple manufacturers.
Direct Email Printing
What do I do if the alias is being stripped from the To: field?
If you are seeing alias is automatically stripped from the To: field, set up a distribution group:
- Remove the alias from the original account.
- Create a distribution list called <printername>@<domain>.com. Example: HPXXX@example.com.
-
Set the only member of the list to the main mailbox. Example: example@example.com.
The main mailbox set for the pull printer on the Service Client's Email Printing tab.
Mail should be delivered to the main mailbox, with <printername>@<domain>.com in the To: field.
Enterprise Data Warehouse (EDW)
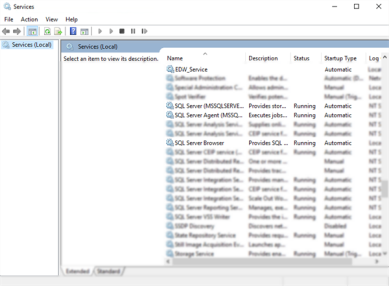
Why can't I see new data in EDW?
If you have any issues with data flowing to the database, ensure the services are running by doing the following:
- Open your Services app.
- The following services should have the Status set to Running and the Start-up Type set to Automatic:
- SQL Server
- SQL Server Agent
- SQL Server Browser
- EDW_Service
Output Automation
I set a DNS name, why do I get a "Failed to get host address" error?
In some setups, external applications may need to reach the Output Automation Service Client using a DNS name that resolves to an external IP address. However, this can cause issues the following issues:
- The Service Client cannot resolve the DNS name to its internal IP address.
- External DNS resolution conflicts with internal requirements.
Check if the Service Client can resolve the DNS name to its internal IP address. If the DNS name doesn't resolve correctly, you may need to modify the hosts file. See Troubleshoot DNS Resolution for Output Automation-Service Client
Ensure that the DNS name in the UI matches the one in the certificate used by the Service Client.
Output Automation - SAP
SAP Output Requests status shows "Output device Unavailable".
If the Output Automation logs have no activity from print jobs, make sure ports are open and the network traffic is flowing. You can use the Check Connection option of the Spool Administration: Output Device (Display) window to verify SAP is reaching the LPD service.
The print job is received by the LPD service, but nothing is printed.
If the Output Automation logs show a error relating to an unsupported command, check the following:
- Make sure the Access Method for the output device is U.
- Make sure the Device Type for the output device matches the destination printer as closely as possible.
- If those look good, there may be a new message type that needs to be supported. Contact support.
PIV / CAC
PIV / CAC Login says "Unable to process CAC Login".
- Open developer tools in the browser and select the Network tab.
- Select the CAC / PIV Login button.
- Watch for red entries, and investigate.
- If the page says "Unable to process CAC Login" look for an error on acquire.php. If you hover over that entry, it should tell you what happened.
- An ERR_NAME_NOT_RESOLVED means that the workstation could not resolve the pivcac CNAME entry.
Trouble authenticating the user during login.
Federal agencies often have to cycle their service account passwords. Ensure that the service account password is correct by:
- Navigate to the Identity Provider Settings section on Tools
 Settings General.
 - Select the domain, then select Modify.
- Select the Test Settings button.
If the Connection with Bind User/Password test fails, the bind username and password require updating.
Are you getting certificate errors upon login?
Verify CAC / PIV Certificate.
- Examine the certificate being used to authenticate to the Admin Console.
- Verify that the certificate has not expired.
- Verify that the certificate is trusted and that all Certificate Authority (CA) in the chain are installed in the respective trusted CA stores for the Local Machine
- Verify the way the certificates are mapped to users inside of Active Directory (AD).
- Are CAC / PIV certificates mapped to multiple AD user accounts through Name Mappings in AD Users and Computers?
- Do the CAC / PIV certificates have a PrincipalName entry inside the subjectAlternativeName extension?
- Does this PrincipalName match the userPrincipalName for the user inside of AD?
PrinterLogic App (Mobile)
What if I printed and held a document from my workstation and the held print job is not visible in the mobile app?
If held print jobs are not visible in the mobile app make sure the end users are logged into the client on the workstation and that is the same user credentials that are being used to log into the mobile app.
When I select a print job to release and select the printer icon, I don't see any printers I can select to print the job.
Most commonly this is because when you printed from your workstation, you selected a specific printer to print to. Depending on how your environment is configured, it is assumed you are performing a secure print function, and want to print to that specific printer. If this is the case, go to the selected printer and either select the Print Release ![]() option, or if configured, scan the QR code
option, or if configured, scan the QR code option.
If you are wanting to release to any printer that is an authorized release printer, you will need to print to a Pull Print queue that has been configured by your application administrator. When printing to a Pull Print queue, all available printers will be displayed to select from.
What if one of my users is not able to sign in to the mobile app?
If your user can't sign in to the mobile app make sure they can log into the Self-service Portal with the same credentials they are using on the app. If they cant, then it's most likely an issue with the IdP implementation.
What if my users are not able to print to a specific printer with their mobile device?
If your end users are not able to print to a specific printer, first make sure their mobile device can communicate with the printer. Another thing to check is that the printer supports IPP, that it is enabled, and TCP Port 631 and 80 are open. If neither of those fix the issue, check to make sure IPPS is not enabled since IPPS is not supported by Virtual Appliance and conflicts with the printing process.
I sent a print job to a printer, but it is not showing on the print release screen.
Although held print jobs generally show up on the app very quickly, depending on your network, a print job may take a short period of time to show in the app. Sometimes you may need swipe down on the print release screen to refresh.
Another consideration is how long it has been since you printed the job. As a default, held print jobs are only kept for 12 hours before being purged. This setting can be modified to be shorter or longer by the application administrator. Confirm with them on what this time is set to.
I am trying to delete printers from my mobile app, but some of them will not let me delete them.
Only printers that are manually added to the mobile device can be deleted. Printers that have been deployed to the mobile device by the administrator cannot be deleted from within the app.
Service Client
What can I do if the PrinterLogicServiceManager.exe is not running?
Verify the Client is installed, authorized and pointing to the correct instance. A quick test is to click the system tray icon to open the Self-service Portal. If it opens to the correct URL, you can sign in, and see / install printers from the portal, then the client is authorized.
If you're prompted for an authorization code in the Self-service Portal, see Device Authorization for steps on how to create one.
If the Self-service Portal opens to an incorrect URL, you'll need to set the home URL. See Update the Client Home URL.
How do I check if the Service Client was configured properly?
Navigate to C:\Program Files (x86)\Printer Properties Pro\Printer Installer Client\ServiceHost. and check the following:
If the Service Host folder is not created, check the machine's hostname or IP address and compare with what you entered for the Service Client in the Admin Console.
If the folder is created, check the config folder in it. A token.json file is saved here when the Service Client is authorized.
If the folder is created, but the token.json file is not there, you need to reauthorize the Service Client, see Reauthorization Steps. Please note that the Service Client authorization is different from the Client authorization.
SSL Certificates
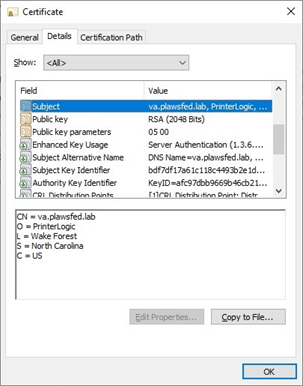
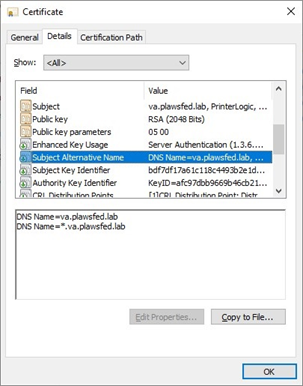
How can I verify the SSL Certificate?
-
On a Windows system, double-click the ssl.crt file to open it in the certificate viewer and select the Details tab.
-
Verify the Subject details

-
Verifty the SubjectAlternativeName properties.

-
-
Select the Certification Path tab. If the certificate status gives a message other than: This certificate is OK, ensure that the Root CA certificate was added to the local computer's Trusted Root Certification Authorities store.

You must add the Root CA certificate to the Trusted Root Certification Authorities store on any workstation, computer, tablet, or printer that communicates with the Virtual Appliance.

If the Root CA is an enterprise root certificate authority that is integrated with Active Directory, the Root CA cert is automatically propagated throughout the Windows Active Directory infrastructure, so all domain-joined Windows workstations will already trust the enterprise root CA.
If the Root CA is a publicly trusted Root CA, MOST devices will already trust it, but it is always better to validate that the certificate is trusted on all devices that connect to the Virtual Appliance.