Last updated: November 14, 2024
Pull Print
Pull Print is a one-to-many option for held print jobs. Jobs sent to pull printers remain in a virtual queue on the workstation until the user authenticates and releases the print job to a pull-print-enabled printer.
Options for releasing print jobs include:
Key Points
-
The number of printers with Pull Print enabled must match or be less than the number of Pull Print licenses purchased. Keep this in mind when enabling Pull Print by default for all printers.
If you enable this option but have more printers than Pull Print licenses, you'll get an error when you sign in to the Admin Console.
- You can see license details by selecting your username in the top right of the Admin Console and select My Account.
- You can enable / disable Pull Print for individual printers in the Pull Printing settings on the printer object's Printing tab.
1. Enable Queue Management
This setting enables the Queue tab on printer objects. You can view the contents of printer queues on end-user machines and makes Pull Print / Direct Secure Release Print jobs visible to the local spooler for release.
- Navigate to the Print Jobs section on Tools
 Settings
  Printing in the Admin Console.
 - Select Enable queue management.
- Select Save or continue on to the next step.
2. Enable Pull Print
There are two configuration options: 1. Default and 2. Printer-Specific. If you select the Allow Pull Print jobs to be released to all printers by default option, you can release jobs sent to the pull printer to any printer objects in your environment. If you leave this option unchecked, you must enable it on each printer object you want to receive pull print jobs.
Enable as Default
- Navigate to the Pull Printing section on Tools
 Settings
  Printing in the Admin Console.
 - Select Enable Workstation Pull Printing / Secure Printing.
- Select the box for Allow Pull Print jobs to be released to all printers by default.
- Select Save
All printer objects can release Pull Print jobs by default.
Enable Printer-Specific
- Navigate to the Pull Printing section on Tools
 Settings
  Printing in the Admin Console.
- Select Enable Workstation Pull Printing / Secure Printing.
- Select Save
For the printer-specific configuration, you must complete the following steps on each printer object to enable Pull Print.
- Select Back to tree view, and navigate to the desired printer object in the tree structure.
- Select the Printing tab.
-
In the Pull Printing section, select Use printer-specific Pull Print setting.
- Select Allow Pull Print jobs to be released to this printer.
- Select Save
- Repeat as needed for additional printer objects.
Printers with this setting enabled can release Pull Print jobs.
3. Create a Pull Printer
There are two options for creating pull printers.
New Button
- In the Admin Console tree structure, select the desired folder.
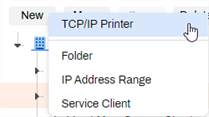
- Select the New button in the upper-left.
-
Select the TCP / IP Printer option.
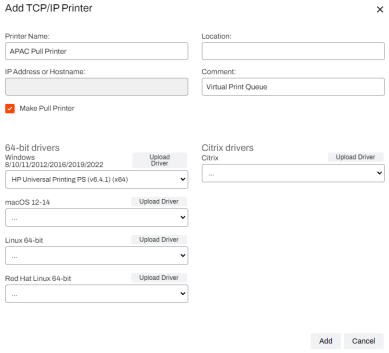
- Give the pull printer a unique name in the Add TCP/IP Printer modal.
- Optional: Location and Comment fields.
- Select the box for Make Pull Printer.
- Upload a new driver or assign an existing driver to the pull printer.
- Select Add.
The pull printer object displays within the folder.
Right-Click Method
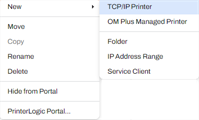
- In the Admin Console tree structure, right click on the desired folder.
-
Select New
 TCP / IP Printer.
 - Give the pull printer a unique name in the Add TCP/IP Printer modal.
- Optional: Location and Comment fields.
- Select the box for Make Pull Printer.
- Upload a new driver or assign an existing driver to the pull printer.
- Select Add.
The pull printer object displays within the folder.
Type 4 drivers don’t work with TCP/IP printer objects with Virtual Appliance because they disable port monitoring, which the application needs. If a TCP/IP printer on a workstation uses a type 4 driver, it may cause printing issues. However, USB and software printers (like Adobe or Microsoft XPS) can still use type 4 drivers without problems.
At this point, you've created a pull printer and configured Pull Print. Print jobs sent to the pull printer are ready for release to any printer with the Allow Pull Print jobs to be released to this printer setting enabled by default or for specific printers.
Additional Resources
After configuring Pull Print or Secure Release Printing, users can release jobs from the Release Portal. For administrators, the Release Tab of the printer object provides a central location to view, release, and delete held jobs for that printer.
Other secure release options for users include:
Additional Resources
- See Printer Deployment for steps to deploy printers and pull printers to end-user workstations.
- See Release Portal Overview for information about using the Release Portal.
- See Direct Secure Release for steps to enable Direct Secure Release.
- See Offline Secure Release Printing for steps to enable Offline Secure Release Print.
-
Released: November 21st, 2024
Updated Application Version Included
-
New Mobile App Release
iOS: November 11th, 2024 -
Released: November 11th, 2024


