Last updated: November 14, 2024
Offline Secure Release Printing
With Offline Secure Release Print (OSRP) users can release a print job from a virtual pull print queue even after the device that sent the print job has shut down, entered sleep mode (low power), hibernate mode (no power), or logged out of a virtual session.
When a user holds a job, the Service Client receives a copy and keeps it in a virtual print queue. When the user goes to release the job, and Virtual Appliance detects the workstation Client is offline, the Service Client releases the copy to the printer.
Requirements
- At least one Service Client running on Windows.
- The OSRP Service Client must reach the printers over the network. Additional Service Clients may be required if printers are on different networks.
- OpenSSL must be installed on the Service Client.
- Configure your identity provider (IdP / LDAP Domain).
- Configure Direct Secure Release. See Direct Secure Release for steps.
Port Information
The Service Client machine requires at least one of the following ports, depending on the services you are running.
- TCP 31989 — OSRP service.
- TCP 31988 — PrinterApps service (CPA).
- TCP 31990 — Simple Badge service.
Install OpenSSL
OpenSSL performs the encryption of held print jobs. Install OpenSSL on the Windows Service Client device(s) running the OSRP service.
Install Win32 OpenSSL v3.2.2 .exe on the Windows Service Client device.
- On the Service Client device, navigate to https://slproweb.com/products/Win32OpenSSL.html.
- Select and download the EXE link.
- Run the downloaded file and proceed through the installation process.
- Add OpenSSL to the PATH variable.
- Select Start and type Path.
- Select Edit the system environment variables.
- Under the Advanced tab, select the Environment Variables button.
- Under the System Variables section, select Path then select Edit.
- Select Edit in the new pop-up box.
- Double-click the next available empty line and enter the path to the OpenSSL bin folder. For example,
C:\Program Files (x86)\OpenSSL-Win32\bin.
- After the OpenSSL installation, reboot the machine.
Configure OSRP
1. Enable OSRP Settings & Filtering
Use the steps below to enable OSRP in an environment with Direct Secure Release already configured.
- In the Admin Console, navigate to the Pull Printing section on Tools
 Settings
  Printing.
 - Select Enable Offline Secure Release Printing.
-
Optional: Configure OSRP so only designated groups / objects can use this feature.
- Select Save
2. Enable OSRP Service
Enable the OSRP service on the Service Client(s). The OSRP Service Client must be able to reach printers over the network. Printers on different networks require another Service Client to reach them.
- In the Admin Console tree view, select a Service Client.
- Select the Offline Printing tab.
-
Select Enable Offline Printing.
- Select Save
- Access the physical device designated as the Service Client.
- Use the system tray icon or start menu to "Refresh Configurations".
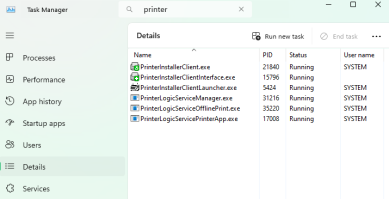
- Open Task Manager and select the Details tab.
- In the Search field type "printer" to locate the Client processes.
- Verify the following services.
- Client services (PrinterInstallerClient.exe, PrinterInstallerClientInterface.exe, PrinterInstallerClientLauncher.exe).
- PrinterLogicServiceManager.exe.
- PrinterLogicServiceOfflinePrint.exe.
- Other enabled services on the Service Client.
Define Service Client on IP Address Range
Use the following steps to define the Service Client that users within an IP Address Range utilize when printing through OSRP. This is an optional configuration that is extremely helpful in large environments. With an OSRP Service Client selected on the IP Address Range object, when a user from within the range prints, the copy of the print job goes to that specific Service Client.
For steps on creating an IP Address Range, see IP Address Range Objects.
-
Released: November 21st, 2024
Updated Application Version Included
-
New Mobile App Release
iOS: November 11th, 2024 -
Released: November 11th, 2024


