Last updated: August 13, 2024
Web Stack Migration to Virtual Appliance
Moving to the Virtual Appliance from Web Stack is both an upgrade and a migration. It’s an upgrade to a new on-prem version of PrinterLogic, but it is also a migration to a different platform. Web Stack runs on a Windows server and the Virtual Appliance comes as a pre-installed Virtual Appliance running on Ubuntu server utilizing Docker containers and microservices. The MySQL database gets migrated during the process, which includes the configuration, printer drivers and reporting data.
Prerequisites and Requirements
Minimum System Requirements
Depending on the configured features and user count, the minimum requirements for the Virtual Appliance may increase. Use the recommendations below when creating your Virtual Appliance, but continue to monitor the CPU and RAM utilization and allocate additional resources as needed.
- Four 3.5-4.0 GHz processors. Add two 3.5 GHz processors for each additional 15,000 users.
- 16GB RAM for up to 15,000 users.
- Add 2 CPUs / 8GB RAM for each additional 15,000 users.
- Add a minimum of 2 CPUs and 4GB RAM if using the Internal Service Client.
- Add 2 CPUs and 4GB RAM per 500 CPA/Simple Badge Release installations.
- 80GB free hard disk space for the host disk.
- There should be 50GB of free hard disk space on the persistent storage disk (add 4GB for every 100 printers).
- There is a requirement for NTLMv2 to connect to the appliance-storage shared folder of the PrinterLogic Virtual Appliance.
Authorization codes are required on the Virtual Appliance. This will ensure communication and security between the client and Virtual Appliance.
Readiness Checklist
- Web Stack instance must be at version 19.1 Service Pack 3.
- MySQL must be version 8 or higher. Contact PrinterLogic support for instructions to upgrade MySQL.
If an update needs to be made, as a best practice, make sure to make a backup of the printer_installer database before performing the MySQL update.
- MySQL configured to allow external access.
- Locate your root password. This is found in
c:\inetpub\wwwroot\config\settings.php Open a MySQL command prompt from the Web Stack server and run the following query (all on one line):
use mysql; update user set host='%' where user='root' and host='localhost'; flush privileges;
- On the server hosting Web Stack, open the Start Menu.
- Select MySQL from the menu items.
- Select the MySQL 8.0 Command Line Client option.
When you are prompted for a password, enter the root password obtained in step a.
 Opening a MySQL command promptCopy Code
use mysql; update user set host='%' where user='root' and host='localhost'; flush privileges; - Locate your root password. This is found in
- DNS configured properly.
- Identify a FQDN to use for the PrinterLogic Virtual Appliance (i.e., printerlogic.mycompany.com).
- Create an A record in DNS (i.e., printerlogic.mycompany.com) that points to the IP address of the Virtual Appliance.
- Create a CNAME record in DNS (i.e., *.printerlogic.mycompany.com) that points to the A record above (i.e., printerlogic.mycompany.com)
- SSL certificates created and available.
- The SubjectAlternativeName extension must list the two DNS entries above (i.e., printerlogic.mycompany.com and *.printerlogic.mycompany.com). In depth information can be found in the Virtual Appliance SSL Certificates document.
- Verify if your current Web Stack instance is configured to use authorization codes and if the clients were installed with authorization codes. This will help determine the type of cut-over performed.
- Check the OAUTH_ENABLED and ALWAYS_GRANT_READ_INSTANCE_SCOPE in the C:\inetpub\wwwroot\.env file.
- If ALWAYS_GRANT_READ_INSTANCE_SCOPE=false and OAUTH_ENABLED=true, this indicates that Auth Codes are being used. You can then check to see if you have a non-expiring Auth Code by going to Tools > Authorized Devices in the Admin Console. If so, then Auth Codes won’t be an issue if a DNS cut-over is desired.
- If ALWAYS_GRANT_READ_INSTANCE_SCOPE=true and OAUTH_ENABLED=true, this indicates that Auth codes aren’t being used, but the handshake has been authorized. Therefore, a DNS cut-over can still be successful. If it is not, it would require a reinstallation of clients. A Client Cut-over is the recommended option in this case.
- If ALWAYS_GRANT_READ_INSTANCE_SCOPE=true and OAUTH_ENABLED=false, this indicates Auth Codes are not required and are not being used. A DNS cut-over would require a client to reinstall during the cut-over, which will be challenging to do if all workstations are not accessible during cut-over. A Client Cut-over is the recommended option in this case.
- Check the OAUTH_ENABLED and ALWAYS_GRANT_READ_INSTANCE_SCOPE in the C:\inetpub\wwwroot\.env file.
- Open ports for DB access from your machine:
- TCP 3306 - MySQL
- TCP 80 - HTTP
- TCP 443 - HTTPS
- TCP 8000 - Configuration API
- TCP 8080 - Configuration UI
- TCP 445 - SMB
Migration Stages
- Ensure the readiness checklist is complete.
- Decide on type of cut-over desired (DNS cut-over vs. Client cut-over). Note the requirements above for DNS cut-over.
- Deploy the Virtual Appliance using a supported hypervisor:
(Hypervisor deployment steps are also included in Step 6 of each cutover option below)
- Perform the migration from Web Stack to the newly configured Virtual Appliance.
Option 1 – Client Cut-over
With this method, you will end up with a different FQDN than the current prod environment. It also requires a re-install of the client, which gets it re-homed and updated. The advantage of this method is that you can do more testing of the Virtual Appliance environment and you don’t have the downtime of a single all-at-once cut-over. Another advantage is you don’t have to create two sets of license files, DNS records and cert files.
A potential downside of this method is you have to re-install all the clients to achieve the cut-over and you have to choose a different FQDN.
Client Cut-over Steps
This example will use printers.company.org as the production FQDN running on Web Stack. The Web Stack server’s host name is server1.company.org and is also listed in the license file. The FQDN for the Virtual Appliance will be printers2.company.org. After the cut-over, the production FQDN will be printers2.company.org.
- If Web Stack is not running on version 19.1 SP3, perform an upgrade to 19.1 SP3.
- If the version of MySQL is 5.5, upgrade MySQL to version 8 or higher.
- Contact PrinterLogic support for instructions to upgrade MySQL at support@printerlogic.com.
- Create a DNS A record for the FQDN of the Virtual Appliance (printers2.company.org) and a wildcard CNAME record for the wildcard underneath the FQDN of the Virtual Appliance (*.printers2.company.org) which points to the FQDN of the Virtual Appliance (printers2.company.org).
- [Optional] If you plan on using any features that require HTTPS, create both:
- A SAN certificate (following the Virtual Appliance SSL Certificates) for the FQDN of the Virtual Appliance (printers2.company.org)
- And the wildcard underneath the FQDN of the Virtual Appliance (*.printers2.company.org),
- Download the latest Virtual Appliance image. Release Notes 2024.
- Links are also included in the drop-downs below.
- Deploy the image to your hypervisor.
- ESXi Prerequisites and Hypervisor Steps
Prerequisites
- Download the Virtual Appliance ova file.
- DNS configured properly.
- Identify a FQDN to use for the PrinterLogic Virtual Appliance (i.e., printerlogic.mycompany.com).
- Create an A record in DNS (i.e., printerlogic.mycompany.com) that points to the IP address of the Virtual Appliance.
- Create a CNAME record in DNS (i.e., *.printerlogic.mycompany.com) that points to the A record above (i.e., printerlogic.mycompany.com)
- SSL certificates created and available.
- The SubjectAlternativeName extension must list the two DNS entries above (i.e., printerlogic.mycompany.com and *.printerlogic.mycompany.com). In depth information can be found in the Virtual Appliance SSL Certificates document.
- Open ports for DB access from your machine:
- TCP 3306 - MySQL
- TCP 80 - HTTP
- TCP 443 - HTTPS
- TCP 8000 - Configuration API
- TCP 8080 - Configuration UI
- TCP 445 - SMB
(Optional) If you are using advanced features requiring a Service Client, you must ensure the Service Client gets appropriately configured. See Set up a service client for more information.
Configure Virtual Machine
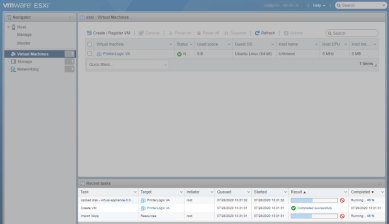
Connect to your ESXi web management interface.
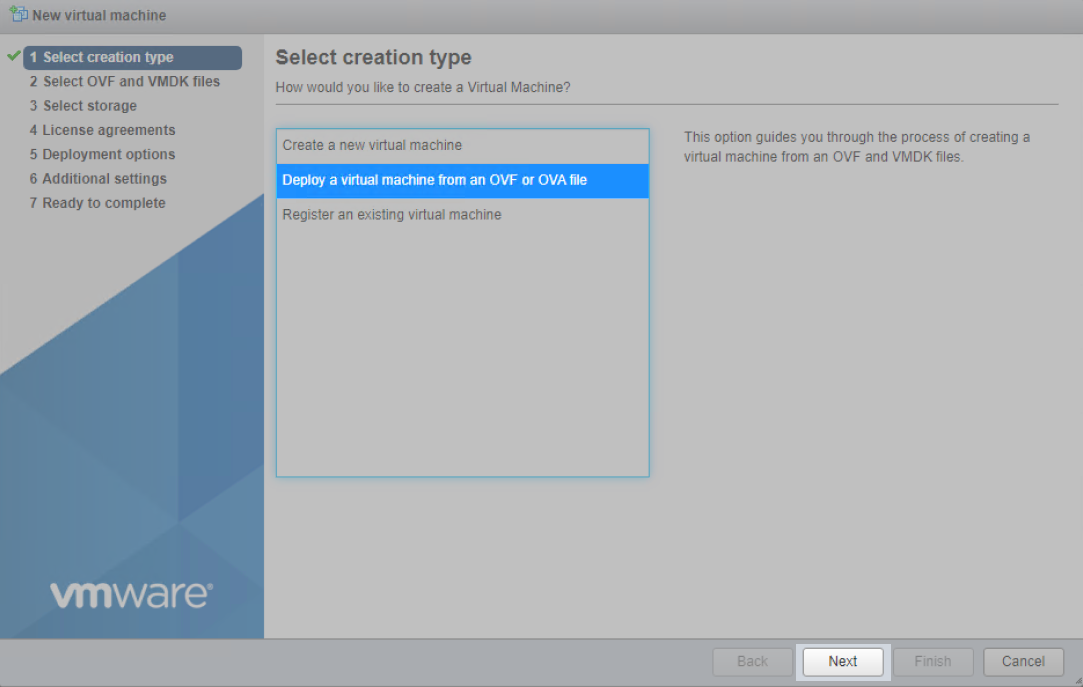
From the Virtual Machines object, choose the action Create/Register VM.

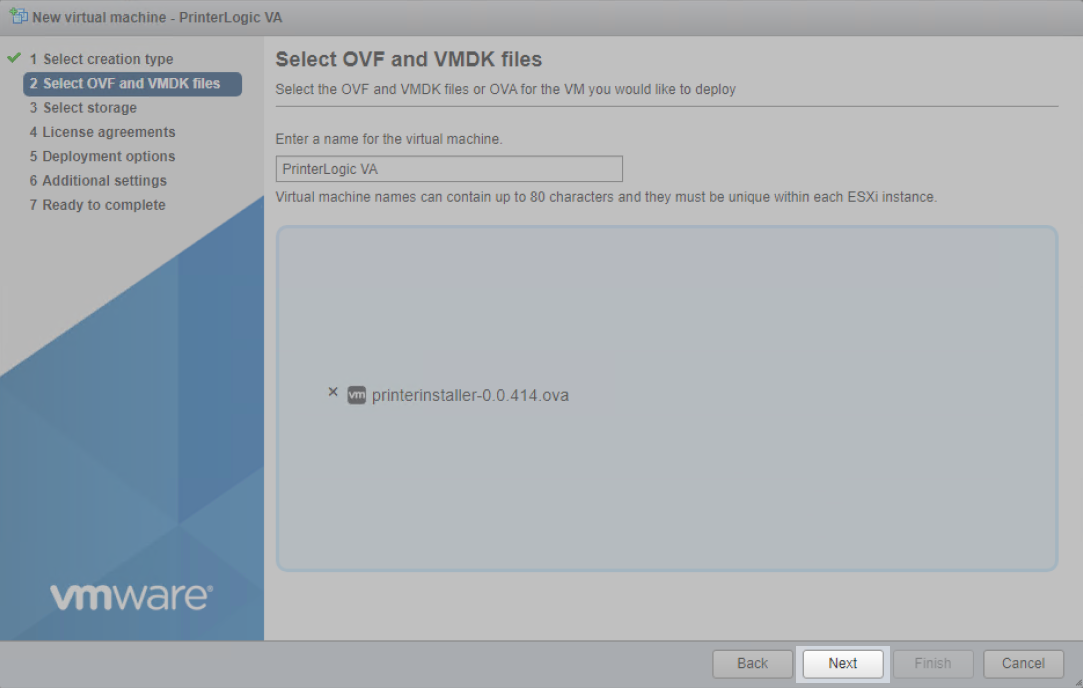
Choose Deploy a virtual machine from an OVF or OVA file, and click Next.

Enter the name for the VM and then Click to select files, and select the OVA file you downloaded earlier.
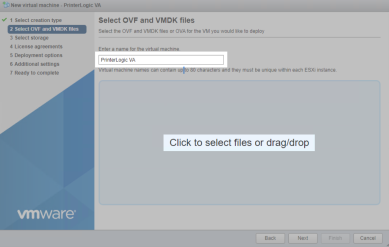
With the OVA file selected, click Next, and allow time for the OVA file to be extracted.

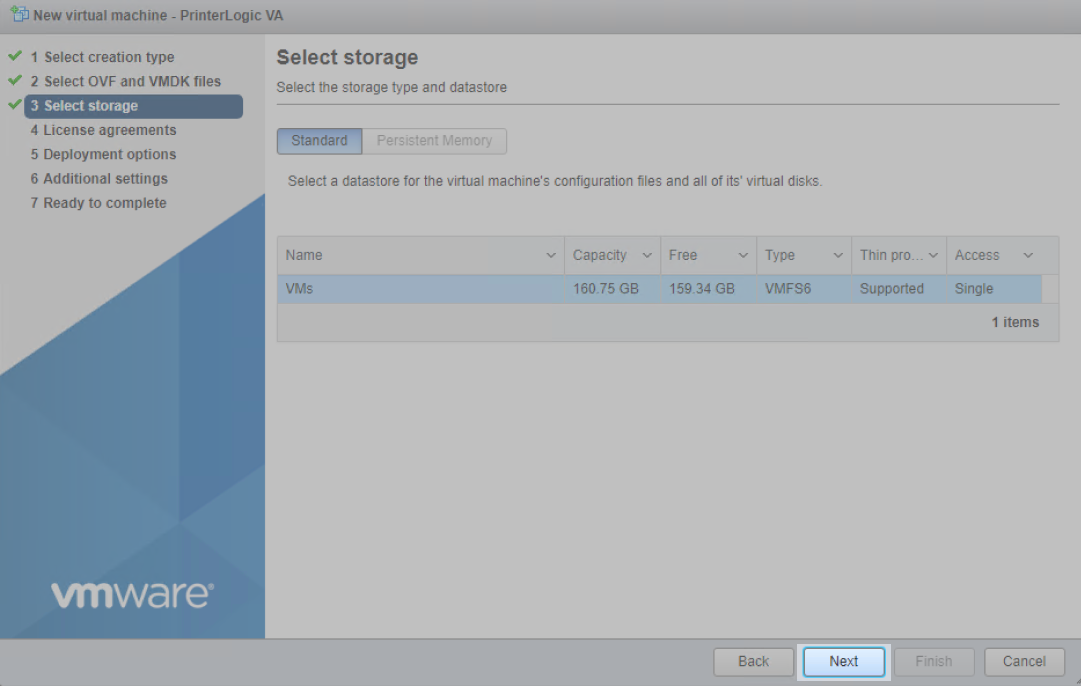
Select the storage to be used for the VM and click Next.

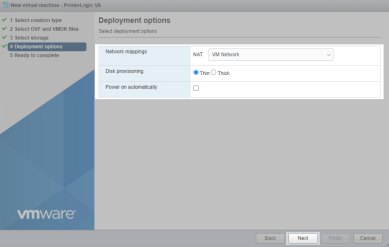
Select the Network mapping for the VM, select whether you want Thin or Thick Disk provisioning, and un-check the Power on automatically option so you can configure other settings prior to powering on. Click on Next.
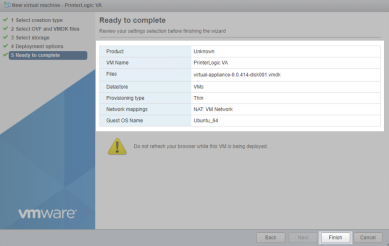
Review your settings summary and then click Finish. Wait for upload to complete.
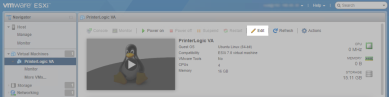
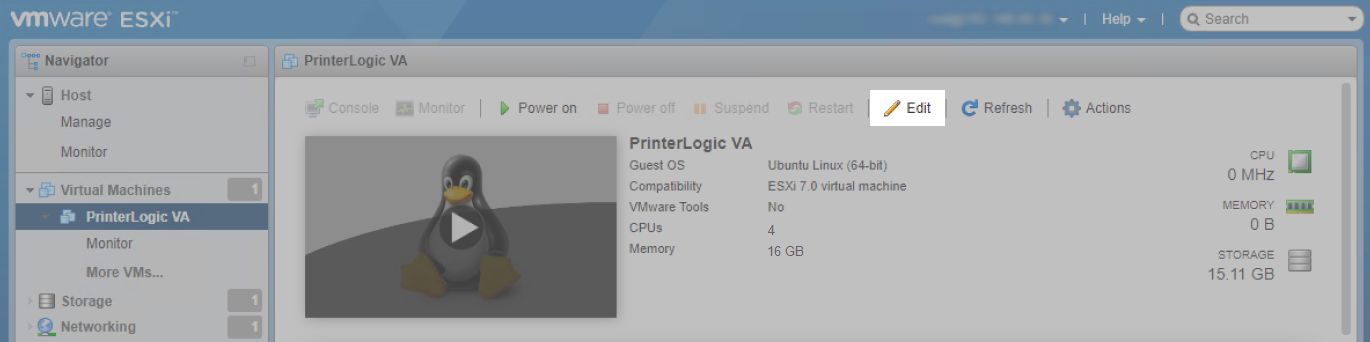
Select the newly created VM and then click Edit.
Increase the memory to 16 GB minimum.
PrinterLogic recommends 16GB RAM for up to 15,000 users (add 8GB for every additional 15,000 users)
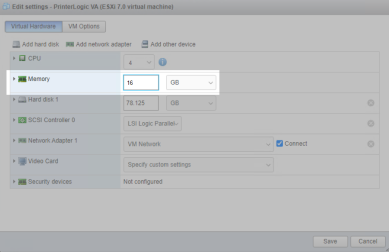
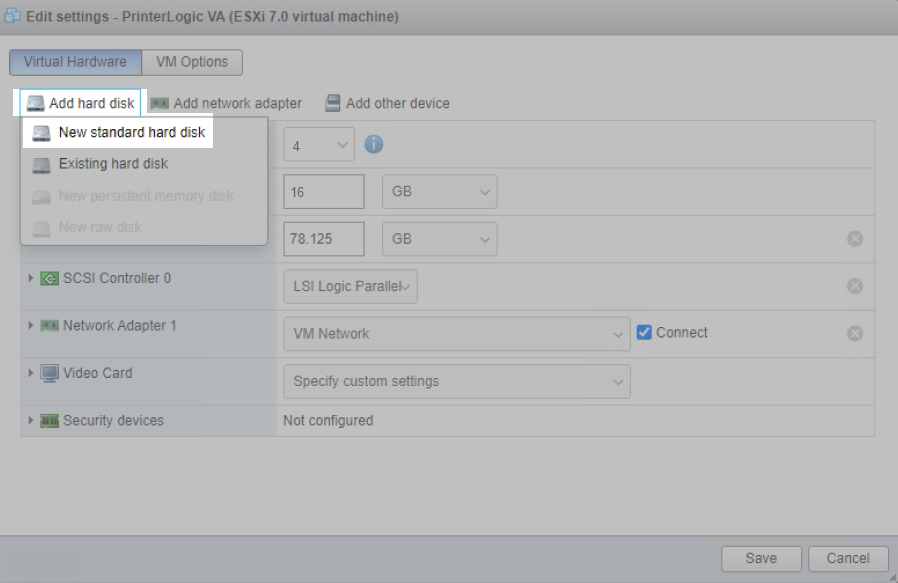
Click Add hard disk, then select New standard hard disk.

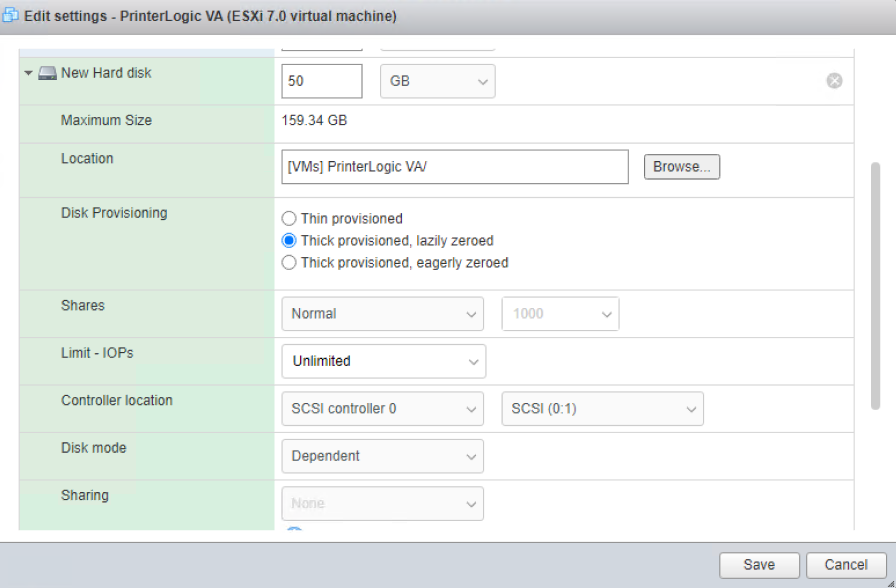
Select the new hard disk and adjust to the recommended minimum size of 50 GB.
PrinterLogic recommends a minimum of 50 GB free persistent hard disk space (add 4 GB for every 100 printers).
Click the drop-down arrow next to the New Hard Disk and adjust the location, Disk Provisioning and other settings as needed. Click on Save.

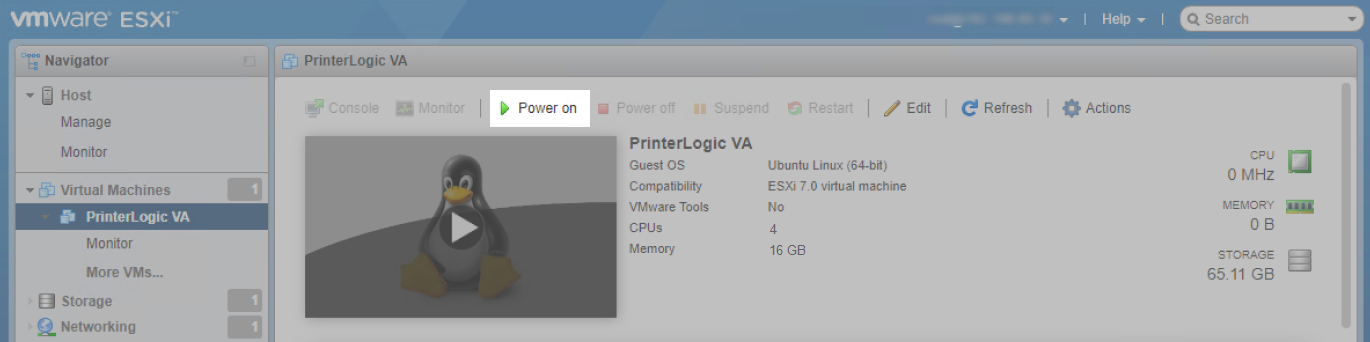
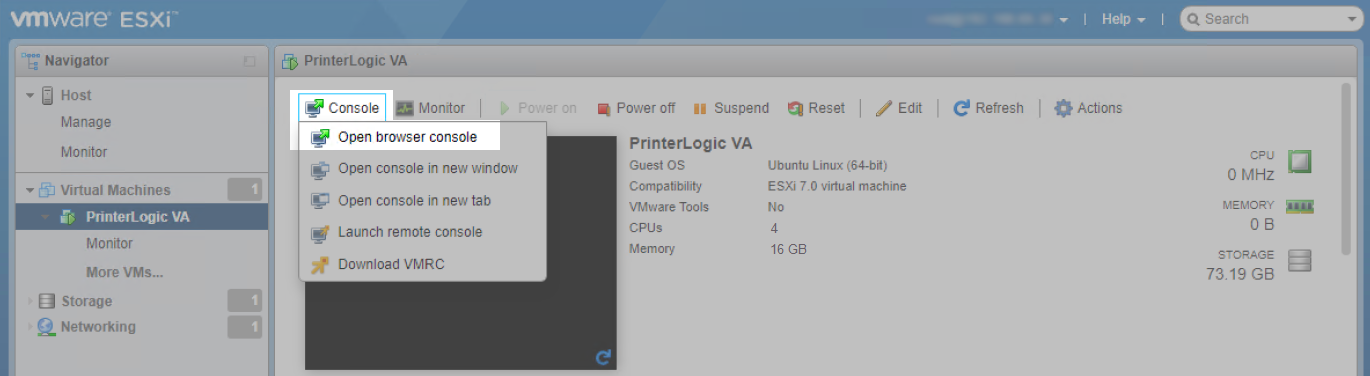
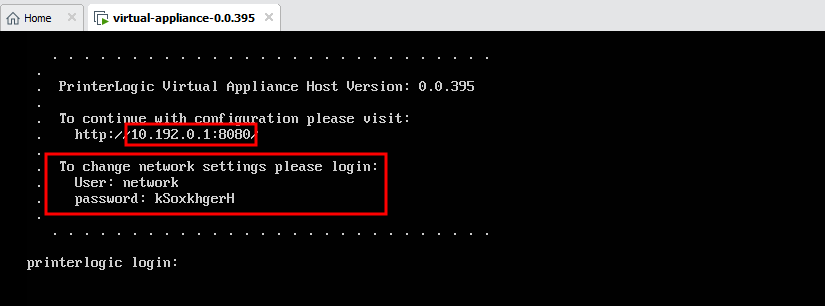
Power on the VM and open a console to it.

Click on Console.

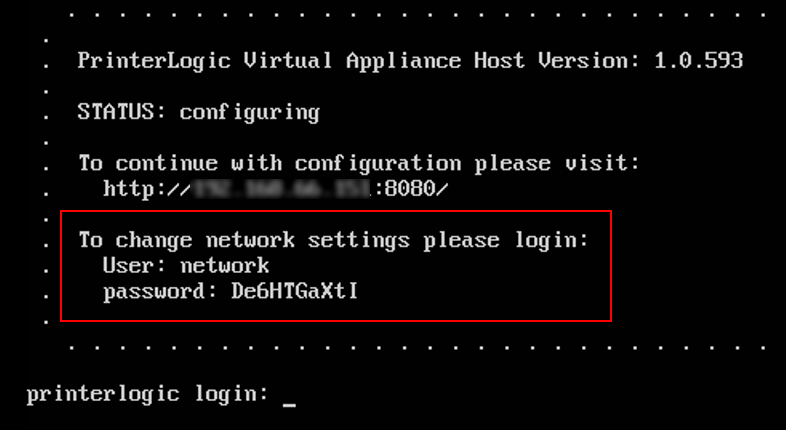
- After VM starts, document the displayed IP address given.
Copy down the displayed login and password displayed to be able to access the network settings. This will be needed if you choose to configure static IP settings or make adjustments to IP address ranges.
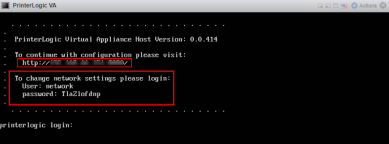
If you will be using a fully qualified domain name for accessing your Virtual Appliance, you should configure it in DNS and assign it the IP address shown on this console. You would also need to have the license file that PrinterLogic provides to contain the same FQDN for the licensed URL. When you are done with configuration from the above URL, the system will redirect you to the FQDN/URL you have in your license. If you are just testing and don’t need to manage more than 5 printers, you can continue to access the server via IP.
- HyperV Prerequisites and Hypervisor Steps
Prerequisites
- Download the latest Virtual Appliance vhd.xz file.
- After downloading the vhd.xz file, you will need to extract the VHD from the vhd.xz file. The extracted VHD file should then be placed in your Hyper-V server folder.
- DNS configured properly.
- Identify a FQDN to use for the PrinterLogic Virtual Appliance (i.e., printerlogic.mycompany.com).
- Create an A record in DNS (i.e., printerlogic.mycompany.com) that points to the IP address of the Virtual Appliance.
- Create a CNAME record in DNS (i.e., *.printerlogic.mycompany.com) that points to the A record above (i.e., printerlogic.mycompany.com)
- SSL certificates created and available.
- The SubjectAlternativeName extension must list the two DNS entries above (i.e., printerlogic.mycompany.com and *.printerlogic.mycompany.com). In depth information can be found in the Virtual Appliance SSL Certificates document.
- Open ports for DB access from your machine:
- TCP 3306 - MySQL
- TCP 80 - HTTP
- TCP 443 - HTTPS
- TCP 8000 - Configuration API
- TCP 8080 - Configuration UI
- TCP 445 - SMB
- (Optional) If you are using advanced features requiring a Service Client, you must ensure the Service Client gets appropriately configured. See Set up a service client for more information.
Configure Virtual Machine
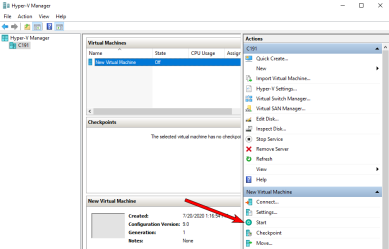
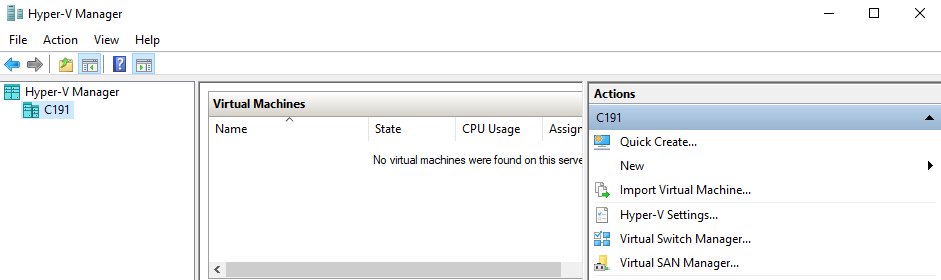
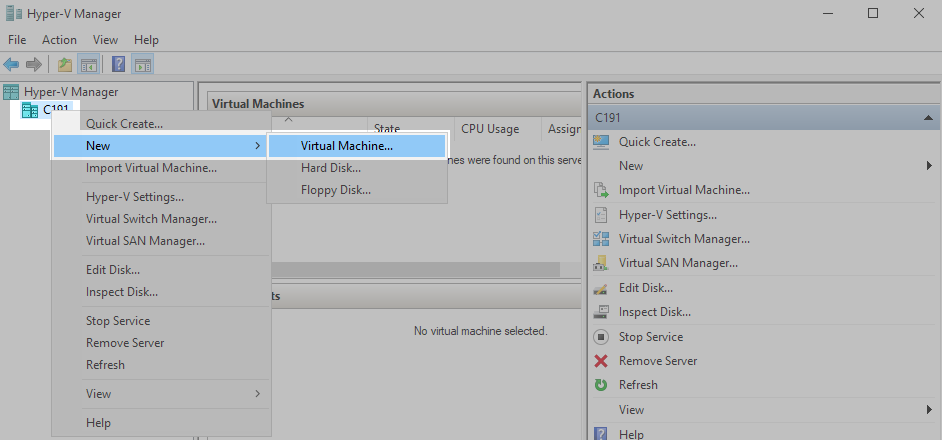
Open up your Hyper-V Manager Console.

Right click on your server, hover your pointer over New, then click on Virtual Machine.

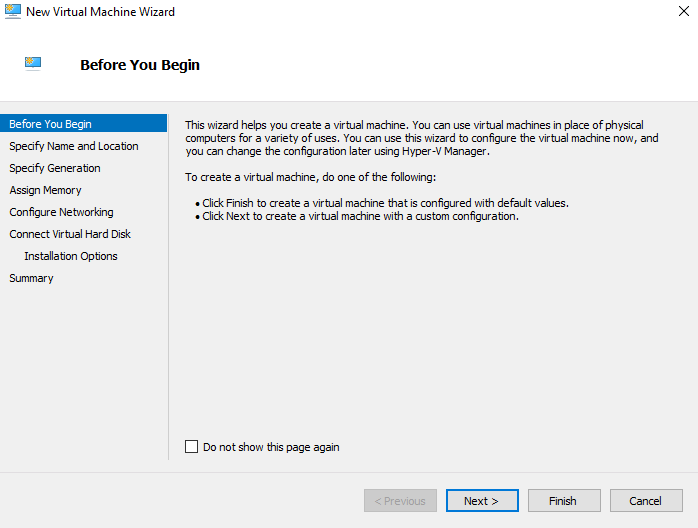
Click on Next.

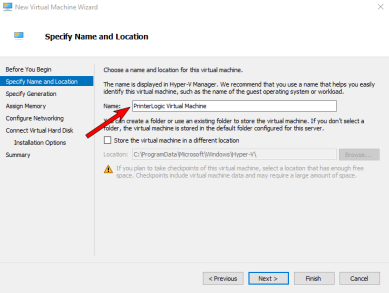
Specify the new Virtual Machines Name, then click Next.
Select Generation 1 and click Next.

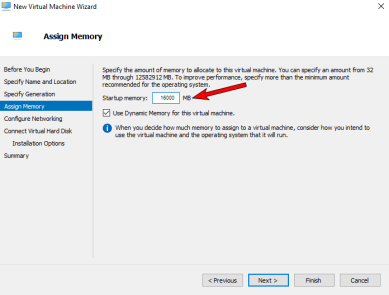
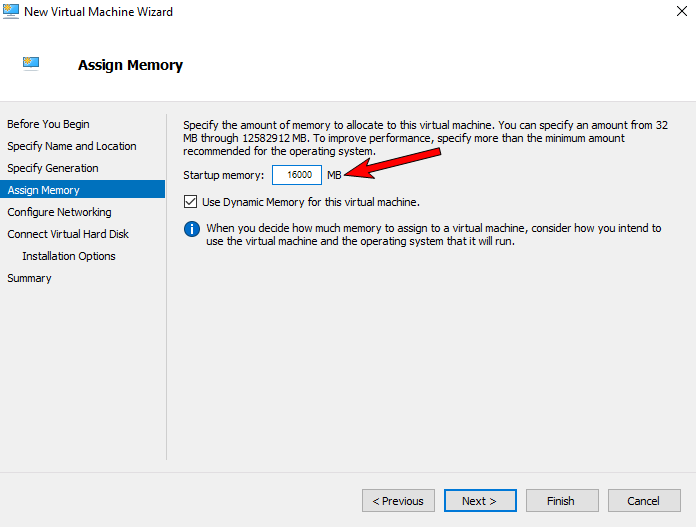
Change the memory to 16000 MB and click Next.
PrinterLogic recommends 16GB RAM for up to 15,000 users (add 4GB for every additional 15,000 users)
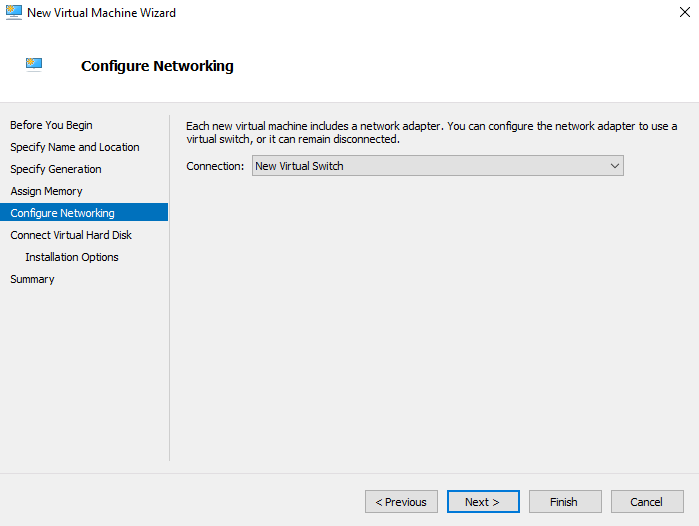
Select the Virtual Switch you have configured in Hyper-V and click Next.

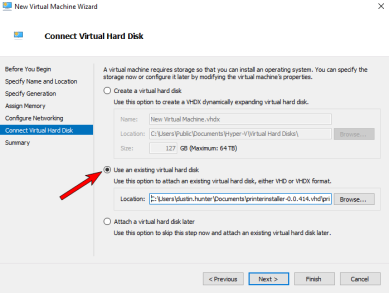
Select the option to Use an existing virtual hard disk, and browse to the downloaded PrinterLogic VHD file. Select the file, and click on Next.
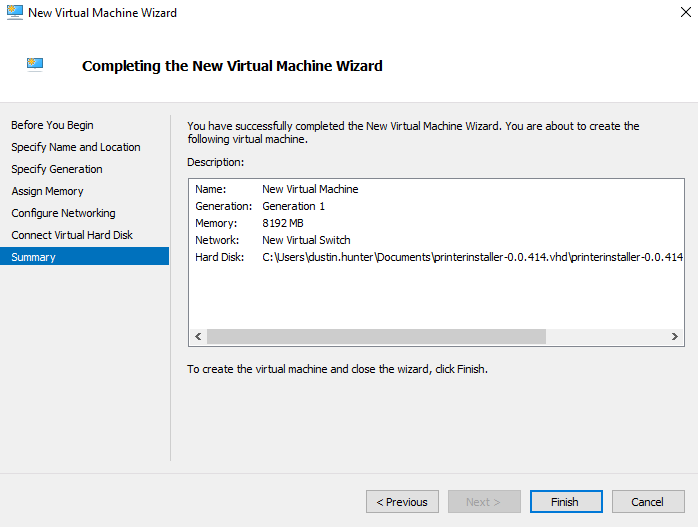
Click Finish at the bottom of the summary screen.

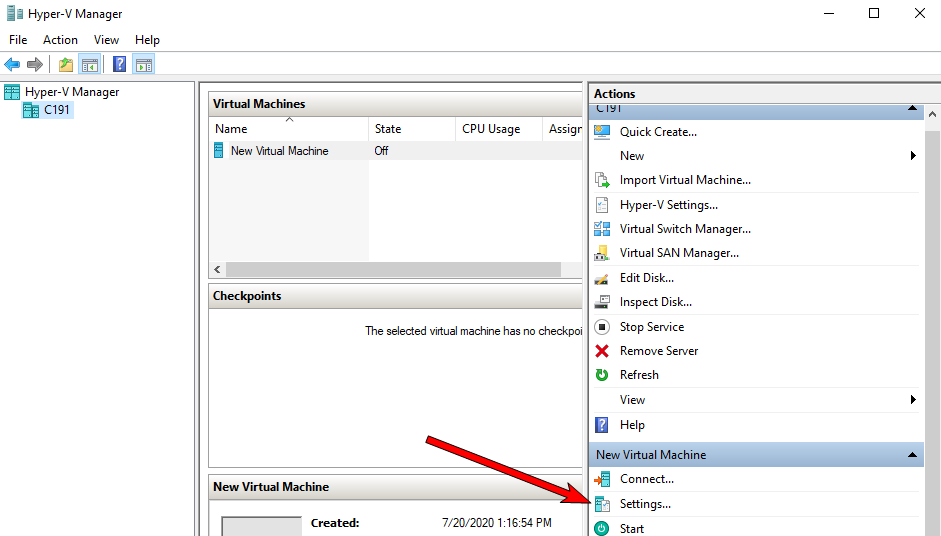
In the Actions pane to the right, under the virtual machine you just created, click on Settings.

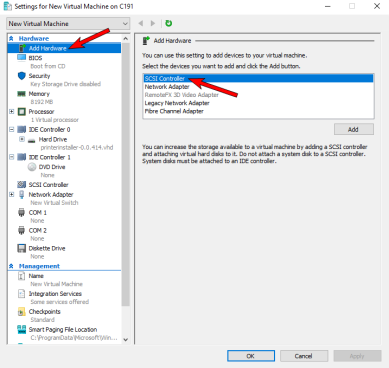
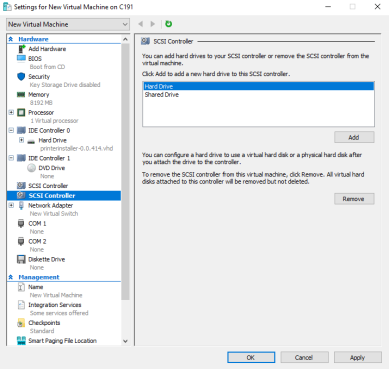
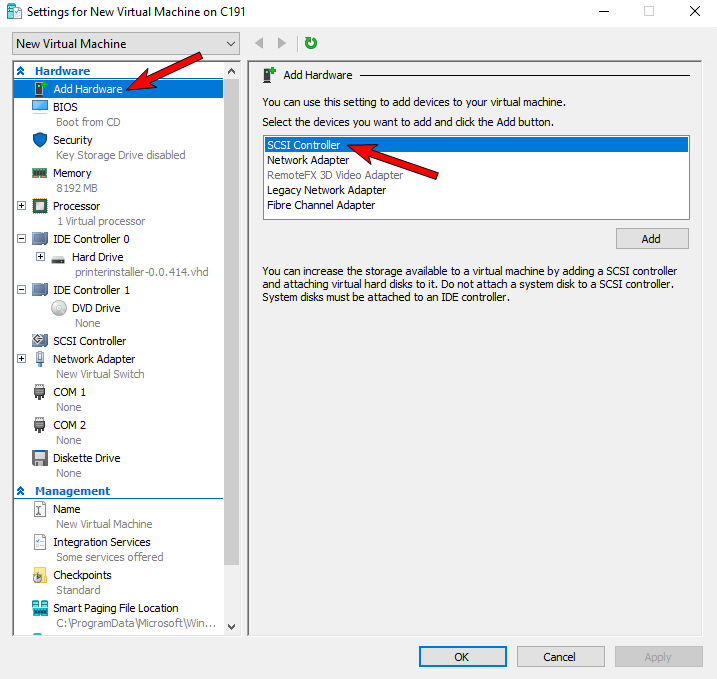
With Add Hardware selected in the left pane and SCSI Controller selected in the right pick list, click on Add.
Select Hard Drive, and click Add.
Select New.
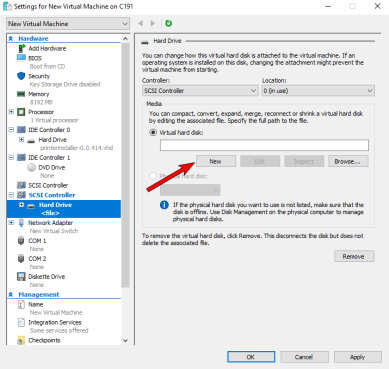
- Click Next.
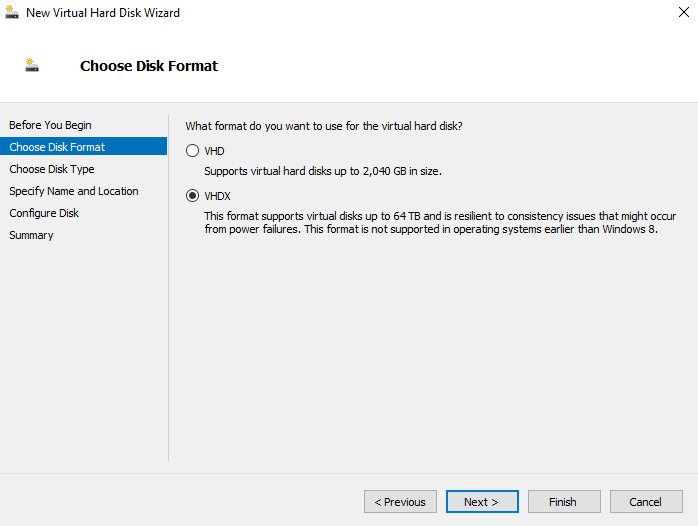
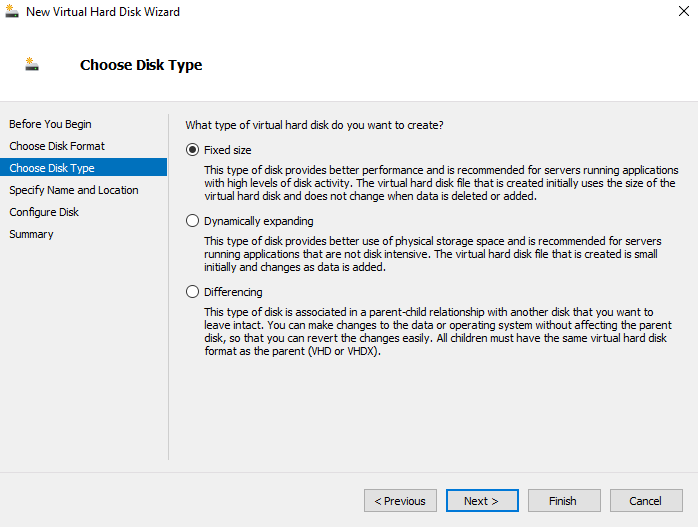
Keep the default VHDX selected and click on Next.

Select the appropriate disk type for your environment and click Next.

Name the disk, and click Next.
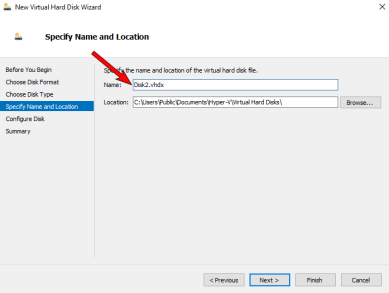
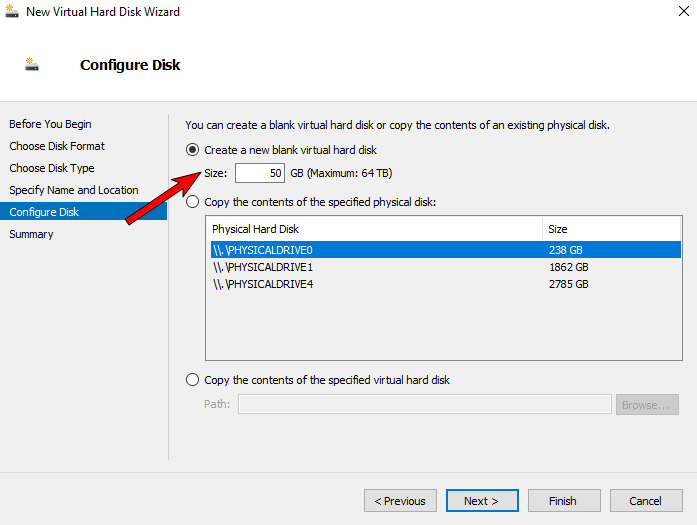
Select the new hard disk and adjust to the recommended minimum size of 50 GB and click Next.
PrinterLogic recommends 50GB free persistent hard disk space (add 4GB for every 100 printers).

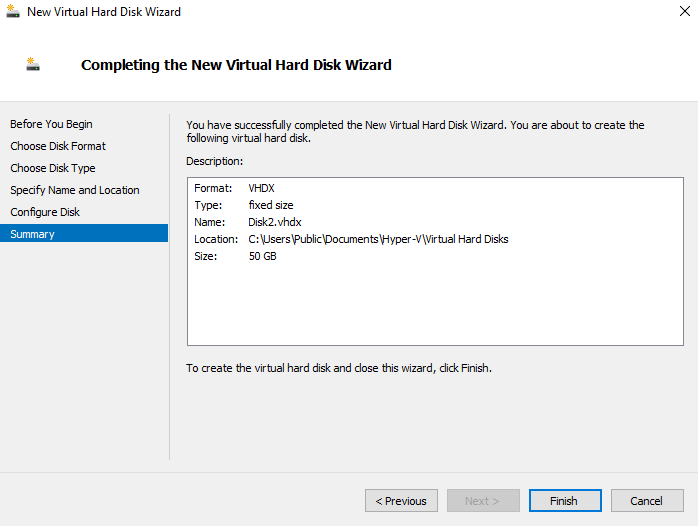
Review the summary page and then click Finish.

- After the wizard finishes building you will be returned to the Settings dialog.
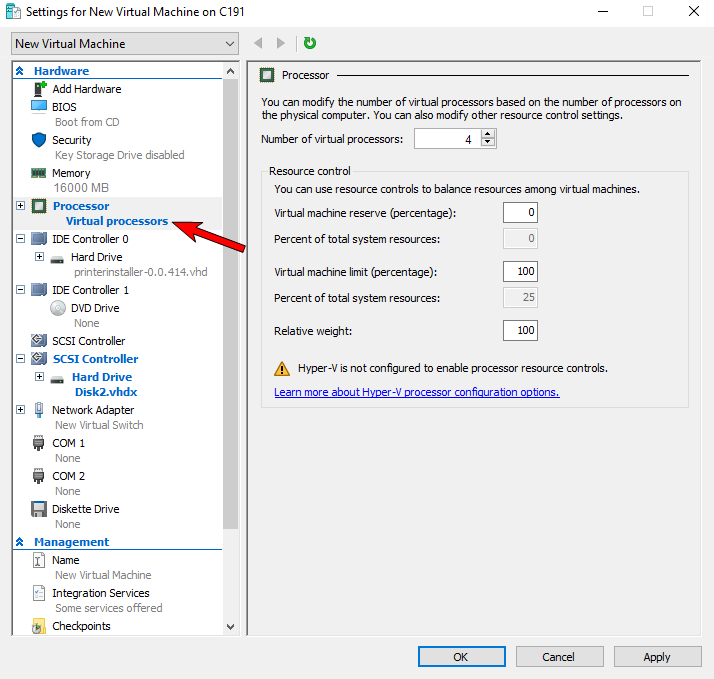
Select Processor from the left pane and increase to a minimum of 4 processors.
PrinterLogic recommends four 3.5-4.0 GHz processors. Add two 3.5 GHz processors for each additional 15,000 users.
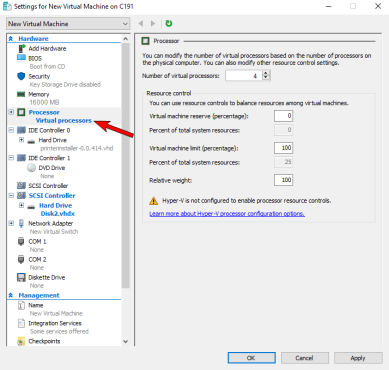
- Click on OK.
In the VM's action pane click on Start.
- After the VM starts, open the VM screen and annotate the provided IP address.
Log in using the displayed login and password to configure the network settings. This allows you to configure a static IP, default gateway, search domain, subnet IP address ranges, and the DNS servers.

If you will be using a fully qualified domain name for accessing your Virtual Appliance, you should configure it in DNS and assign it the IP address shown on this console. You would also need to have the license file that PrinterLogic provides to contain the same FQDN for the licensed URL. When you are done with configuration from the above URL, the system will redirect you to the FQDN/URL you have in your license. If you are just testing and don’t need to manage more than 5 printers, you can continue to access the server via IP.
- VM Workstation Pro Prerequisites and Hypervisor Steps
Prerequisites
- Download the Virtual Appliance ova file.
- DNS configured properly.
- Identify a FQDN to use for the PrinterLogic Virtual Appliance (i.e., printerlogic.mycompany.com).
- Create an A record in DNS (i.e., printerlogic.mycompany.com) that points to the IP address of the Virtual Appliance.
- Create a CNAME record in DNS (i.e., *.printerlogic.mycompany.com) that points to the A record above (i.e., printerlogic.mycompany.com)
- SSL certificates created and available.
- The SubjectAlternativeName extension must list the two DNS entries above (i.e., printerlogic.mycompany.com and *.printerlogic.mycompany.com). In depth information can be found in the Virtual Appliance SSL Certificates document.
- Open ports for DB access from your machine:
- TCP 3306 - MySQL
- TCP 80 - HTTP
- TCP 443 - HTTPS
- TCP 8000 - Configuration API
- TCP 8080 - Configuration UI
- TCP 445 - SMB
- (Optional) If you are using advanced features requiring a Service Client, you must ensure the Service Client gets appropriately configured. See Set up a service client for more information.
Configure Virtual Machine
Virtual Appliance should be able to work on any supported version of VM Workstation Pro, but it has been successfully tested on versions 12 and 15.
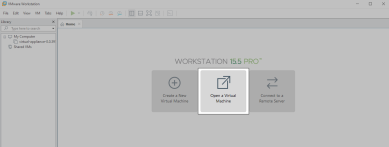
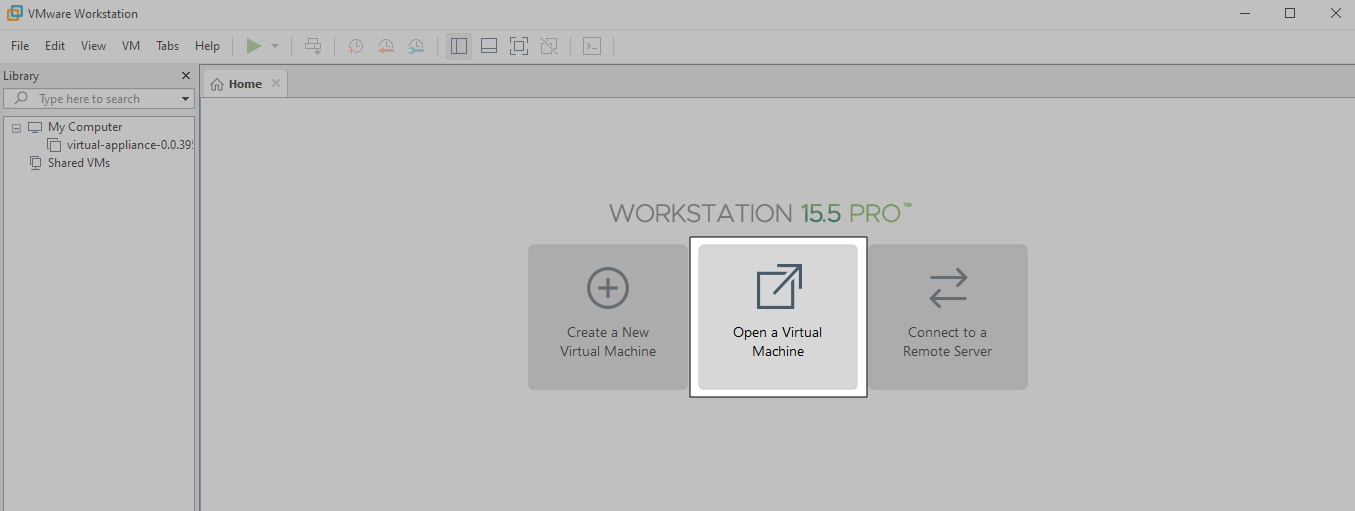
- Open VMWare Workstation Pro.
Click Open a Virtual Machine.
Navigate to the .ova file you downloaded.
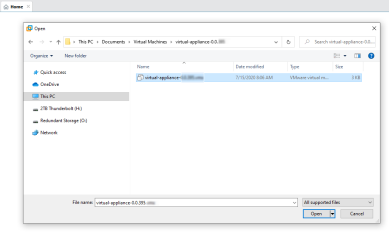
- Click Open.
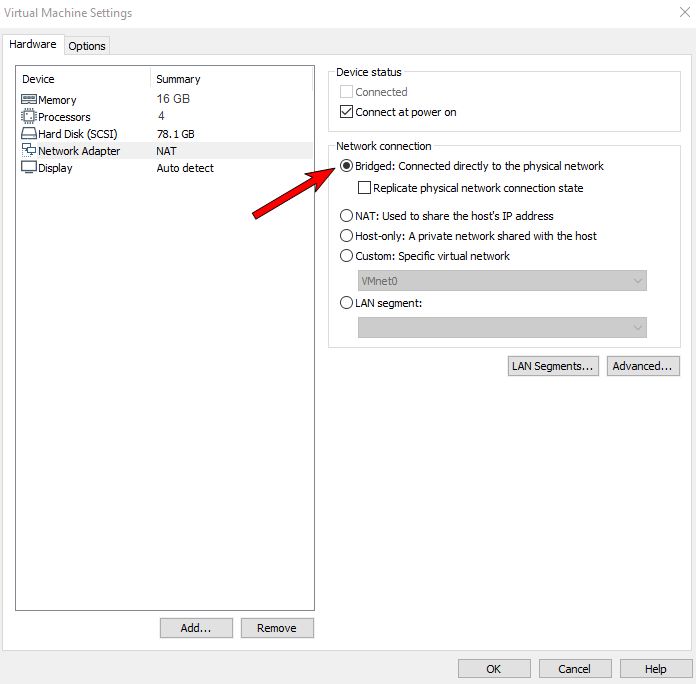
Click Edit virtual machine settings.
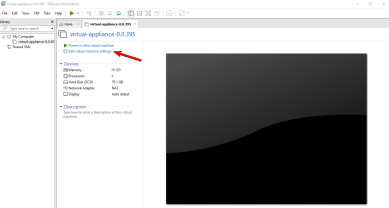
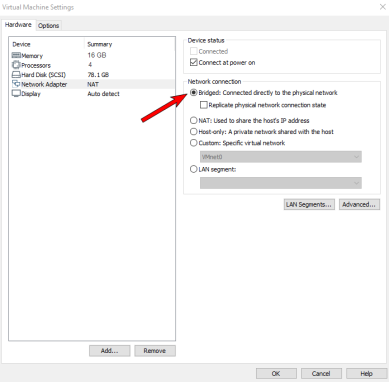
Click Network Adapter.
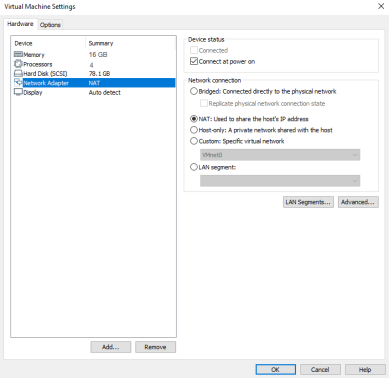
Select Bridged: Connected directly to the physical network (if it is not already selected).
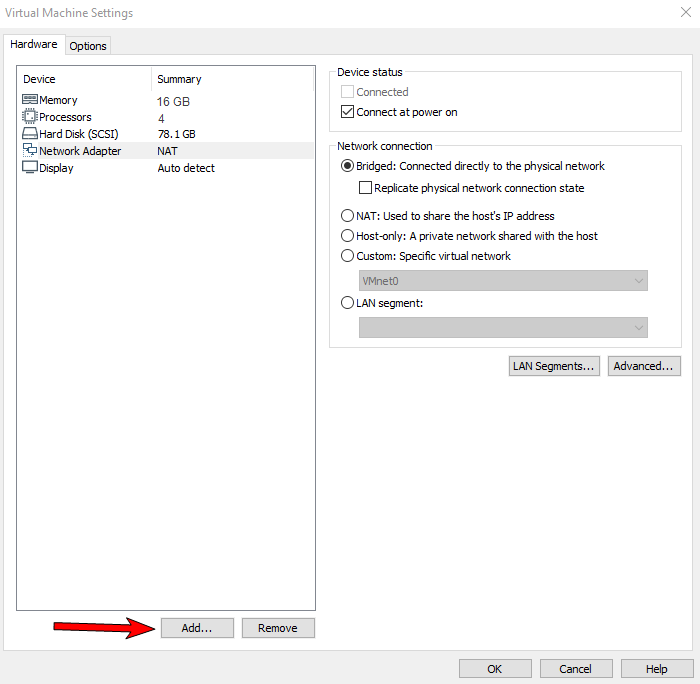
Click Add.

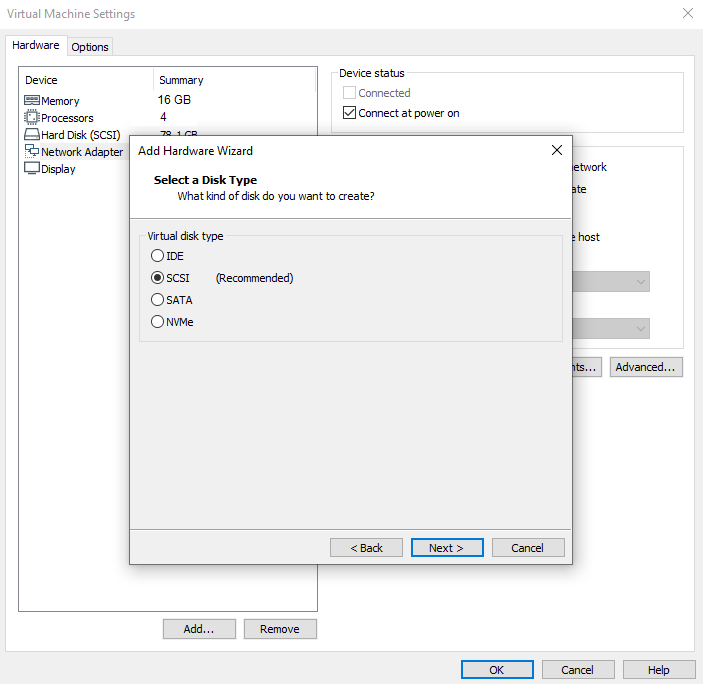
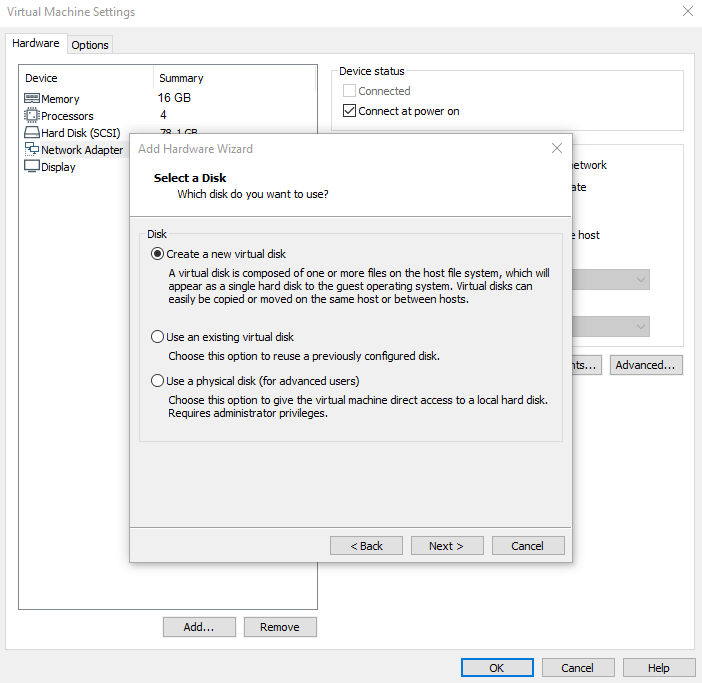
Select Hard Disk and click Next.

Keep SCSI selected and click Next.
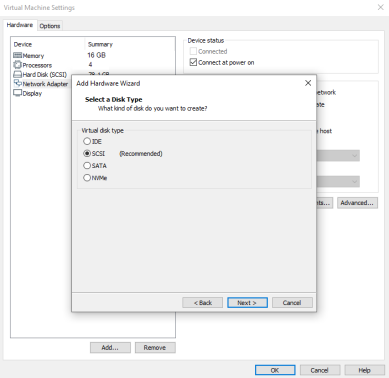
Keep Create a new virtual disk selected and click Next.

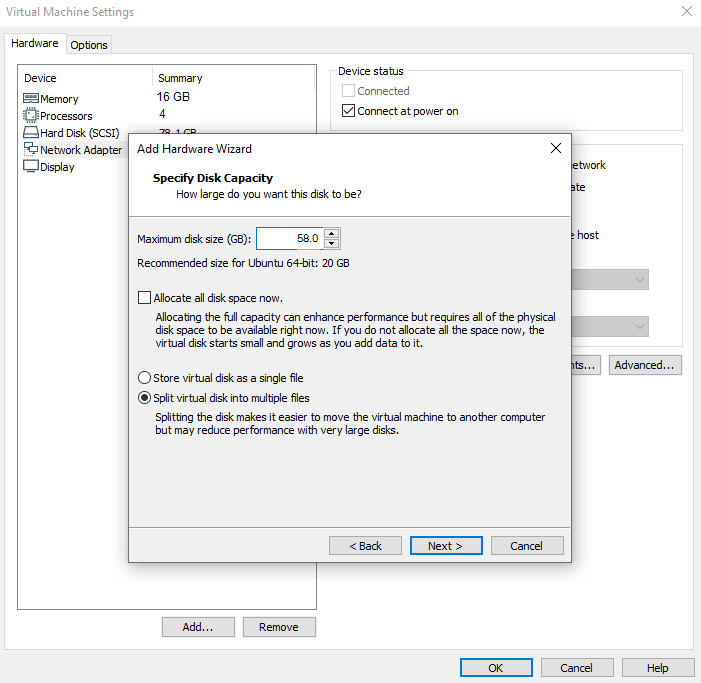
Adjust the disk size to the minimum recommended setting of 50 GB and click Next.
PrinterLogic recommends 50GB free persistent hard disk space (add 4GB for every 100 printers).

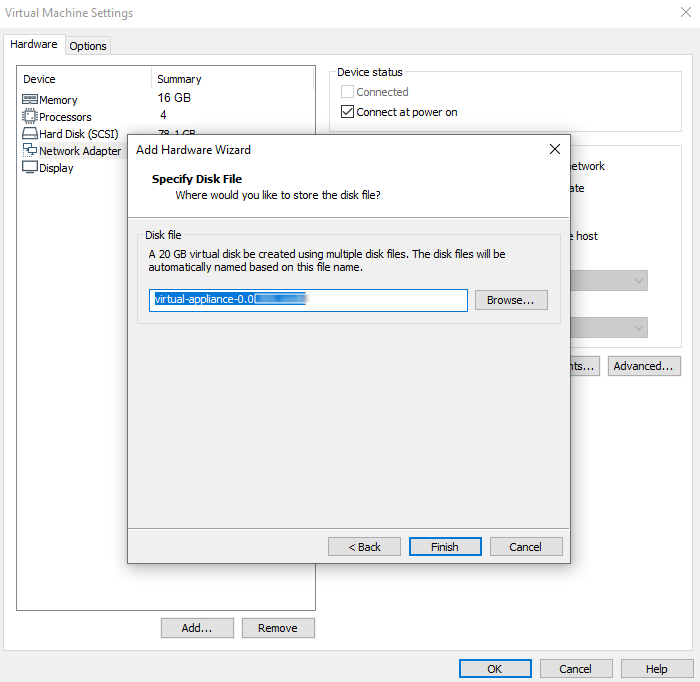
Click Finish.

- Click OK.
Click Power on this virtual machine.
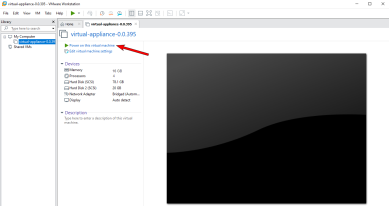
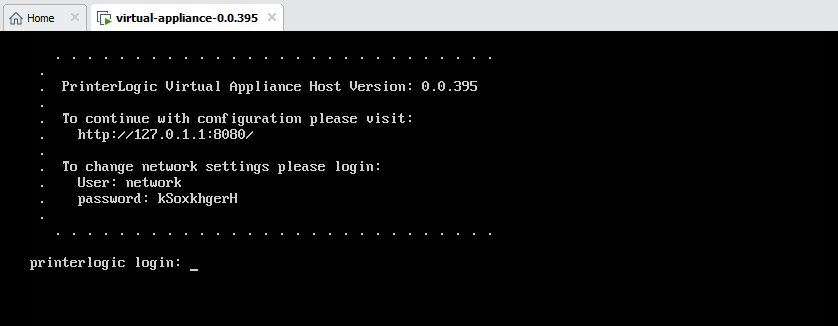
When the virtual machine loads, you will see the following message.

- The IP address will be specific to your PrinterLogic Virtual Appliance. You will want to note it for a following step.
Copy down the displayed login and password displayed to be able to access the network settings. This will be needed if you choose to configure static IP settings..

If you will be using a fully qualified domain name for accessing your Virtual Appliance, you should configure it in DNS and assign it the IP address shown on this console. You would also need to have the license file that PrinterLogic provides to contain the same FQDN for the licensed URL. When you are done with configuration from the above URL, the system will redirect you to the FQDN/URL you have in your license. If you are just testing and don’t need to manage more than 5 printers, you can continue to access the server via IP.
- Google Cloud Platform Prerequisites and Steps
Prerequisites
- Download the Virtual Appliance vmdk file.
- DNS configured properly.
- Identify a FQDN to use for the PrinterLogic Virtual Appliance (i.e., printerlogic.mycompany.com).
- Create an A record in DNS (i.e., printerlogic.mycompany.com) that points to the IP address of the Virtual Appliance.
- Create a CNAME record in DNS (i.e., *.printerlogic.mycompany.com) that points to the A record above (i.e., printerlogic.mycompany.com)
- SSL certificates created and available.
- The SubjectAlternativeName extension must list the two DNS entries above (i.e., printerlogic.mycompany.com and *.printerlogic.mycompany.com). In depth information can be found in the Virtual Appliance SSL Certificates document.
- Open ports for DB access from your machine:
- TCP 3306 - MySQL
- TCP 80 - HTTP
- TCP 443 - HTTPS
- TCP 8000 - Configuration API
- TCP 8080 - Configuration UI
- TCP 445 - SMB
- (Optional) If you are using advanced features requiring a Service Client, you must ensure the Service Client gets appropriately configured. See Set up a service client for more information.
Initial Configuration
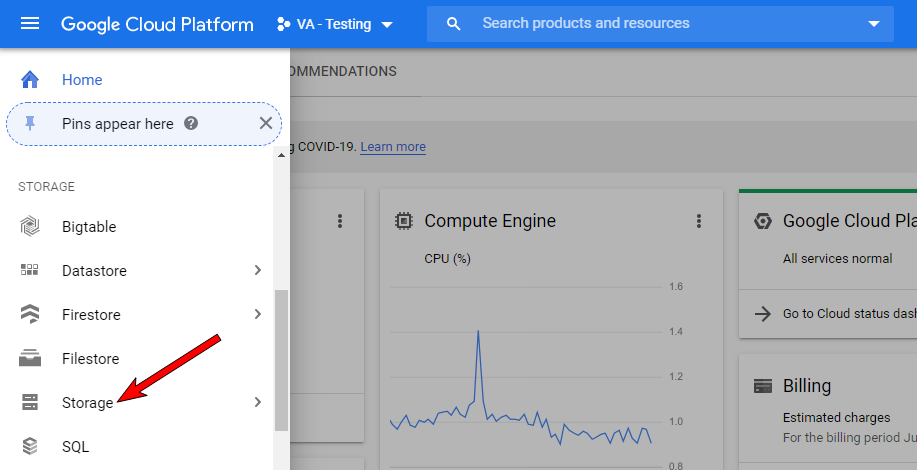
- Log into Google Cloud Platform.
Select Storage from the menu on the left.

Either create a new storage bucket or select an existing storage bucket.
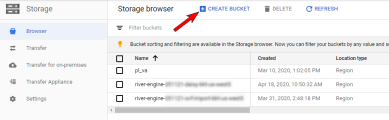
After creating or selecting a storage bucket, select Upload Files.
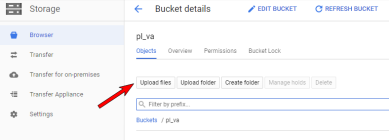
Upload the Virtual Machine Disk file (.vmdk) that was downloaded in the prerequisites.
It is recommended that this step be done from a PC with an internet connection that supports high upload speeds due to the large file size.
Convert the VMDK
This process can take up to 40mn.
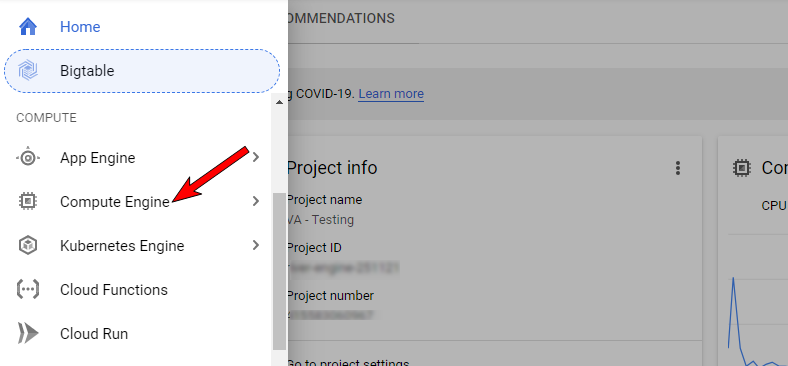
Back on the Google Cloud Platform home screen, select Compute Engine from the left side menu.
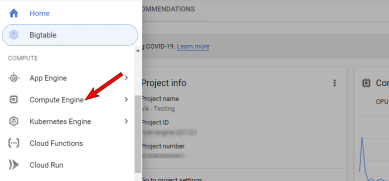
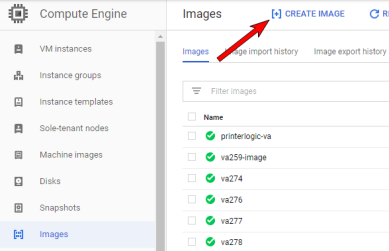
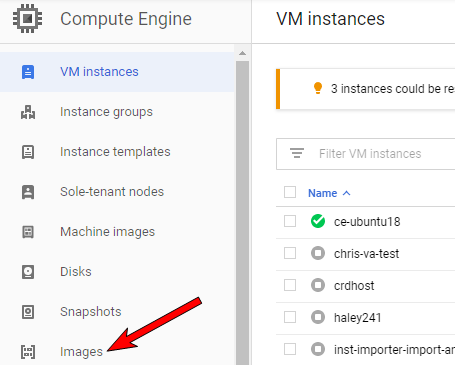
From the new menu displayed on the left, select Images.

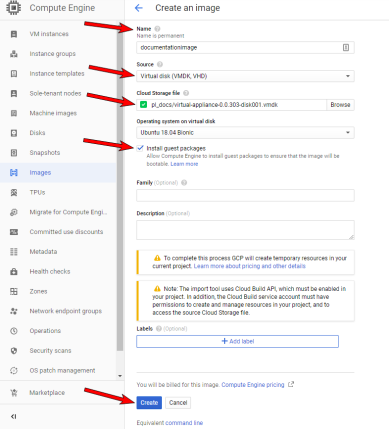
From the top menu, select Create Image.
- On the Create Image screen:
- Give it a name.
- Select Virtual disk (VMDK, VHD) as the source to be used.
- Select the Cloud Storage File
- In the Operating system on virtual disk section, Select Ubuntu 18.04 Bionic.
- Ensure that the Install guest packages box is checked.
Click on Create.
Configure the Image
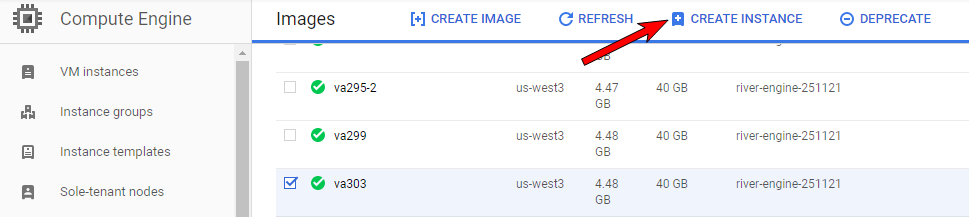
Back on the Google Cloud Platform home screen, select Compute Engine from the left side menu.
From the new menu displayed on the left, select Images.
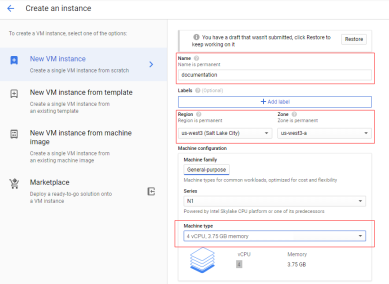
Click on the newly created image name, then select Create Instance at the top.

Give the instance a name, select appropriate Region and Zone, and select the Machine Type that meets the recommended system requirements of:
- Four 3.5-4.0 GHz processors. Add two 3.5 GHz processors for each additional 15,000 users.
- 16GB RAM for up to 15,000 users.
- Add 2 CPUs / 8GB RAM for each additional 15,000 users.
- Add a minimum of 2 CPUs and 4GB RAM if using the Internal Service Client.
- Add 2 CPUs and 4GB RAM per 500 CPA/Simple Badge Release installations.
- 80GB free hard disk space for the host disk.
- There should be 50GB of free hard disk space on the persistent storage disk (add 4GB for every 100 printers).
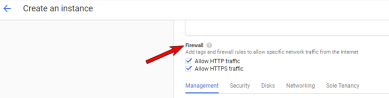
Port 8080, 8000, 3306 and 443 must be open to complete the setup phase.
Scroll down to the Firewall section and select the appropriate settings to allow your workstation to communicate with the Virtual Appliance.
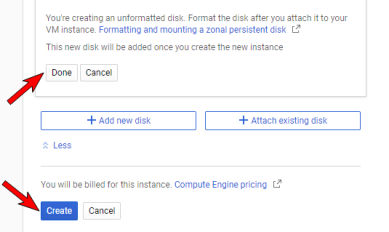
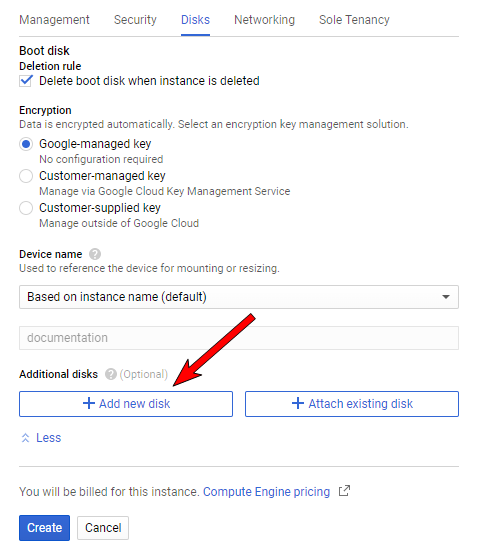
Select Disks, and then scroll down and select the Add new disk button.

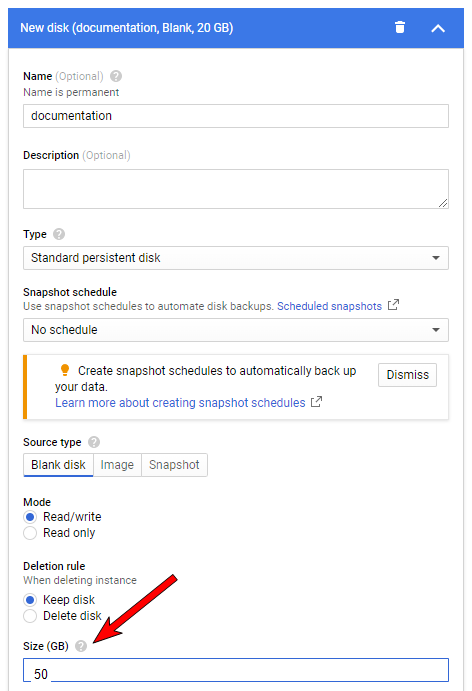
Give the new disk a name and set a size (50 GB is recommended).

- Scroll down and select Done on the bottom left.
Click Create on the bottom left.
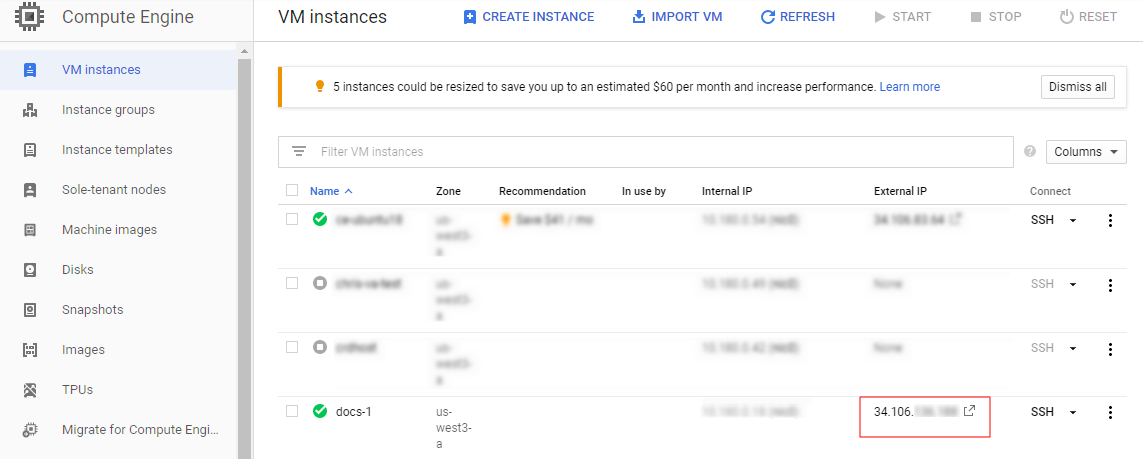
- Start the newly created VM instance.
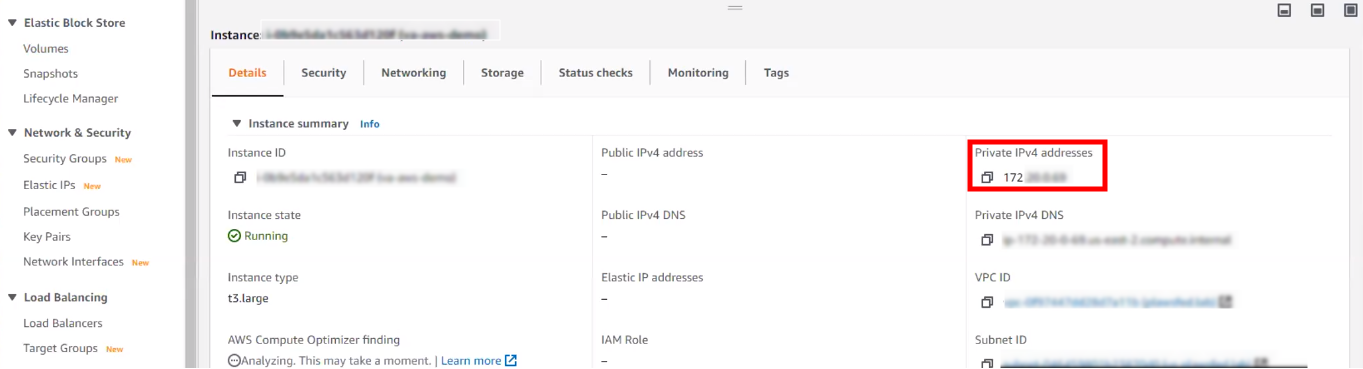
Locate the IP of the newly created virtual machine and copy it.
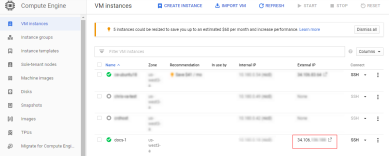
If you will be using a fully qualified domain name for accessing your Virtual Appliance, you should configure it in DNS and assign it the IP address shown on this console. You would also need to have the license file that PrinterLogic provides to contain the same FQDN for the licensed URL. When you are done with configuration from the above URL, the system will redirect you to the FQDN/URL you have in your license. If you are just testing and don’t need to manage more than 5 printers, you can continue to access the server via IP.
- AWS Prerequisites and Steps
Prerequisites
Contact your PrinterLogic sales representative to provide you with access to the Virtual Appliance AMI.
Only a PrinterLogic representative can provide the Virtual Appliance AMI. It is not available as a Public AMI.
- DNS configured properly.
- Identify a FQDN to use for the PrinterLogic Virtual Appliance (i.e., printerlogic.mycompany.com).
- Create an A record in DNS (i.e., printerlogic.mycompany.com) that points to the IP address of the Virtual Appliance.
- Create a CNAME record in DNS (i.e., *.printerlogic.mycompany.com) that points to the A record above (i.e., printerlogic.mycompany.com)
- SSL certificates created and available.
- The SubjectAlternativeName extension must list the two DNS entries above (i.e., printerlogic.mycompany.com and *.printerlogic.mycompany.com). In depth information can be found in the Virtual Appliance SSL Certificates document.
- Open ports for DB access from your machine:
- TCP 3306 - MySQL
- TCP 80 - HTTP
- TCP 443 - HTTPS
- TCP 8000 - Configuration API
- TCP 8080 - Configuration UI
- TCP 445 - SMB
- (Optional) If you are using advanced features requiring a Service Client, you must ensure the Service Client gets appropriately configured. See Set up a service client for more information.
Setup
AWS is a supported platform to run the PrinterLogic Virtual Appliance. Currently, a PrinterLogic sales representative will need to assist you with getting access to the AMI.
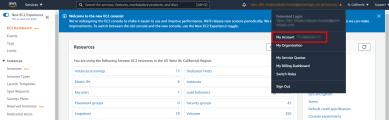
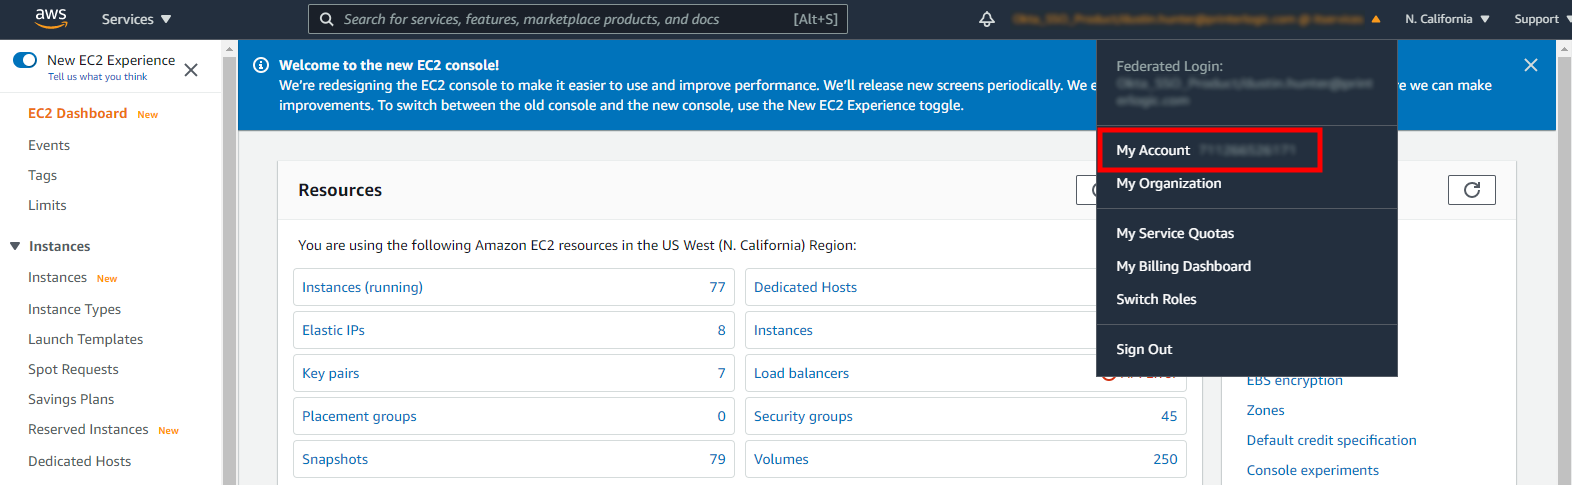
Please be prepared to provide the PrinterLogic sales representative with your AWS Account number so they can share the most current AMI to your account. You can find your account number in your AWS console by clicking on the drop-down next to your login name.
Copy the AMI
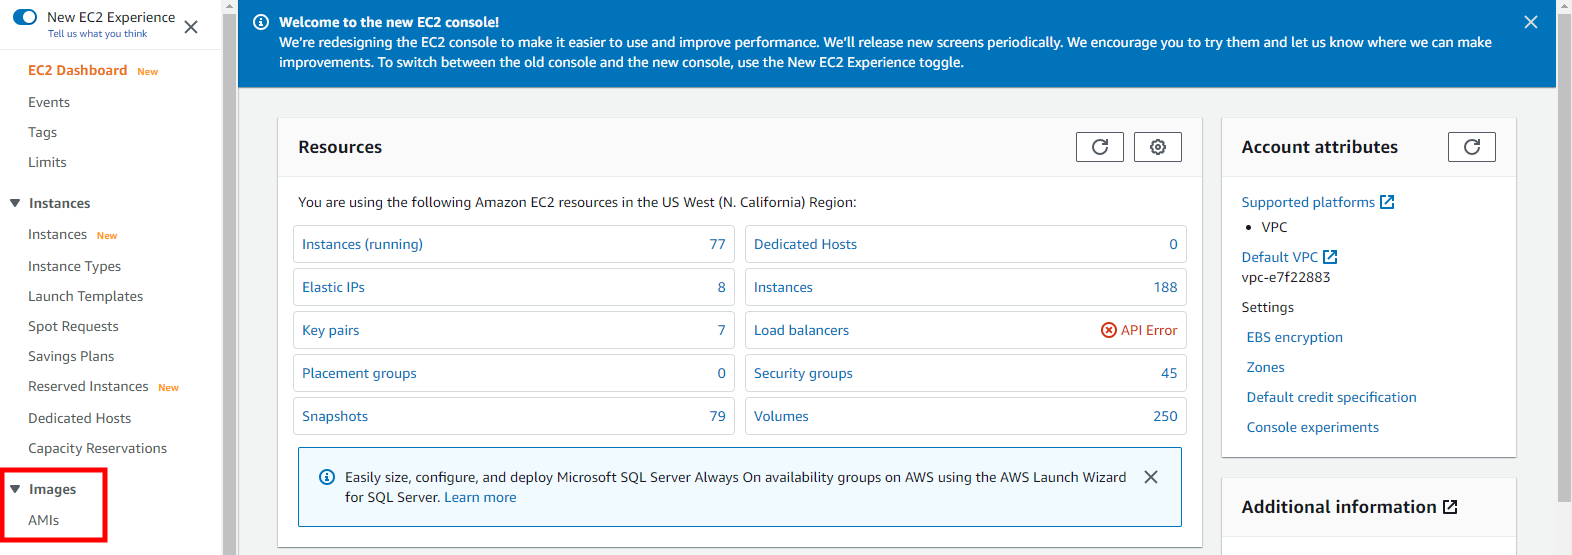
In your AWS EC2 Dashboard, in the Images drop-down, select AMIs.

Set your AWS region to the region provided by your PrinterLogic representative.

On the AMI list screen, select Private Images.

- Locate the AMI that was provided to you in the list.
- Right click the image and select Copy AMI.
On the Copy AMI screen, select your Destination Region and click Copy AMI.
The copy process can take several minutes to complete.
- Back on the AMI screen, select the region you copied the AMI to.
Locate the AMI you just copied from the list.
The copied AMI will display a different AMI ID now that it is in your region. However, the AMI name will stay the same.
- Rename or tag the AMI as needed for your use.
Launch the AMI
- Right click on the AMI and select Launch Instance from AMI.
- Provide the Virtual Appliance instance a name.
- Scroll down and select the Instance type ensuring you are meeting the Web Stack Migration to Virtual Appliance.
- Scroll down and select the Key Pair (login) you want to use.
- Scroll down to the Network settings section and select the VPC you want the instance installed in.
- Select the Subnet you want the instance deployed to.
In the Firewall (security groups) section, select your Existing security group if you have configured a Virtual Appliance in the past. If this is your first deployment in AWS, it will be necessary to create a security group following the steps in the drop-down option below:
Create a Security Group for PrinterLogic Virtual Appliance- In the Firewall (security group) section, select Create Security Group.
- Enter a Security Group Name.
- Enter a Description for the security group.
Enter the following security group rules:
Security Group Rules Type Protocol Port Source MySQL/Aurora
TCP 3306 Anywhere HTTP TCP 80 Anywhere HTTPS TCP 443 Anywhere Custom TCP TCP 8000 Anywhere Custom TCP TCP 8080 Anywhere SMB TCP 445 Anywhere Custom ICMP - IPv4 Echo Request 8 Anywhere
- The Advance Network Configuration section is optional for the following scenario:
- If a Static IP address for the Virtual Appliance is desired:
- Create a Network Interface and assign it the desired IP address.
- Attach that network interface in these settings.
- If DHCP will be used, nothing needs to be done with these settings.
- If a Static IP address for the Virtual Appliance is desired:
Scroll down to the Configure Storage section and ensure there's a minimum of 80 GB. We also suggest that an SSD (gp3) gets used to offer the ability to specify IOPS for the volume.
Do not add the additional data volume at this time. You will add that in a later step..
- Scroll down to the Advanced Details section and expand it.
Scroll to the bottom and paste the following code into the User Data field.
Set the DOCKER_NETWORK IP address to the desired private TCP/IP network with a /20 or lower.
Copy Code#!/bin/bash -x
DOCKER_NETWORK="172.16.0.0/16"
echo "*** cloud-init script begin ***"
# Wait for Docker to become available
until systemctl is-active docker >/dev/null 2>&1
do
echo "Waiting for Docker to become available..."
sleep 5
done
echo "Setting Docker network to $DOCKER_NETWORK..."
set-network "$DOCKER_NETWORK"
echo "*** cloud-init script end ***"- Select Launch Instance.
- Select View All Instances.
- Wait for the Virtual Appliance instance to completely launch.
Attach Data Volume
Select Volumes under the Elastic Block Store section of the menu.

- Click on Create Volume.
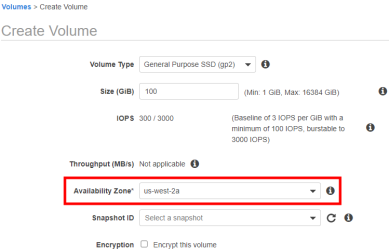
- Select the Volume Type. It is suggested that an SSD (gp3) be used to give the ability to specify IOPS for the volume.
Select the Volume Size.
PrinterLogic recommends a minimum of 50 GB of free persistent hard disk space (add 4 GB for every 100 additional printers).
Select the Availability Zone, ensuring it is in the same zone as your Virtual Appliance instance.
- (Optional) Select the Encryption checkbox and your desired master key if you want drive encryption.
Click on Click to add a Name tag, and give your volume a name.
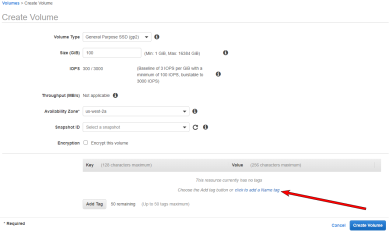
- Click on Create Volume.
- The Volume Created Successfully message will display, click on Close to return to your list of volumes.
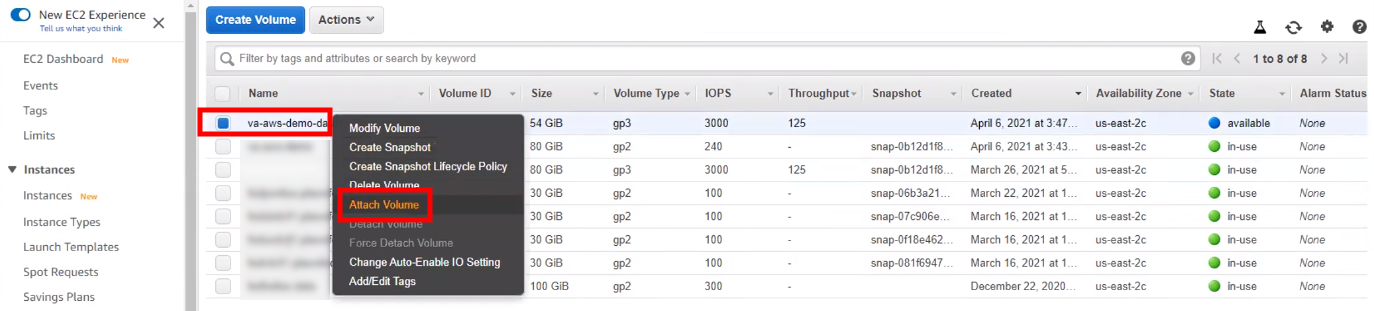
Locate the newly created volume, right-click on it, and select Attach Volume.
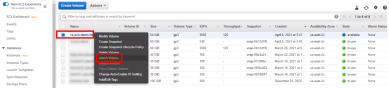
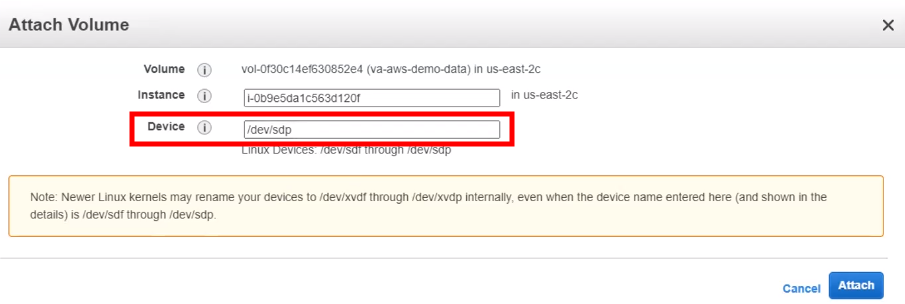
- In the instance field, select the Virtual Appliance you just created.
In the Device field, enter /dev/sdp.

- Click on Attach.
- Return to your Virtual Appliance instance by clicking on Instances.
- Locate and select your Virtual Appliance instance.
Copy the IP Address of your Virtual Appliance.
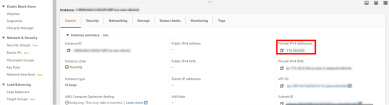
- If not already started, start the Virtual Appliance.
- For VM Workstation Pro, HyperV, and ESXi hypervisors ONLY. (For AWS and Google Cloud Platform skip to Step 9.)
- Launch the remote VM console of your hypervisor and login to the Virtual Appliance Console with the network user credentials specified. Configure TCP/IP settings as applicable (use either manual settings or DHCP reservation).
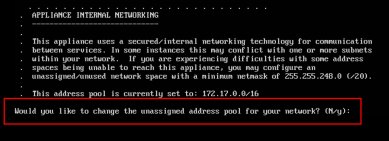
- The Virtual Appliance starts as a DHCP client. It’s possible to leave it that way and configure the TCP/IP settings via DHCP Reservation. Otherwise, use the steps below to configure a static IP and to optionally change the private IP range that the Virtual Appliance uses by default so that it doesn’t conflict with existing subnets in the environment.
- Login to the Virtual Appliance Console and Configure Network Settings
- In the hypervisor where the Virtual Appliance runs, open the web console to access the Virtual Appliance Linux terminal interface.
- Login with the credentials supplied in the terminal banner for the network user.

- Enter "Y" to change the network settings.
- Enter "Y" to change the network mode.
Enter the TCP/IP settings.
The image below is just an example. Ensure you use the settings specific to your network.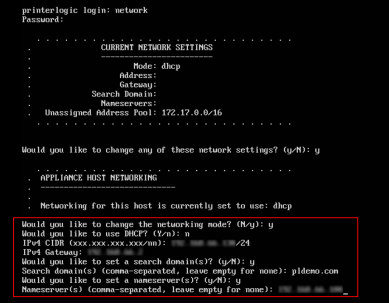
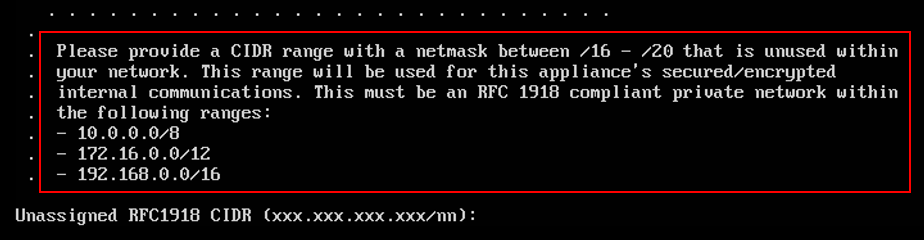
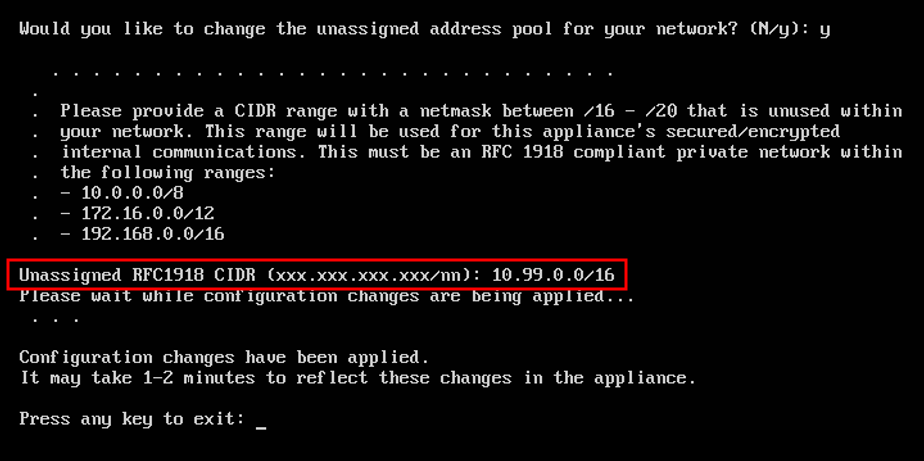
If the existing address pool does not conflict with any subnets in the environment, enter “N”. Otherwise, enter “Y” to set a different address range.
 If needing to adjust IP addresses, be sure to read and understand the network range options you are presented with. Any range used must have a netmask < 20.
If needing to adjust the IP address ranges, configure the address range.
The image below is just an example. Ensure you use the settings specific to your network.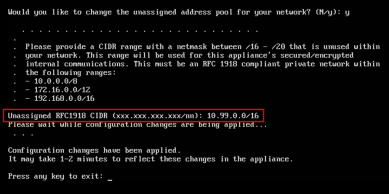
- Press any key to exit.
-
Run the Virtual Appliance Configuration UI by navigating to http://VA_IP_Address:8080 .
-
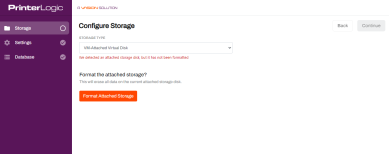
On the Configure Storage page, select VM-Attached Virtual Disk for the Storage Type and click Format Attached Storage.
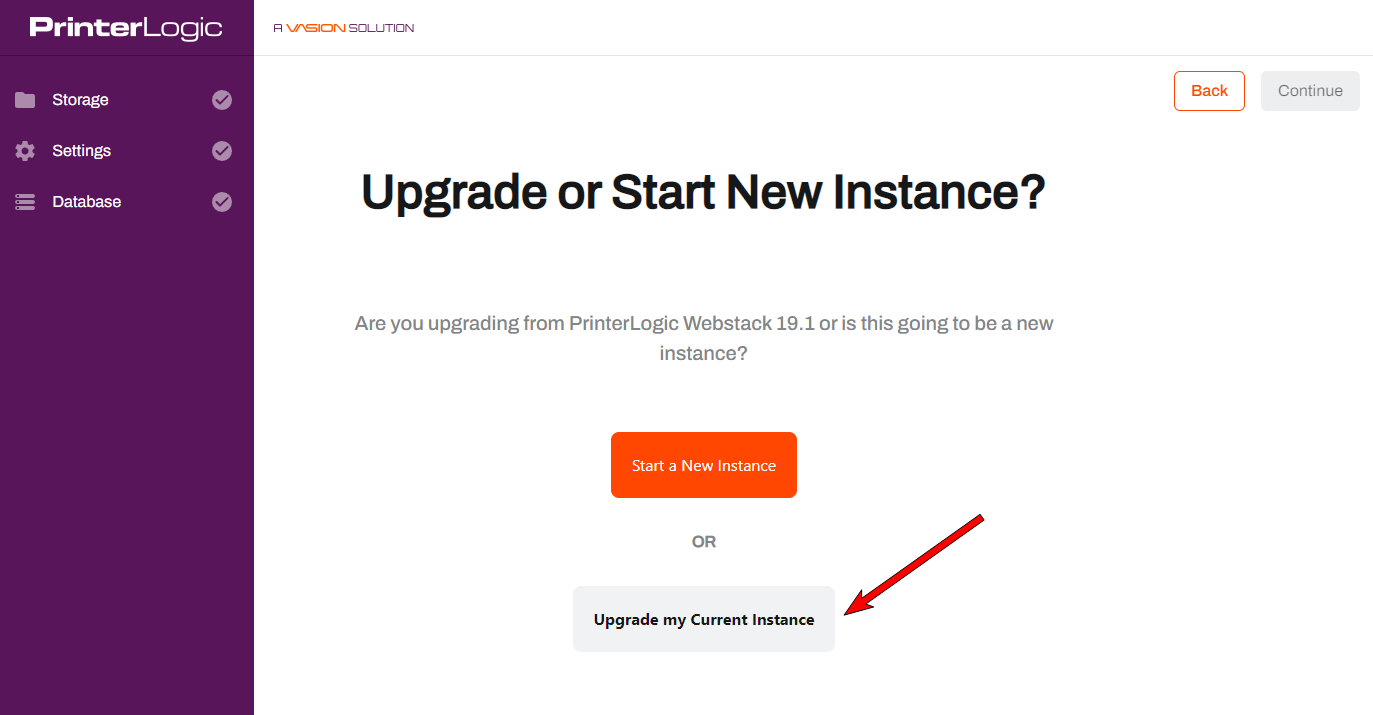
-
Choose the Upgrade my Current Instance option.

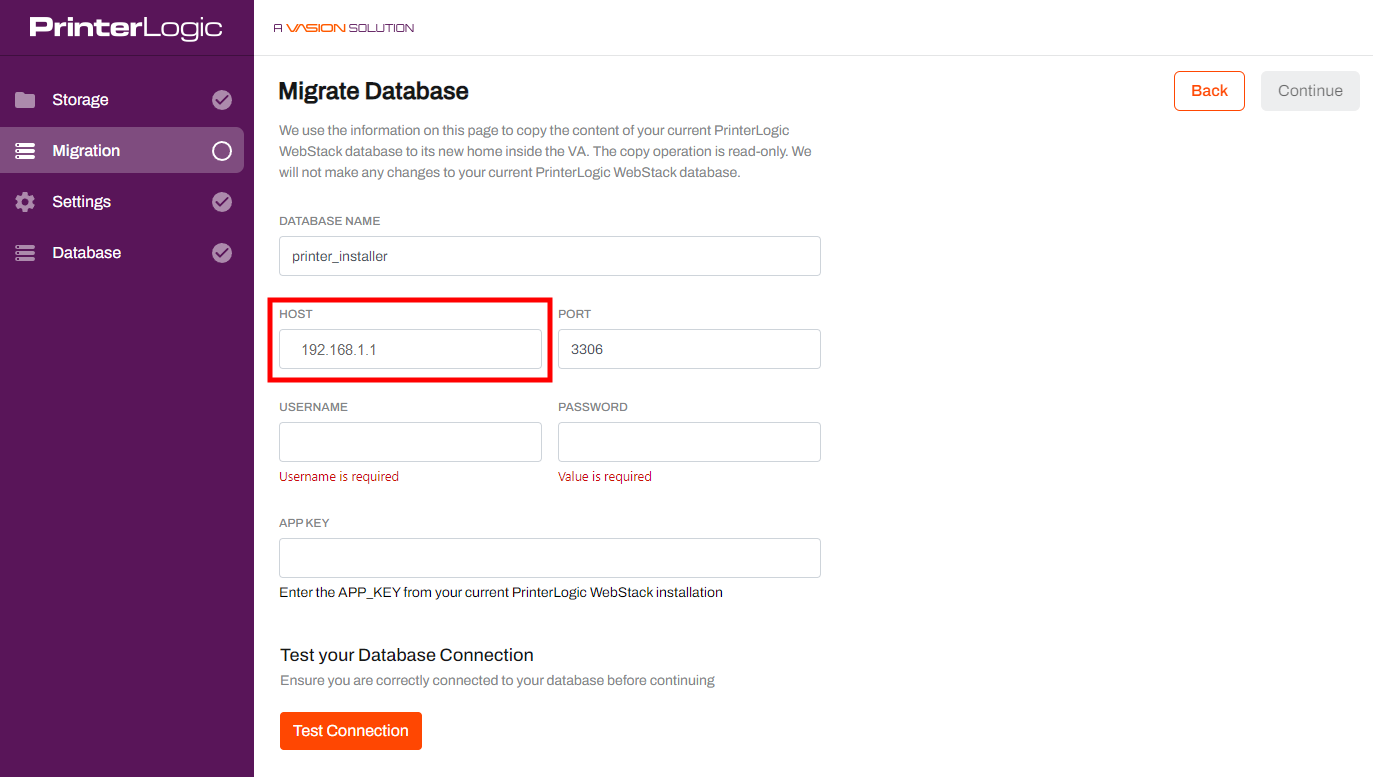
-
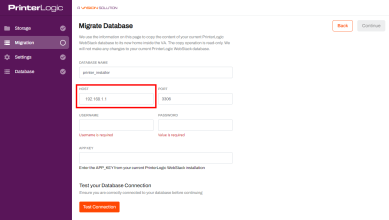
On the Migrate Database page, enter the FQDN of the production Web Stack instance (printers.company.org) in the Host field.
-
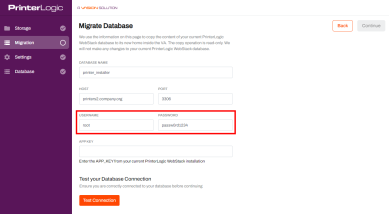
Enter in your Username and Password.
-
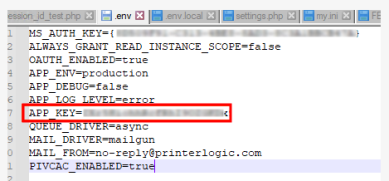
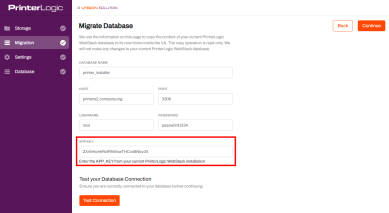
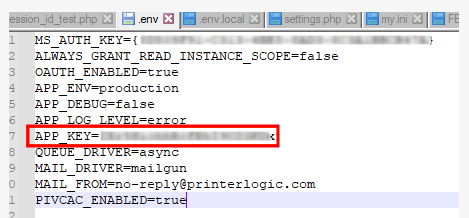
Enter the APP_KEY from your Web Stack instance.
Where can I find my Web Stack APP_KEY?
- Browse to your Web Stack .ENV file.
- Default path is:
C:\intetpub\wwwroot\.env
- Default path is:
-
Open the file with a text editor and locate the APP_KEY and copy it.
- Browse to your Web Stack .ENV file.
-
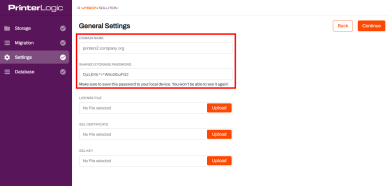
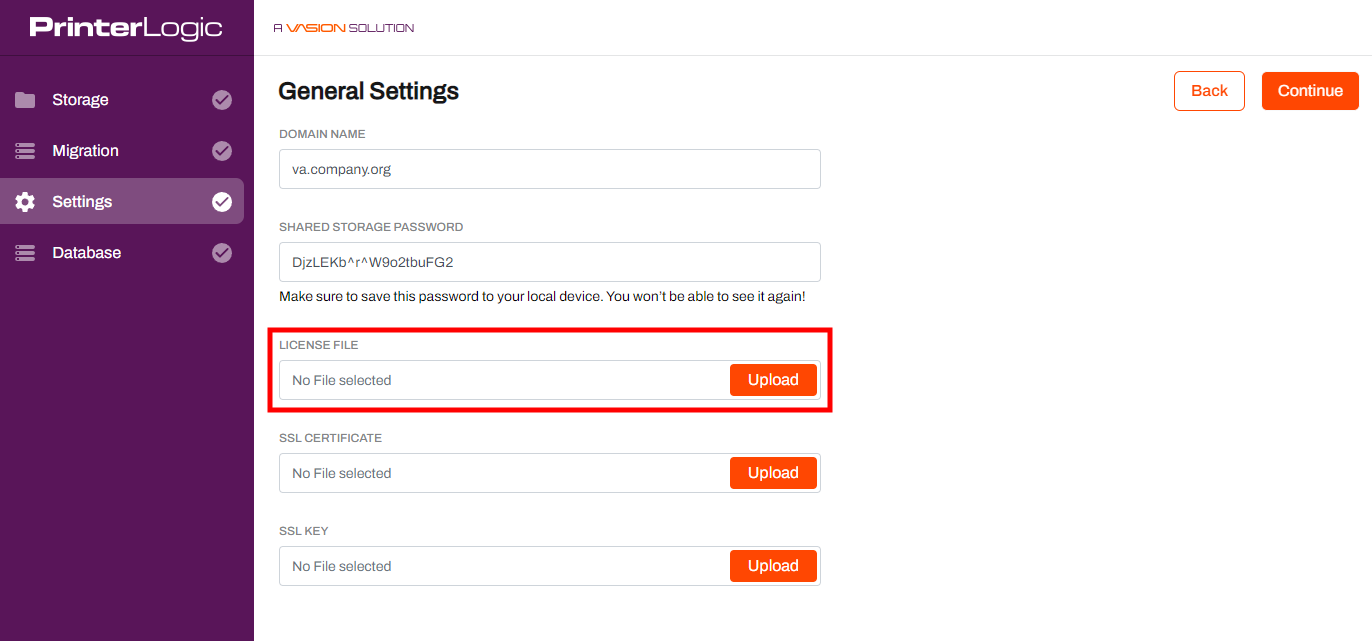
On the General Settings page, enter the FQDN of the Virtual Appliance (printers2.company.org) in the Domain Name field. Keep the suggested Shared Storage Password or set it to something else, and click Continue. Ensure you document the password!
-
Request that your PrinterLogic representative give you your Virtual Appliance license that will match your Web Stack license capabilities, except use the new FQDN of the Virtual Appliance (printers2.company.org).
-
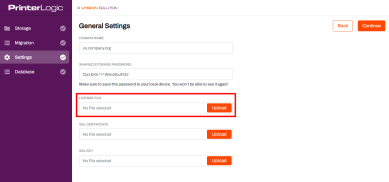
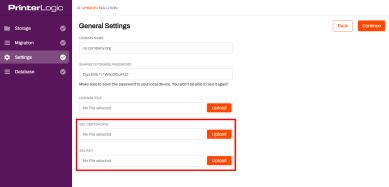
[Optional] If you created a SSL certificate for the Virtual Appliance, upload the certificate and key here, and click Continue.
- Select Continue on the Setup Database page.
-
Click the final Finish Upgrade button and wait for it to complete.

A large database could take a couple hours to complete.
- Perform any testing with clients that are re-homed to printers2.company.org.
-
After successful testing, setup the uninstall/reinstall script and start pushing it out.
- To uninstall/reinstall the client follow these steps:
- In Apps and Features, uninstall the Printer Installer Client.
- Delete the following directory on the workstation: C:\Program Files (X86)\Printer Properties Pro
- Install new client with new URL and Auth Code.
Further information on Installing and Uninstalling the Client can be found in the PrinterLogic Client section.
- To uninstall/reinstall the client follow these steps:
- New clients will start pointing to the Virtual Appliance and old clients will continue to point to Web Stack until they are updated.
- After all the clients are converted, have your PrinterLogic representative update the prod license file to reflect the new single URL .
- Copy the license file to the /pi/storage folder on the shared drive.


By default, the Web Stack MySQL instance is configured to only allow local connections. If the MySQL Connection Test fails on this step, this restriction can be lifted so that the Virtual Appliance Migration can access the production MySQL database.
Run the following command at a MySQL Command Prompt on the production Web Stack server (the MySQL root password can be found inside the c:\inetpub\wwwroot\config\settings.php file on the production Web Stack instance):
use mysql; update user set host='%' where user='root' and host='localhost'; flush privileges;
use mysql; update user set host='%' where user='root' and host='localhost'; flush privileges;To revert this setting, run the following command at a MySQL Command Prompt on the production Web Stack server:
use mysql; update user set host='localhost' where user='root' and host='%'; flush privileges;
use mysql; update user set host='localhost' where user='root' and host='%'; flush privileges;

Option 2 – DNS Cut-over
This method eliminates the need to re-install the clients during cut-over. However, you will still want to update the clients after migration, since the latest client provided by Web Stack does not support every new feature in the Virtual Appliance. The clients can be updated after the migration using the auto-update settings in the Admin Console.
You will use a different (temporary) FQDN during the migration so that you can access both the Virtual Appliance and the Web Stack server while testing. This will require a temporary DNS A/CNAME record and license file as well. When you are ready to cut-over, shut down Web Stack, change the FQDN of the Virtual Appliance, the DNS A/CNAME records, and the license file to the production FQDN. The next time the clients check in, they will be accessing the Virtual Appliance instead of Web Stack.
A potential downside of this method is that you can’t test the Virtual Appliance with the production FQDN prior to cut-over (unless you are able to change DNS temporarily during off-hours). Because the Virtual Appliance leverages DNS to communicate with the individual microservices internally, it's not possible to simply change the hosts file on a workstation to test connectivity to the Virtual Appliance using a different IP for the FQDN. The Virtual Appliance will still be pointing to the company's DNS servers, which will not include these temporary DNS settings -- the production FQDN will still resolve to the Web Stack instance, and the Virtual Appliance microservices will fail on name resolution. The FQDN of the Virtual Appliance must be changed in the secrets.env file at the same time DNS is changed.
When editing the secrets.env file, an editor like Notepad ++, Sublime Text, or Visual Studio Code must be used to ensure the file uses Unix line endings (LF only) and is saved in UTF-8 format with no byte-order mark.
DNS Cut-over Steps
This example will use printers.company.org as the production FQDN running on Web Stack. The Web Stack server’s host name is server1.company.org and is also listed in the license file. The temporary FQDN for the Virtual Appliance will be va.company.org. After the cut-over, the Virtual Appliance will be using printers.company.org.
- If Web Stack is not running on version 19.1 SP3, perform an upgrade to 19.1 SP3.
- If the version of MySQL is 5.5, upgrade MySQL to version 8 or higher.
- Contact PrinterLogic support for instructions to upgrade MySQL at support@printerlogic.com.
- Create a DNS A record for the temporary FQDN of the Virtual Appliance (va.company.org) and a wildcard CNAME record for the wildcard underneath the temporary FQDN of the Virtual Appliance (*.va.company.org) which points to the temporary FQDN of the Virtual Appliance (va.company.org).
- [Optional] If you plan on using any features that require HTTPS, create both:
- A temporary SAN certificate (following the Virtual Appliance SSL Certificates) for the temporary FQDN of the Virtual Appliance (va.company.org).
- And the wildcard underneath the temporary FQDN of the Virtual Appliance (*.va.company.org).
- Download the latest Virtual Appliance image. Release Notes 2024.
- Links are also included in the drop-downs below.
- Deploy the image to your hypervisor.
- ESXi Prerequisites and Hypervisor Steps
Prerequisites
- Download the Virtual Appliance ova file.
- DNS configured properly.
- Identify a FQDN to use for the PrinterLogic Virtual Appliance (i.e., printerlogic.mycompany.com).
- Create an A record in DNS (i.e., printerlogic.mycompany.com) that points to the IP address of the Virtual Appliance.
- Create a CNAME record in DNS (i.e., *.printerlogic.mycompany.com) that points to the A record above (i.e., printerlogic.mycompany.com)
- SSL certificates created and available.
- The SubjectAlternativeName extension must list the two DNS entries above (i.e., printerlogic.mycompany.com and *.printerlogic.mycompany.com). In depth information can be found in the Virtual Appliance SSL Certificates document.
- Open ports for DB access from your machine:
- TCP 3306 - MySQL
- TCP 80 - HTTP
- TCP 443 - HTTPS
- TCP 8000 - Configuration API
- TCP 8080 - Configuration UI
- TCP 445 - SMB
(Optional) If you are using advanced features requiring a Service Client, you must ensure the Service Client gets appropriately configured. See Set up a service client for more information.
Configure Virtual Machine
Connect to your ESXi web management interface.
From the Virtual Machines object, choose the action Create/Register VM.
Choose Deploy a virtual machine from an OVF or OVA file, and click Next.
Enter the name for the VM and then Click to select files, and select the OVA file you downloaded earlier.
With the OVA file selected, click Next, and allow time for the OVA file to be extracted.
Select the storage to be used for the VM and click Next.
Select the Network mapping for the VM, select whether you want Thin or Thick Disk provisioning, and un-check the Power on automatically option so you can configure other settings prior to powering on. Click on Next.
Review your settings summary and then click Finish. Wait for upload to complete.
Select the newly created VM and then click Edit.
Increase the memory to 16 GB minimum.
PrinterLogic recommends 16GB RAM for up to 15,000 users (add 8GB for every additional 15,000 users)
Click Add hard disk, then select New standard hard disk.
Select the new hard disk and adjust to the recommended minimum size of 50 GB.
PrinterLogic recommends a minimum of 50 GB free persistent hard disk space (add 4 GB for every 100 printers).
Click the drop-down arrow next to the New Hard Disk and adjust the location, Disk Provisioning and other settings as needed. Click on Save.
Power on the VM and open a console to it.
Click on Console.
- After VM starts, document the displayed IP address given.
Copy down the displayed login and password displayed to be able to access the network settings. This will be needed if you choose to configure static IP settings or make adjustments to IP address ranges.
If you will be using a fully qualified domain name for accessing your Virtual Appliance, you should configure it in DNS and assign it the IP address shown on this console. You would also need to have the license file that PrinterLogic provides to contain the same FQDN for the licensed URL. When you are done with configuration from the above URL, the system will redirect you to the FQDN/URL you have in your license. If you are just testing and don’t need to manage more than 5 printers, you can continue to access the server via IP.
- HyperV Prerequisites and Hypervisor Steps
Prerequisites
- Download the latest Virtual Appliance vhd.xz file.
- After downloading the vhd.xz file, you will need to extract the VHD from the vhd.xz file. The extracted VHD file should then be placed in your Hyper-V server folder.
- DNS configured properly.
- Identify a FQDN to use for the PrinterLogic Virtual Appliance (i.e., printerlogic.mycompany.com).
- Create an A record in DNS (i.e., printerlogic.mycompany.com) that points to the IP address of the Virtual Appliance.
- Create a CNAME record in DNS (i.e., *.printerlogic.mycompany.com) that points to the A record above (i.e., printerlogic.mycompany.com)
- SSL certificates created and available.
- The SubjectAlternativeName extension must list the two DNS entries above (i.e., printerlogic.mycompany.com and *.printerlogic.mycompany.com). In depth information can be found in the Virtual Appliance SSL Certificates document.
- Open ports for DB access from your machine:
- TCP 3306 - MySQL
- TCP 80 - HTTP
- TCP 443 - HTTPS
- TCP 8000 - Configuration API
- TCP 8080 - Configuration UI
- TCP 445 - SMB
- (Optional) If you are using advanced features requiring a Service Client, you must ensure the Service Client gets appropriately configured. See Set up a service client for more information.
Configure Virtual Machine
Open up your Hyper-V Manager Console.
Right click on your server, hover your pointer over New, then click on Virtual Machine.
Click on Next.
Specify the new Virtual Machines Name, then click Next.
Select Generation 1 and click Next.
Change the memory to 16000 MB and click Next.
PrinterLogic recommends 16GB RAM for up to 15,000 users (add 4GB for every additional 15,000 users)
Select the Virtual Switch you have configured in Hyper-V and click Next.
Select the option to Use an existing virtual hard disk, and browse to the downloaded PrinterLogic VHD file. Select the file, and click on Next.
Click Finish at the bottom of the summary screen.
In the Actions pane to the right, under the virtual machine you just created, click on Settings.
With Add Hardware selected in the left pane and SCSI Controller selected in the right pick list, click on Add.
Select Hard Drive, and click Add.
Select New.
- Click Next.
Keep the default VHDX selected and click on Next.
Select the appropriate disk type for your environment and click Next.
Name the disk, and click Next.
Select the new hard disk and adjust to the recommended minimum size of 50 GB and click Next.
PrinterLogic recommends 50GB free persistent hard disk space (add 4GB for every 100 printers).
Review the summary page and then click Finish.
- After the wizard finishes building you will be returned to the Settings dialog.
Select Processor from the left pane and increase to a minimum of 4 processors.
PrinterLogic recommends four 3.5-4.0 GHz processors. Add two 3.5 GHz processors for each additional 15,000 users.
- Click on OK.
In the VM's action pane click on Start.
- After the VM starts, open the VM screen and annotate the provided IP address.
Log in using the displayed login and password to configure the network settings. This allows you to configure a static IP, default gateway, search domain, subnet IP address ranges, and the DNS servers.
If you will be using a fully qualified domain name for accessing your Virtual Appliance, you should configure it in DNS and assign it the IP address shown on this console. You would also need to have the license file that PrinterLogic provides to contain the same FQDN for the licensed URL. When you are done with configuration from the above URL, the system will redirect you to the FQDN/URL you have in your license. If you are just testing and don’t need to manage more than 5 printers, you can continue to access the server via IP.
- VM Workstation Pro Prerequisites and Hypervisor Steps
Prerequisites
- Download the Virtual Appliance ova file.
- DNS configured properly.
- Identify a FQDN to use for the PrinterLogic Virtual Appliance (i.e., printerlogic.mycompany.com).
- Create an A record in DNS (i.e., printerlogic.mycompany.com) that points to the IP address of the Virtual Appliance.
- Create a CNAME record in DNS (i.e., *.printerlogic.mycompany.com) that points to the A record above (i.e., printerlogic.mycompany.com)
- SSL certificates created and available.
- The SubjectAlternativeName extension must list the two DNS entries above (i.e., printerlogic.mycompany.com and *.printerlogic.mycompany.com). In depth information can be found in the Virtual Appliance SSL Certificates document.
- Open ports for DB access from your machine:
- TCP 3306 - MySQL
- TCP 80 - HTTP
- TCP 443 - HTTPS
- TCP 8000 - Configuration API
- TCP 8080 - Configuration UI
- TCP 445 - SMB
- (Optional) If you are using advanced features requiring a Service Client, you must ensure the Service Client gets appropriately configured. See Set up a service client for more information.
Configure Virtual Machine
Virtual Appliance should be able to work on any supported version of VM Workstation Pro, but it has been successfully tested on versions 12 and 15.
- Open VMWare Workstation Pro.
Click Open a Virtual Machine.
Navigate to the .ova file you downloaded.
- Click Open.
Click Edit virtual machine settings.
Click Network Adapter.
Select Bridged: Connected directly to the physical network (if it is not already selected).
Click Add.
Select Hard Disk and click Next.
Keep SCSI selected and click Next.
Keep Create a new virtual disk selected and click Next.
Adjust the disk size to the minimum recommended setting of 50 GB and click Next.
PrinterLogic recommends 50GB free persistent hard disk space (add 4GB for every 100 printers).
Click Finish.
- Click OK.
Click Power on this virtual machine.
When the virtual machine loads, you will see the following message.
- The IP address will be specific to your PrinterLogic Virtual Appliance. You will want to note it for a following step.
Copy down the displayed login and password displayed to be able to access the network settings. This will be needed if you choose to configure static IP settings..
If you will be using a fully qualified domain name for accessing your Virtual Appliance, you should configure it in DNS and assign it the IP address shown on this console. You would also need to have the license file that PrinterLogic provides to contain the same FQDN for the licensed URL. When you are done with configuration from the above URL, the system will redirect you to the FQDN/URL you have in your license. If you are just testing and don’t need to manage more than 5 printers, you can continue to access the server via IP.
- Google Cloud Platform Prerequisites and Steps
Prerequisites
- Download the Virtual Appliance vmdk file.
- DNS configured properly.
- Identify a FQDN to use for the PrinterLogic Virtual Appliance (i.e., printerlogic.mycompany.com).
- Create an A record in DNS (i.e., printerlogic.mycompany.com) that points to the IP address of the Virtual Appliance.
- Create a CNAME record in DNS (i.e., *.printerlogic.mycompany.com) that points to the A record above (i.e., printerlogic.mycompany.com)
- SSL certificates created and available.
- The SubjectAlternativeName extension must list the two DNS entries above (i.e., printerlogic.mycompany.com and *.printerlogic.mycompany.com). In depth information can be found in the Virtual Appliance SSL Certificates document.
- Open ports for DB access from your machine:
- TCP 3306 - MySQL
- TCP 80 - HTTP
- TCP 443 - HTTPS
- TCP 8000 - Configuration API
- TCP 8080 - Configuration UI
- TCP 445 - SMB
- (Optional) If you are using advanced features requiring a Service Client, you must ensure the Service Client gets appropriately configured. See Set up a service client for more information.
Initial Configuration
- Log into Google Cloud Platform.
Select Storage from the menu on the left.
Either create a new storage bucket or select an existing storage bucket.
After creating or selecting a storage bucket, select Upload Files.
Upload the Virtual Machine Disk file (.vmdk) that was downloaded in the prerequisites.
It is recommended that this step be done from a PC with an internet connection that supports high upload speeds due to the large file size.
Convert the VMDK
This process can take up to 40mn.
Back on the Google Cloud Platform home screen, select Compute Engine from the left side menu.
From the new menu displayed on the left, select Images.
From the top menu, select Create Image.
- On the Create Image screen:
- Give it a name.
- Select Virtual disk (VMDK, VHD) as the source to be used.
- Select the Cloud Storage File
- In the Operating system on virtual disk section, Select Ubuntu 18.04 Bionic.
- Ensure that the Install guest packages box is checked.
Click on Create.
Configure the Image
Back on the Google Cloud Platform home screen, select Compute Engine from the left side menu.
From the new menu displayed on the left, select Images.
Click on the newly created image name, then select Create Instance at the top.
Give the instance a name, select appropriate Region and Zone, and select the Machine Type that meets the recommended system requirements of:
- Four 3.5-4.0 GHz processors. Add two 3.5 GHz processors for each additional 15,000 users.
- 16GB RAM for up to 15,000 users.
- Add 2 CPUs / 8GB RAM for each additional 15,000 users.
- Add a minimum of 2 CPUs and 4GB RAM if using the Internal Service Client.
- Add 2 CPUs and 4GB RAM per 500 CPA/Simple Badge Release installations.
- 80GB free hard disk space for the host disk.
- There should be 50GB of free hard disk space on the persistent storage disk (add 4GB for every 100 printers).
Port 8080, 8000, 3306 and 443 must be open to complete the setup phase.
Scroll down to the Firewall section and select the appropriate settings to allow your workstation to communicate with the Virtual Appliance.
Select Disks, and then scroll down and select the Add new disk button.
Give the new disk a name and set a size (50 GB is recommended).
- Scroll down and select Done on the bottom left.
Click Create on the bottom left.
- Start the newly created VM instance.
Locate the IP of the newly created virtual machine and copy it.
If you will be using a fully qualified domain name for accessing your Virtual Appliance, you should configure it in DNS and assign it the IP address shown on this console. You would also need to have the license file that PrinterLogic provides to contain the same FQDN for the licensed URL. When you are done with configuration from the above URL, the system will redirect you to the FQDN/URL you have in your license. If you are just testing and don’t need to manage more than 5 printers, you can continue to access the server via IP.
- AWS Prerequisites and Steps
Prerequisites
Contact your PrinterLogic sales representative to provide you with access to the Virtual Appliance AMI.
Only a PrinterLogic representative can provide the Virtual Appliance AMI. It is not available as a Public AMI.
- DNS configured properly.
- Identify a FQDN to use for the PrinterLogic Virtual Appliance (i.e., printerlogic.mycompany.com).
- Create an A record in DNS (i.e., printerlogic.mycompany.com) that points to the IP address of the Virtual Appliance.
- Create a CNAME record in DNS (i.e., *.printerlogic.mycompany.com) that points to the A record above (i.e., printerlogic.mycompany.com)
- SSL certificates created and available.
- The SubjectAlternativeName extension must list the two DNS entries above (i.e., printerlogic.mycompany.com and *.printerlogic.mycompany.com). In depth information can be found in the Virtual Appliance SSL Certificates document.
- Open ports for DB access from your machine:
- TCP 3306 - MySQL
- TCP 80 - HTTP
- TCP 443 - HTTPS
- TCP 8000 - Configuration API
- TCP 8080 - Configuration UI
- TCP 445 - SMB
- (Optional) If you are using advanced features requiring a Service Client, you must ensure the Service Client gets appropriately configured. See Set up a service client for more information.
Setup
AWS is a supported platform to run the PrinterLogic Virtual Appliance. Currently, a PrinterLogic sales representative will need to assist you with getting access to the AMI.
Please be prepared to provide the PrinterLogic sales representative with your AWS Account number so they can share the most current AMI to your account. You can find your account number in your AWS console by clicking on the drop-down next to your login name.
Copy the AMI
In your AWS EC2 Dashboard, in the Images drop-down, select AMIs.
Set your AWS region to the region provided by your PrinterLogic representative.
On the AMI list screen, select Private Images.
- Locate the AMI that was provided to you in the list.
- Right click the image and select Copy AMI.
On the Copy AMI screen, select your Destination Region and click Copy AMI.
The copy process can take several minutes to complete.
- Back on the AMI screen, select the region you copied the AMI to.
Locate the AMI you just copied from the list.
The copied AMI will display a different AMI ID now that it is in your region. However, the AMI name will stay the same.
- Rename or tag the AMI as needed for your use.
Launch the AMI
- Right click on the AMI and select Launch Instance from AMI.
- Provide the Virtual Appliance instance a name.
- Scroll down and select the Instance type ensuring you are meeting the Web Stack Migration to Virtual Appliance.
- Scroll down and select the Key Pair (login) you want to use.
- Scroll down to the Network settings section and select the VPC you want the instance installed in.
- Select the Subnet you want the instance deployed to.
In the Firewall (security groups) section, select your Existing security group if you have configured a Virtual Appliance in the past. If this is your first deployment in AWS, it will be necessary to create a security group following the steps in the drop-down option below:
Create a Security Group for PrinterLogic Virtual Appliance- In the Firewall (security group) section, select Create Security Group.
- Enter a Security Group Name.
- Enter a Description for the security group.
Enter the following security group rules:
Security Group Rules Type Protocol Port Source MySQL/Aurora
TCP 3306 Anywhere HTTP TCP 80 Anywhere HTTPS TCP 443 Anywhere Custom TCP TCP 8000 Anywhere Custom TCP TCP 8080 Anywhere SMB TCP 445 Anywhere Custom ICMP - IPv4 Echo Request 8 Anywhere
- The Advance Network Configuration section is optional for the following scenario:
- If a Static IP address for the Virtual Appliance is desired:
- Create a Network Interface and assign it the desired IP address.
- Attach that network interface in these settings.
- If DHCP will be used, nothing needs to be done with these settings.
- If a Static IP address for the Virtual Appliance is desired:
Scroll down to the Configure Storage section and ensure there's a minimum of 80 GB. We also suggest that an SSD (gp3) gets used to offer the ability to specify IOPS for the volume.
Do not add the additional data volume at this time. You will add that in a later step..
- Scroll down to the Advanced Details section and expand it.
Scroll to the bottom and paste the following code into the User Data field.
Set the DOCKER_NETWORK IP address to the desired private TCP/IP network with a /20 or lower.
Copy Code#!/bin/bash -x
DOCKER_NETWORK="172.16.0.0/16"
echo "*** cloud-init script begin ***"
# Wait for Docker to become available
until systemctl is-active docker >/dev/null 2>&1
do
echo "Waiting for Docker to become available..."
sleep 5
done
echo "Setting Docker network to $DOCKER_NETWORK..."
set-network "$DOCKER_NETWORK"
echo "*** cloud-init script end ***"- Select Launch Instance.
- Select View All Instances.
- Wait for the Virtual Appliance instance to completely launch.
Attach Data Volume
Select Volumes under the Elastic Block Store section of the menu.
- Click on Create Volume.
- Select the Volume Type. It is suggested that an SSD (gp3) be used to give the ability to specify IOPS for the volume.
Select the Volume Size.
PrinterLogic recommends a minimum of 50 GB of free persistent hard disk space (add 4 GB for every 100 additional printers).
Select the Availability Zone, ensuring it is in the same zone as your Virtual Appliance instance.
- (Optional) Select the Encryption checkbox and your desired master key if you want drive encryption.
Click on Click to add a Name tag, and give your volume a name.
- Click on Create Volume.
- The Volume Created Successfully message will display, click on Close to return to your list of volumes.
Locate the newly created volume, right-click on it, and select Attach Volume.
- In the instance field, select the Virtual Appliance you just created.
In the Device field, enter /dev/sdp.
- Click on Attach.
- Return to your Virtual Appliance instance by clicking on Instances.
- Locate and select your Virtual Appliance instance.
Copy the IP Address of your Virtual Appliance.
- If not already started, start the Virtual Appliance.
- For VM Workstation Pro, HyperV, and ESXi hypervisors ONLY. (For AWS and Google Cloud Platform skip to Step 9.)
- Launch the remote VM console of your hypervisor and login to the Virtual Appliance Console with the network user credentials specified. Configure TCP/IP settings as applicable (use either manual settings or DHCP reservation).
- The Virtual Appliance starts as a DHCP client. It’s possible to leave it that way and configure the TCP/IP settings via DHCP Reservation. Otherwise, use the steps below to configure a static IP and to optionally change the private IP range that the Virtual Appliance uses by default so that it doesn’t conflict with existing subnets in the environment.
- Login to the Virtual Appliance Console and Configure Network Settings
- In the hypervisor where the Virtual Appliance runs, open the web console to access the Virtual Appliance Linux terminal interface.
- Login with the credentials supplied in the terminal banner for the network user.
- Enter "Y" to change the network settings.
- Enter "Y" to change the network mode.
Enter the TCP/IP settings.
The image below is just an example. Ensure you use the settings specific to your network.If the existing address pool does not conflict with any subnets in the environment, enter “N”. Otherwise, enter “Y” to set a different address range.
If needing to adjust IP addresses, be sure to read and understand the network range options you are presented with. Any range used must have a netmask < 20.If needing to adjust the IP address ranges, configure the address range.
The image below is just an example. Ensure you use the settings specific to your network.- Press any key to exit.
-
Run the Virtual Appliance Configuration UI by navigating to http://VA_IP_Address:8080
-
Choose the Upgrade my Current Instance option.
-
On the Configure Storage page, select VM-Attached Virtual Disk for the Storage Type and click Format Attached Storage.
-
On the Migrate Database page, enter the IP Address of the production Web Stack instance (printers.company.org) in the Host field.
-
Enter in your Username and Password.
-
Enter the APP_KEY from your Web Stack instance.
Where can I find my Web Stack APP_KEY?
- Browse to your Web Stack .ENV file.
- Default path is:
C:\intetpub\wwwroot\.env
- Default path is:
-
Open the file with a text editor and locate the APP_KEY and copy it.
- Browse to your Web Stack .ENV file.
-
On the General Settings page, enter the temporary FQDN of the Virtual Appliance (va.company.org example used in image) in the Domain Name field. Keep the suggested Shared Storage Password or set it to something else, and click Continue. Ensure you document the password!
Ensure that the entire FQDN is used and not just the domain name in the Domain field.
Ensure you document and save the Shared Storage Password so you can access the Data Drive later as needed.
-
Request that your PrinterLogic representative create a trial license that will match your production license capabilities, except use the temporary FQDN of the Virtual Appliance (va.company.org).
-
[Optional] If you created a temporary SSL certificate for the Virtual Appliance, upload the certificate and key here, and click Continue.
- Select Continue on the Setup Database page.
-
Click the final Finish Upgrade button and wait for it to complete.
A large database could take a couple hours to complete.
- Perform any testing with one or more clients that have been updated to point to the temporary FQDN of the Virtual Appliance (va.company.org).
- Schedule cut-over to the Virtual Appliance in production.
-
Cut-over steps:
- [Optional] Install the updated PrinterLogic Client on end-user workstations (this can be done automatically after cut-over in the Virtual Appliance Admin Console by configuring client automatic updates.
- Shutdown the Web Stack server.
- Copy the production license file to the /pi/storage folder on the Virtual Appliance appliance-storage share, overwriting the existing.
- [Optional] Copy the new production Virtual Appliance certificate files (referenced above in the requirements section) to the certs folder on the Virtual Appliance appliance-storage share, overwriting the existing files. The SSL certificate files need to be named ssl.crt and ssl.key.
-
Edit the secrets.env file at the root of the Virtual Appliance appliance-storage share and change the PRINTERCLOUD_DOMAIN variable to the production FQDN (printers.company.org).
When editing the secrets.env file, an editor like Notepad ++, Sublime Text, or Visual Studio Code must be used to ensure the file uses Unix line endings (LF only) and is saved in UTF-8 format with no byte-order mark.
- Modify the existing DNS A record for the production FQDN (printers.company.org) to point to the IP address of the Virtual Appliance.
- Create a DNS CNAME record for the wildcard underneath the production FQDN (*.printers.company.org) and point it to the production FQDN (printers.company.org).
- Reboot the Virtual Appliance. Once the Virtual Appliance is in a “Running” state, clients should be able to connect.
By default, the Web Stack MySQL instance is configured to only allow local connections. If the MySQL Connection Test fails on this step, this restriction can be lifted so that the Virtual Appliance Migration can access the production MySQL database.
Run the following command at a MySQL Command Prompt on the production Web Stack server (the MySQL root password can be found inside the c:\inetpub\wwwroot\config\settings.php file on the production Web Stack instance):
use mysql; update user set host='%' where user='root' and host='localhost'; flush privileges;
use mysql; update user set host='%' where user='root' and host='localhost'; flush privileges;To revert this setting, run the following command at a MySQL Command Prompt on the production Web Stack server:
use mysql; update user set host='localhost' where user='root' and host='%'; flush privileges;
use mysql; update user set host='localhost' where user='root' and host='%'; flush privileges;
Features Impacting Migrations
Data Warehouse
If you are currently using the Data Warehouse feature, you will lose that capability until PrinterLogic releases the new reporting API.
Mobile Printing
The migration will create a Service Client object “Service Client Migrated” if Web Stack didn’t have one defined. It will place any Mobile Print settings on the SC, but they will not be functional because Mobile Print needs to run on an external SC. If you had a SC already on Web Stack, the settings will reside there. You will need to create an external SC and copy those settings over.
Control Panel Application
If you are using the CPA on any printers, it is recommended that you uninstall them prior to cut-over and then reinstall from the Virtual Appliance.
Simple Badge Release
If you are using Simple Badge Release, it is recommended that the configuration be undone prior to cut-over and then reconfigure with the new SBR interface.
External Service Client
Uninstall existing external Service Clients, and set them up again after cut-over.
-
Released: September 3rd, 2024
-
Updated Supported ChromeOS Version
Supports ChromeOS 109+
-
New Mobile App Releases
Released: August 26th, 2024 -
New Host and Application Builds
Released: 8/20/2024
Updated Client Versions Included
-
Set Up Using VMM
Now Supporting Linux KVM Environments