Last updated: September 04, 2024
Virtual Appliance SSL Certificates
To enable HTTPS for the Vasion Virtual Appliance, you need to generate and apply an SSL certificate
The SSL certificate secures the following:
- All communications between the Virtual Appliance Clients and the Virtual Appliance instance.
- Internal communications between the Docker containers and microservices running inside the Virtual Appliance.
The SSL certificate must be signed by a public Certification Authority (CA) or a private CA trusted by the enterprise. Please note that the features will only work with a publicly trusted CA:
- IdP SCIM configurations.
- PrinterLogic Mobile App.
- Off-Network External Gateways.
- The Application update button on the About PrinterLogic page (accessible by navigating to Support & Training
 About PrinterLogic).
To update the appliance build, the Virtual Appliance has to reach out to gw.<subdomain>.<domain>.<tld>/<URL_to_update_file>, and it must have a valid publicly trusted CA certificate covering gw.<subdomain>.<domain>.<tld> or *.<subdomain>.<domain>.<tld>.
Requirements
There are specific requirements to keep in mind when generating an SSL certificate for the Virtual Appliance. Please review the following before generating your certificate.
Validity Period
The validity period of the certificate should not exceed 1 year from the issued date, in accordance with current industry standard practices.
Common Name (CN)
The CN of the certificate must be the Fully Qualified Domain Name (FQDN) The complete domain name for a specific computer or host on the Internet and consists of two parts: the hostname and the domain name. of the Virtual Appliance.
SubjectAlternativeName (SAN)
We recommend using wildcards for the certificate SAN attribute. If the use of a wildcards is not permitted in your environment, list the feature services individually.
With Wildcard
You will need SAN entries for:
- FQDN of the Virtual Appliance.
- Wildcard of FQDN (*HOMEURL).
Without Wildcard
You will need SAN entries for:
- FQDN of the Virtual Appliance.
- Each of the following internal microservices:
- gw.HOMEURL.
- traefik.HOMEURL.
- portainer.HOMEURL.
- cdn.HOMEURL.
- app.HOMEURL.
- agent-api.HOMEURL.
- printer-admin-api.HOMEURL.
- If using Advanced Features:
- Control Panel Application (CPA) — cpa-api.HOMEURL.
- Control Panel Application (CPA) — cpp-ui.HOMEURL.
- Off-Network Print — ofn.HOMEURL.
- Off-Network Print — ofn-gw.HOMEURL.
- If using the Enterprise Data Warehouse:
- edw.HOMEURL.
- If using CAC/PIV:
- pivcac.HOMEURL.
Format the Certificate & Key
Once you generate the SSL certificate, it needs to be properly formatted into two files using a specific naming convention. The Virtual Appliance is configured to look specifically for these file names, ssl.crt and ssl.key and will not recognize certificates with other file names.
- ssl.crt — the base64-encoded X.509 certificate of the Virtual Appliance, followed by each base64-encoded X.509 certificate in the certificate chain (ending with the base64-encoded X.509 certificate of the root CA).
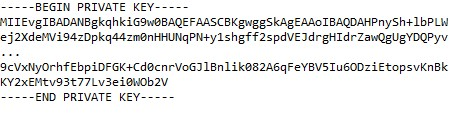
- ssl.key — the PKCS8 non-encrypted private key.
- The required minimum signature algorithm is SHA 256.
You can upload these two files during the initial configuration or after by copying the files to the appliance-storage\certs folder of the shared storage volume.
Certificate Chain Example
Corresponding ssl.crt file:
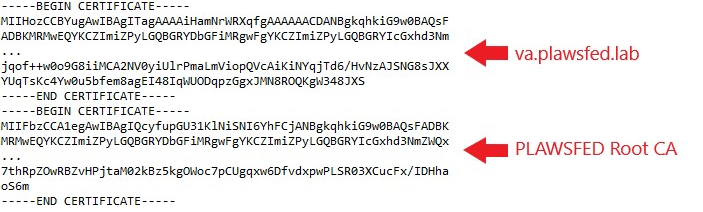
Corresponding ssl.key file:
The Virtual Appliance-Cert-Utility Tool
We provide the Virtual Appliance Cert-Utility tool to assist with configuring the Virtual Appliance certificates. The steps below cover how to use the utility tool if a PFX file is available for use, creating the CSR, and building out a full-chain certificate.
Method 1: Using a PFX File
This method covers converting a PKCS12 PFX certificate to Base64 encoded PEM files.
- Download the Virtual Appliance-CertUtil application.
- Unzip the archive file into its own folder.
- Copy your PFX file into the new folder. To simplify this process, rename the PFX file to ssl.pfx.
- Open up Command Prompt or PowerShell terminal.
- Use the change directory (cd) command to change the directory to where the archive contents have been dumped.
-
In the terminal window run the following command.
- Enter the input filename of the PKCS12 bundle (PFX) to convert. The default selection is the text inside the brackets. To accept the default suggestion, press the Enter key.
-
Enter the password of the PKCS12 bundle when prompted and press the Enter key to continue. The terminal does not display the password characters.
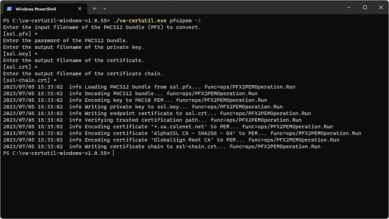
- Enter the output filename of the private key — press Enter to accept the default value, ssl.key.
- Enter the output filename of the certificate — press Enter to accept the default value, ssl.cert.
- Enter the output filename of the certificate chain — press Enter to accept the default value, ssl-chain.crt.

Move the Files
When the process completes, you will see the new files:
- ssl.key,
- ssl.crt,
- ssl-chain.crt.
- Rename ssl-chain.crt to ssl.crt.
- Place this file and the corresponding private key file (ssl.key) in the following shared drive location(\\IP-of-Virtual Appliance\appliance-storage\certs).
It may take the Virtual Appliance up to 10 minutes to recognize the new certificates. You may reboot the Virtual Appliance to speed this up.
Method 2: Manual CSR and Cert Publishing
This method creates the ssl.csr and ssl.key files needed for a Certificate Authority to publish the ssl.crt file.
- Download the Virtual Appliance-CertUtil application.
- Unzip the archive file into its own folder.
- Open up Command Prompt or PowerShell terminal.
- Use the change directory (cd) command to change the directory to the location where you saved the extracted files.
-
In the terminal window, run the following command.
-
With the interactive CSR tool open, generate a private key. Create the private key in the unencrypted PKCS8 format required for the Virtual Appliance.
- In the menu, the default selection is the text bracket on the left-hand side. For example, [Y]Press the Enter key to accept the value.
-
When entering information regarding Organization Unit (OU), locality, etc., enter one string per line. Enter a blank line to finish.
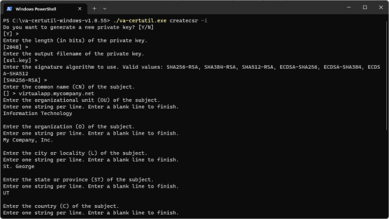
- To generate a new private key, press Enter to accept the [Y] (Yes) value.
- Enter the length (bits) of the private key. (2048 is the recommended minimum.)
- Enter the output filename of the private key. (This must be ssl.key)
- Enter the signature algorithm to use. (SHA256-RSA, SHA38-RSA, SHA512-RSA, ECDSA-SHA256,ECDSA-SHA384, ECDSA-SHA512)
- Enter the common name (CN) of the subject. (*.va.YOUR_URL)
- Enter the organizational unit (OU) of the subject.
- Enter the organization (O) of the subject.
- Enter the city or locality (L) of the subject.
- Enter the state or province (ST) of the subject.
- Enter the country (C) of the subject.
- Enter the DNS name of the subjectAlternativeName.
- Enter the IP Address of the subjectAlternativeName, if necessary. (You can leave it blank.)
- Enter the email address of the subjectAlternativeName.
- Enter the output filename of the CSR. (This must be ssl.csr)

Submit the Certificate
When the process completes, you'll see the following new files:
- ssl.key.
- ssl.csr.
Submit the ssl.csr file to your CA to publish back the required certificate. Ensure the private key is not exposed online or to unauthorized personnel.
Once the CA provides the certificate"
- Rename the file to ssl.crt.
- Place this file and the ssl.key file in the following Virtual Appliance shared drive location(\\IP-of-Virtual Appliance\appliance-storage\certs).
- See Format the Certificate & Key. If you need to compile your full chain certificate, reference Create a Full Chain Certificate.
It may take the Virtual Appliance up to 10 minutes to recognize the new certificates. You may reboot the Virtual Appliance to speed this up.
The following instructions walk you through creating a full-chain certificate using the ssl.crt and ssl.key files created in Method 2.
This method is for creating a full-chain certificate using the ssl.crt and ssl.key files created in Method 2.
- Download the Virtual Appliance-CertUtil application.
- Unzip the archive file into its own folder.
- Put your certificate file into the same folder. If your crt file is not already named ssl.crt, rename it during file placement.
- Open up Command Prompt or PowerShell terminal.
- Use the change directory (cd) command to change the directory to the location where you saved the extracted files.
-
In the terminal window, run the following command.
-
With the interactive utility open, complete the following. The default values are the text inside the brackets. To accept the default suggestion, press the Enter key.
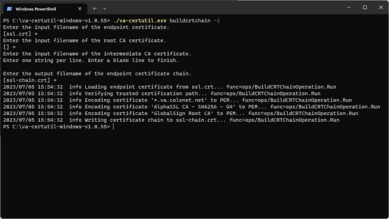
- Enter the filename of the endpoint certificate.
- Enter the input filename of the root CA certificate.
- Enter the input filename of the intermediate CA certificate. Enter one string per line. Enter a blank line to finish.
- Enter the output filename of the endpoint cerficate chain. Press Enter to accept the default value ssl-chain.crt.

Move the Files
When the process completes, you will see the new file, ssl-chain.crt, in the folder.
- Rename ssl-chain.crt to ssl.crt.
- Place this file and the corresponding private key file (ssl.key) in the following Virtual Appliance shared drive location(\\IP-of-Virtual Appliance\appliance-storage\certs).
It may take the Virtual Appliance up to 10 minutes to recognize the new certificates. You may reboot the Virtual Appliance to speed this up.
Alternative Methods (OpenSSL)
Here are additional methods for creating SSL certificates using OpenSSL. These options are for those not using the Virtual Appliance Cert-Utility tool outlined above.
Method 1: Submit an SSL CSR to PKI Team
Some organizations have a PKI team that generate SSL certificates and private keys without requiring a Certificate Signing Request (CSR). If you use that method, ensure the PKI team understands the requirements above and verifies the certificate details. If the PKI team generates a certificate in PKCS12 format (.pfx) it needs to be converted to PEM format.
The following OpenSSL commands convert PKCS12 to PEM format. Mac / Linux devices include OpenSSL by default, but Windows devices require installing Windows Subsystem Linux (WSL). If your Windows device does not support WSL, these packages are available. The Win64 or Win32 Light version works.
openssl pkcs12 -in va_cert.pfx -out ssl.crt -clcerts -nokeys
openssl pkcs12 -in va_cert.pfx -out ssl.key -nocerts -nodes
If the PKCS12 bundle was saved with a password, each of the preceding commands will prompt for that password.
Once you convert the PKCS12 certificate, continue to the Verify the SSL Certificate step below.
Method 2: Create / Submit an SSL CSR
1. Create the SSL Certificate Signing Request (CSR)
Generate a CSR using OpenSSL. Mac / Linux devices include OpenSSL by default, but Windows devices require installing Windows Subsystem Linux (WSL). If your Windows device does not support WSL, these packages are available. The Win64 or Win32 Light version works.
2. Create the OpenSSL Configuration File
Create a file called ssl.cnf with the following content, overriding countryName, stateOrPrivinceName, locatlityName, organizationName, commonName, DNS.1 and DNS.2 as required.
Override Specifics:
- stateOrProvinceName should be spelled out in full (i.e., Utah).
- localityName should not include punctuation.
- commonName should be the Virtual Appliance FQDN. For example, va.plawsfed.lab.
- DNS.1 should be theVirtual Appliance FQDN.
- DNS.2 should be the wildcard underneath the Virtual Appliance FQDN. For example *.va.plawsfed.lab.
ssl.cnf File Contents
[req]
default_bits = 2048
distinguished_name = req_distinguished_name
req_extensions = req_ext
prompt = no
[req_distinguished_name]
countryName = US
stateOrProvinceName = Utah
localityName = Saint George
organizationName = PrinterLogic
commonName = printerlogic.mycompany.com
[req_ext]
keyUsage = keyEncipherment, dataEncipherment
extendedKeyUsage = serverAuth
subjectAltName = @alt_names
[alt_names]
DNS.1 = printerlogic.mycompany.com
DNS.2 = *.printerlogic.mycompany.com3. Generate the Private Key and CSR
Using Command Prompt or Terminal, run the following commands. For Windows devices, include the path to openssl.exe in the PATH environment variable, OR type the fully qualified path to openssl.exe.
This command reads the ssl.cnf configuration file and generates a new 2048-bit RSA private key (stored in ssl.key) and the CSR (stored in ssl.csr). To generate a new private key and the CSR:
openssl req -out ssl.csr -newkey rsa:2048 -nodes -keyout ssl.key -config ssl.cnfTo validate the parameters of the CSR, run the following command.
openssl req -text -noout -verify -in ssl.csrSample output:

4. Submit the CSR to a Certification Authority for Signature
The next step is submitting the ssl.csr file to a Certification Authority (CA). If your organization includes a PKI team or has an existing process for certificate signing, use that method. If submitting the CSR directly to a Windows Certificate Authority, determine which certificate template you need. A Windows CA defines a WebServer certificate template by default, but often, this is duplicated and customized.
-
Upload the CSR to the CA and run the following in an elevated command prompt. In the command,
C:\certs\va.plawsfed.labis the example folder location.Copy Codecertreq -attrib "CertificateTemplate:WebServer" -submit C:\certs\va.plawsfed.lab\ssl.csrInclude the certificate name in the command if using a custom WebServer certificate template.
Copy Codecertreq -attrib "CertificateTemplate:PLAWSFEDWebServer" -submit C:\certs\va.plawsfed.lab\ssl.csr -
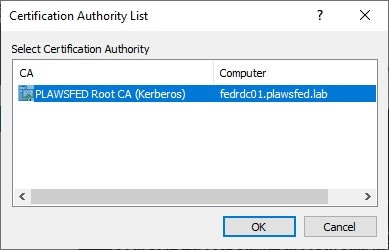
Select the online certification authority handling the request, then select OK.

-
Save the generated certificate to a file called ssl.crt, then select OK.
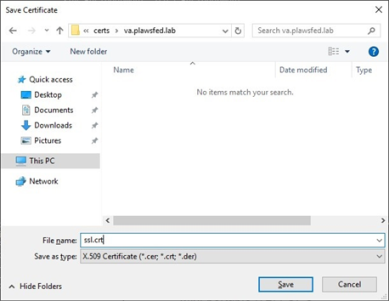
-
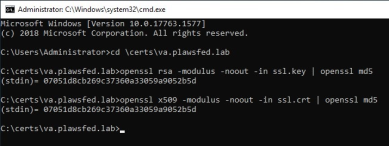
Verify the resulting ssl.crt file matches the private key generated earlier.
Copy Codeopenssl rsa -modulus -noout -in ssl.key | openssl md5
openssl x509 -modulus -noout -in ssl.crt | openssl md5 -
Both MD5 hashes should be identical.


The following instructions are for checking the certificate before adding it to the shared drive.
Prepare SSL Certificate for Upload
-
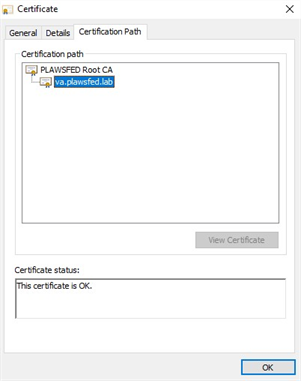
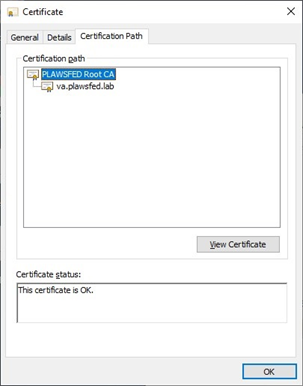
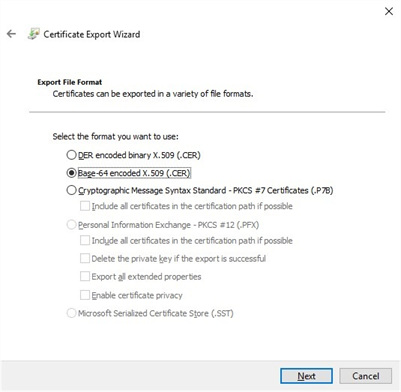
Open the ssl.crt file and select the Certification Path tab.
- Working from the bottom of the certificate chain to the top, select each certificate above the Virtual Appliance certificate and perform the following steps.
Select the View Certificate button.
Select the Details tab then select Copy to File.

On the Export File Format section of the wizard, select Base-64 encoded X.509 (.CER), then select Next.

- Enter the path/filename to store the certificate then select Save Make sure to give this file an appropriate name, so that you can reference it properly later.
- Select Finish.


Append All Certificates
Once all certificates in the chain have been exported to file, return to the command prompt and append all CA certificates to ssl.crt. Follow these guidelines to create a properly formatted ssl.crt file:
- The order of the certificates in the ssl.crt file is crucial. The file should start with the endpoint certificate (the Virtual Appliance certificate), then working up the certificate chain, any intermediate certificates, followed lastly by the root certificate.
- Each certificate in the file should begin with the certificate header on a line by itself. -----BEGIN CERTIFICATE-----
- Have a base-64 encoded X.509 certificate payload.
- End with the certificate footer on a line by itself. -----END CERTIFICATE-----
Strip Informational Text
Strip any other informational text. For example, if the Virtual Appliance certificate chain looks like this:
- Root CA (saved as root.cer)
- Intermediate CA 1 (saved as int1.cer)
- Intermediate CA 2 (saved as int2.cer)
- Virtual Appliance Certificate
- Intermediate CA 2 (saved as int2.cer)
- Intermediate CA 1 (saved as int1.cer)
Do the following:
-
Use the following commands to properly build the certificate chain into the ssl.crt file:
Copy CodeMac/Linux Commands
cat int2.cer | tee -a ssl.crt
cat int1.cer | tee -a ssl.crt
cat root.cer | tee -a ssl.crt -
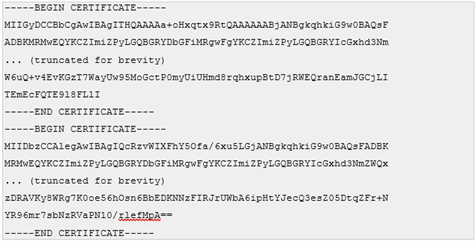
Open the ssl.crt file in a text editor and validate that all certificates are present and follow the guidelines above. See the examples below.
This is an example of a properly formatted Virtual Appliance certificate:
This is an example of an INVALID Virtual Appliance certificate (the END CERTIFICATE footer and BEGIN CERTIFICATE header appear together on the same line):
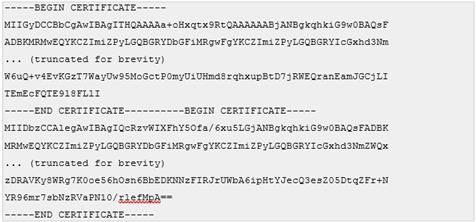
To correct this, simply add a new line between the -----END CERTIFICATE----- footer and the -----BEGIN CERTIFICATE----- header (there are always 5 dashes or hyphens before and after the words).
Resources & Information
The Virtual Appliance has specific DNS requirements that correspond directly to the SSL Certificate. The certificate must have SubjectAlternativeName entries for both the FQDN and the wildcard underneath. (*.FQDN). The corresponding CNAME records (*.FQDN) must exist and point back to the FQDN. The entry must be in place for the microservice communication within the Virtual Appliance.
Example: With an FQDN of va.plawsfed.lab, a corresponding CNAME record must exist for *.va.plawsfed.lab that points back to va.plawsfed.lab.
- SSL Certificate Installation on the Virtual Appliance.
- How to get a working Certificate Template in Windows Server.
Troubleshooting Help
-
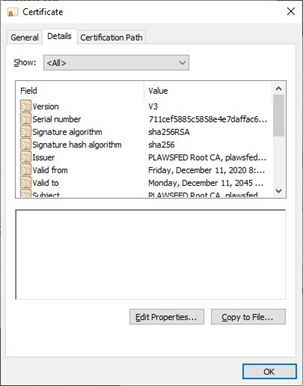
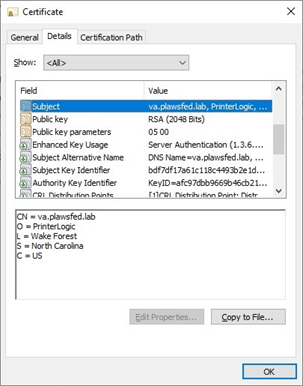
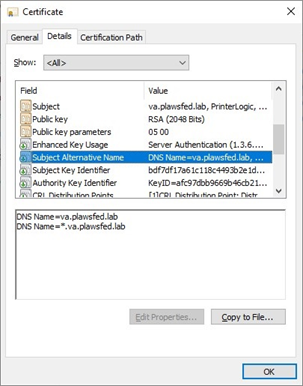
On a Windows system, double-click the ssl.crt file to open it in the certificate viewer and select the Details tab.
-
Verify the Subject details

-
Verifty the SubjectAlternativeName properties.

-
-
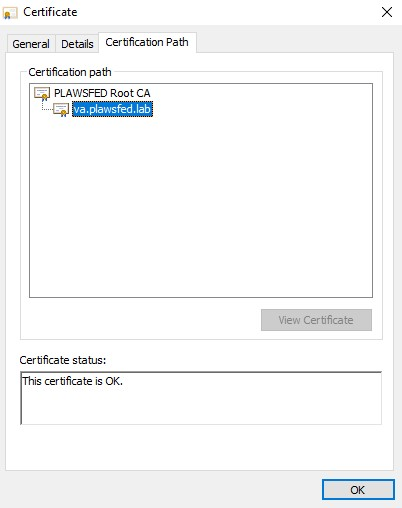
Select the Certification Path tab. If the certificate status gives a message other than: This certificate is OK, ensure that the Root CA certificate was added to the local computer's Trusted Root Certification Authorities store.

You must add the Root CA certificate to the Trusted Root Certification Authorities store on any workstation, computer, tablet, or printer that communicates with the Virtual Appliance.

If the Root CA is an enterprise root certificate authority that is integrated with Active Directory, the Root CA cert is automatically propagated throughout the Windows Active Directory infrastructure, so all domain-joined Windows workstations will already trust the enterprise root CA.
If the Root CA is a publicly trusted Root CA, MOST devices will already trust it, but it is always better to validate that the certificate is trusted on all devices that connect to the Virtual Appliance.
-
New Mobile App Release
iOS: November 11th, 2024 -
Released: November 11th, 2024
-
Released: October 22nd, 2024
Updated Application Version Included