Last updated: August 13, 2024
New Install: Virtual Machine Manager
This topic provides the requirements and steps to create your Virtual Appliance using a qcow2 file. While the steps are specific to Virtual Machine Manager, they provide a guideline for similar hypervisors.
Minimum System Requirements
Resource usage may increase depending on configured features and user count. Use the recommendations below when creating your Virtual Appliance, but continue to monitor the CPU and RAM utilization and allocate additional resources as needed.
- Four 3.5-4.0 GHz processors. Add two 3.5 GHz processors for each additional 15,000 users.
- 16 GB RAM for up to 15,000 users.
- Add 2 CPUs / 8GB RAM for each additional 15,000 users.
- Add a minimum of 2 CPUs and 4GB RAM if using the Internal Service Client.
- Add 2 CPUs and 4GB RAM per 500 CPA / Simple Badge Release installations.
- 160GB free hard disk space for the host disk.
- There should be 50GB of free hard disk space on the persistent storage disk (add 4GB for every 100 printers).
- NT LAN Manager (NTLM) v2 must connect to the Virtual Appliance's appliance-storage shared folder.
Prerequisites
Installation File
Navigate to the Virtual Appliance Release Notes and download the latest qcow2 file from the Host tab. The file should be placed in a location accessible by the device managing your virtual machines.
DNS Configured
- Identify a FQDN to use for the Virtual Appliance. (e.g., printerlogic.mycompany.com).
- Create an A record in DNS (i.e., printerlogic.mycompany.com) that points to the IP address of the Virtual Appliance.
- Create a CNAME record in DNS (i.e., *.printerlogic.mycompany.com) that points to the A record above (i.e., printerlogic.mycompany.com).
SSL Certificates
Create the Secure Socket Layer (SSL) certificate. The certificate and key require a specific naming convention and format. Reference Virtual Appliance SSL Certificates for detailed information, steps, and tools to guide you through the certificate creation process.
Ports
The following ports must be opened for database access on the device managing your virtual machines.
- TCP 3306 — MySQL.
- TCP 80 — HTTP.
- TCP 443 — HTTPS.
- TCP 8000 — Configuration Application Programming Interface (API).
- TCP 8080 — Configuration User Interface (UI).
- TCP 445 — Server Message Block (SMB).
Key Points
Headless Server Instances — If you are running a Linux KVM headless server, be aware that you must be able to see or access the Virtual Appliance Host UI. By design, the host is not allowed remote command line / SSH access. Access the console directly to manage network changes, such as setting a static IP.
QEMU (Quick Emulator) — The Virtual Appliance Host does not include a qemu-guest-agent package, so any QEMU Agent options for virtual machine settings should be disabled. The hypervisor uses ACPI calls to turn the virtual machine on, off, and reboot.
Create Virtual Appliance
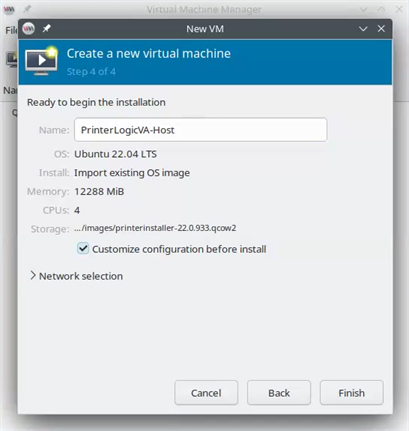
1. Create Virtual Machine
- Open your Virtual Machine Manager and log in.
- Select the Create a new virtual machine button.
- In the Create... modal select the Import existing disk image option.
- In Architecture options verify x86_64 > is selected, then select Forward in the modal.
- Use the Browse button to locate the downloaded qcow2 file.
- If needed, use the plus icon in the lower left to change the directory.
- In the Choose the operating system you are installing section, select the Ubuntu 22.04 LTS option, then select Forward in the modal.
- Define the Memory and CPU allotments based on the Minimum System Requirements noted above, then select Forward in the modal.
- Give the machine a unique name.
- Check the box for Customize configuration before install.
- Select Finish.
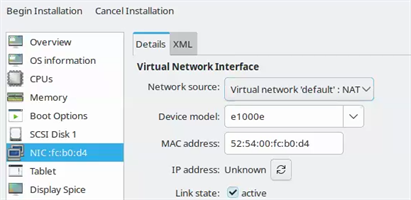
2. Configure VM Settings
- In the Details modal, select VirtIO Disk 1.
- Select SCSI in the Disk bus dropdown.
- Select Apply.
- Select the NIC option in the left-side menu.
- In the Device model dropdown, select e1000e.
- Configure other fields as necessary for your network.
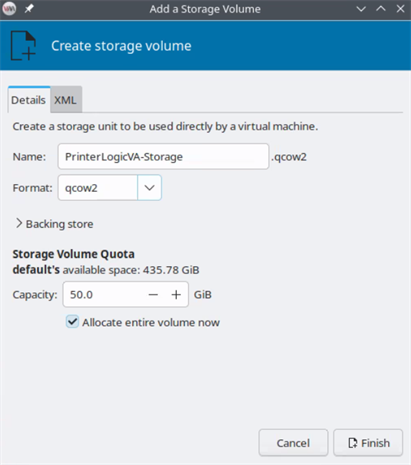
3. Add Secondary Drive
- Select Add Hardware in the lower-left.
- In the Add New Virtual Hardware modal, select the Storage option.
- Choose the Select or create custom storage option, then select the Manage... button.
- Use the plus icon to create a new volume.
- Give it a unique name.
- Leave the format as qcow2.
- Ensure the capacity meets the Minimum System Requirements noted above.
- Check the box for Allocate entire volume now.
- Select Finish.
- After the volume creates, select it from the list then select Choose Volume.
- Select Finish in the modal.
- Select Boot Options from the left-side menu.
- Confirm the Boot device order reflects the Host drive (First drive) at the top.
- Select Begin Installation in the upper-left.
4. Configure Network Settings
Once the virtual machine spins up, use the Web Console to configure the network settings.
The Virtual Appliance starts as a DHCP client, requiring TCP / IP settings to be configured via DHCP Reservation. Alternatively, you can use the steps below to configure a static IP and adjust the private IP range used by the Virtual Appliance services to avoid conflict with existing subnets in the environment.
- In the hypervisor, open the Web Console to access the Virtual Appliance Linux terminal interface.
-
Log in to the terminal using the network user credentials supplied in the terminal banner.
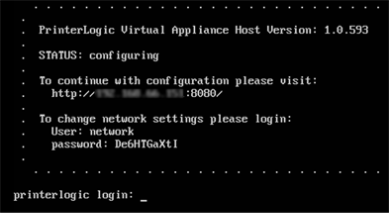
- Enter "Y" to change the network settings.
- Enter "Y" to change the network mode.
-
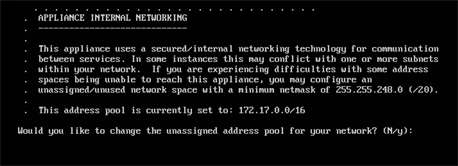
Enter the TCP / IP settings.
The image below is just an example. Ensure you use the settings specific to your network.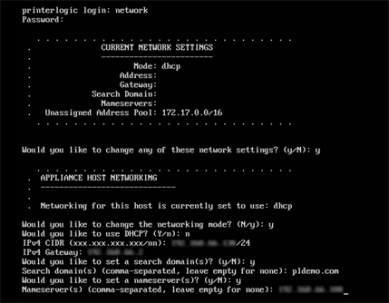
-
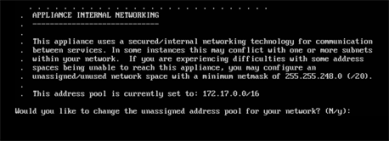
If the existing address pool does not conflict with any subnets in the environment, enter “N”. Otherwise, enter “Y” to set a different address range.
-
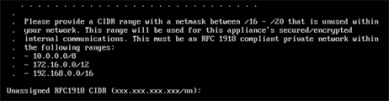
Configure the address range. If you need to adjust IP addresses, be sure to read and understand the network range options you are presented with. Any range used must have a netmask < 20.
- Press any key to exit.


5. Virtual Appliance Wizard
The steps below are for creating new Virtual Appliance instances. If you are upgrading from an older host build, reference Host Upgrade.
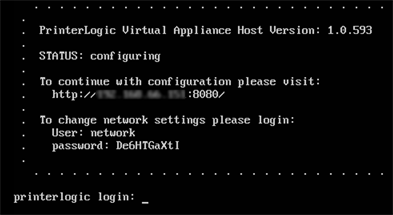
- In your preferred, supported browser, paste or enter the Virtual Appliance IP Address including port 8080. Example: 192.168.10.20:8080
- This IP Address is also located at the top of the Web Console seen in the previous steps.
-
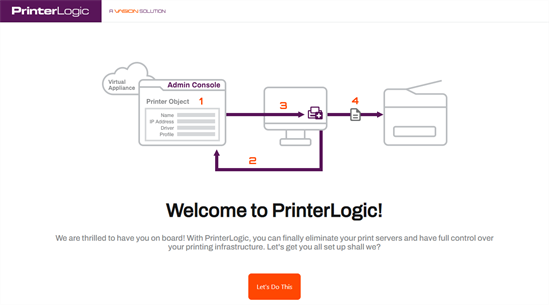
Once the setup wizard displays, select Let's Do This.

-
Select the Storage Type drop-down and select VM-Attached Virtual Disk.

- Select Format Attached Storage. When the attached disk is ready, select Continue.
-
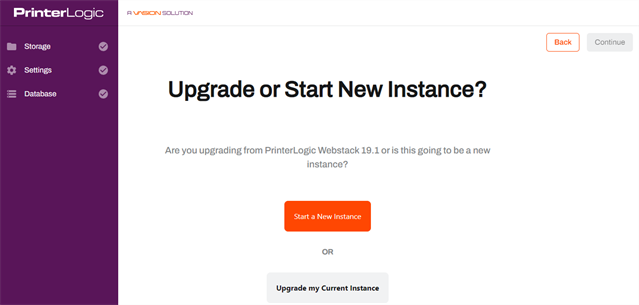
Select Start a New Instance.

-
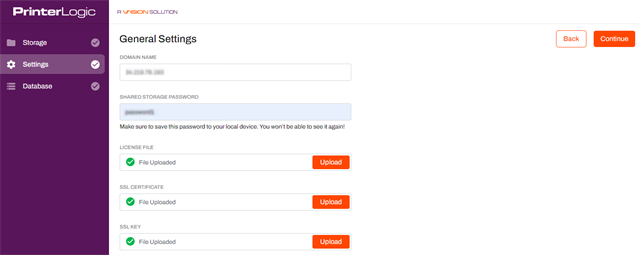
On the General Settings tab:
- Add the domain name.
- Upload your license file.
- Upload your SSL certificate, and SSL key.
Document and save the Shared Storage Password. It is only available during the web portion of the new Host configuration steps.
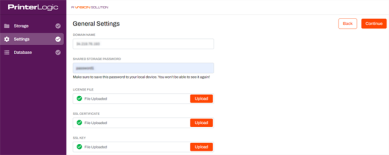
- Select Continue when finished.
-
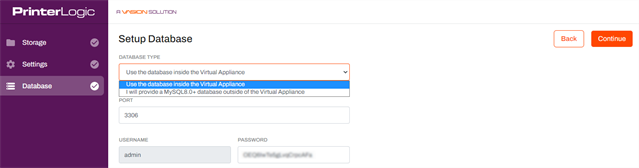
On the Setup Database tab make adjustments for the database type and password if needed, then select Continue. The internal database option is selected by default.

-
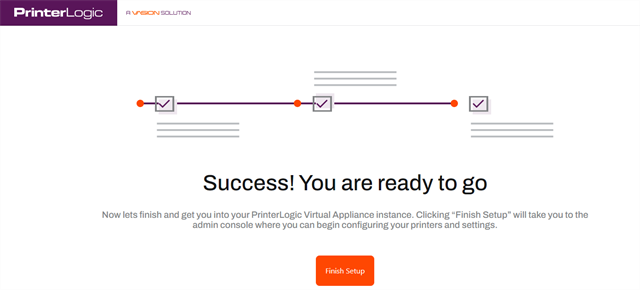
Select Finish Setup.
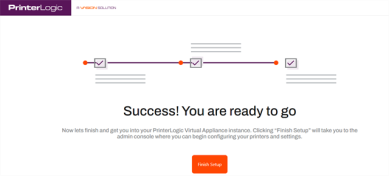
Please do not refresh the page during the installation procedure.
- A new "Thank You" browser window will open when the installation is complete. This window can be closed as needed.

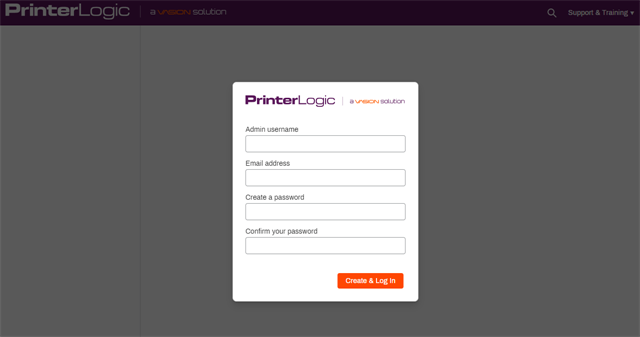
6. Initial Access & Root Account
After the installation completes, the Admin Console opens automatically in the browser. A root account user must be created to access the instance.
- When the Admin Console login screen displays, enter the desired credentials for the root account.
- Once logged in, review and accept the License Agreement.
- At this point the instance creation and initial access are complete, and you are ready to set up printers, folders, and other features.
-
Released: November 21st, 2024
Updated Application Version Included
-
New Mobile App Release
iOS: November 11th, 2024 -
Released: November 11th, 2024