Last updated: August 13, 2024
Host Upgrade
This document provides the steps to upgrade the Host for your Virtual Appliance. These steps are general directions and not specific to any hypervisor.
Minimum System Requirements
Resource usage may increase depending on configured features and user count. Use the recommendations below when creating your Virtual Appliance, but continue to monitor the CPU and RAM utilization and allocate additional resources as needed.
- Four 3.5-4.0 GHz processors. Add two 3.5 GHz processors for each additional 15,000 users.
- 16 GB RAM for up to 15,000 users.
- Add 2 CPUs / 8GB RAM for each additional 15,000 users.
- Add a minimum of 2 CPUs and 4GB RAM if using the Internal Service Client.
- Add 2 CPUs and 4GB RAM per 500 CPA / Simple Badge Release installations.
- 160GB free hard disk space for the host disk.
- There should be 50GB of free hard disk space on the persistent storage disk (add 4GB for every 100 printers).
- NT LAN Manager (NTLM) v2 must connect to the Virtual Appliance's appliance-storage shared folder.
Application & Host Compatibility Information (VMDK/VHD/OVA)
- Customers on host build 1.0.756 or older, please contact our support team to upgrade to the latest version.
- Customers on host build 22.0.862 and earlier must do an incremental upgrade to 22.0.913 before upgrading to the latest version.
- Customers on host build 22.0.893 and newer can upgrade right to the latest version.
|
Application |
Host |
Release Date |
Minimum Supported Host |
MySQL Version Compatibility |
Included Client Versions |
|---|---|---|---|---|---|
|
20.0.2702 |
22.0.1026 |
November 21, 2024 |
22.0.893 |
8.0.35 / 8.0.37 |
Windows: 25.0.0.1074 |
|
20.0.2614 |
22.0.1002 |
October 22, 2024 |
22.0.893 |
8.0.35 / 8.0.37 |
Windows: 25.0.0.1071 |
|
20.0.2592 |
22.0.951 |
October 2, 2024 |
22.0.893 |
8.0.35 / 8.0.37 |
Windows: 25.0.0.1071 |
|
20.0.2489 |
22.0.951 |
August 19, 2024 |
22.0.893 |
8.0.35 / 8.0.37 |
Windows: 25.0.0.1034 |
|
20.0.2368 |
22.0.933 |
May 30, 2024 |
22.0.818 |
8.0.30 / 8.0.35 |
Windows: 25.0.0.1025 |
|
20.0.2253 |
22.0.913 |
February 28, 2024 |
22.0.818 |
8.0.26 / 8.0.30 |
Windows: 25.0.0.1000 |
|
20.0.2140 |
22.0.893 |
December 1, 2023 |
22.0.818 |
8.0.26 / 8.0.30 |
Windows: 25.0.0.973 |
|
20.0.2014 |
22.0.862 |
September 28, 2023 |
1.0.757 |
8.0.26 / 8.0.30 |
Windows: 25.0.0.939 |
|
20.0.1923 |
22.0.843 |
June 23, 2023 |
1.0.750 |
8.0.26 / 8.0.30 |
Windows: 25.0.0.917 |
|
20.0.1766 |
22.0.818 |
March 17, 2023 |
1.0.742 |
8.0.26 / 8.0.30 |
Windows: 25.0.0.864 |
|
20.0.1708 |
22.0.818 |
January 20, 2023 |
1.0.674 |
8.0.26 / 8.0.30 |
Windows: 25.0.0.802 |
|
20.0.1682 |
22.0.818 |
January 10, 2023 |
1.0.674 |
8.0.26 / 8.0.30 |
Windows: 25.0.0.791 |
|
20.0.1582 |
1.0.757 |
September 29, 2022 |
1.0.674 |
|
Windows: 25.0.0.734 |
|
20.0.1533 |
1.0.757 |
August 18, 2022 |
1.0.674 |
|
Windows: 25.0.0.693 |
|
20.0.1510 |
1.0.757 |
July 29, 2022 |
1.0.674 |
|
Windows: 25.0.0.673 |
|
20.0.1480 |
1.0.756 |
June 27, 2022 |
1.0.674 |
|
Windows: 25.0.0.658 |
|
20.0.1442 |
1.0.750 |
May 18, 2022 |
1.0.674 |
|
Windows: 25.0.0.639 |
Application & Host Compatibility Information (AMI)
|
AMI Version |
Application Version |
Release Date |
Included Client Versions |
|---|---|---|---|
|
1.0.712 |
20.0.2702 |
November 21, 2024 |
Windows: 25.0.0.1074 |
|
1.0.671 |
20.0.2614 |
October 22, 2024 |
Windows: 25.0.0.1071 |
|
1.0.587 |
20.0.2489 |
August 19, 2024 |
Windows: 25.0.0.1034 |
|
1.0.537 |
20.0.2368 |
May 30, 2024 |
Windows: 25.0.0.1025 |
|
1.0.498 |
20.0.2253 |
February 28, 2024 |
Windows: 25.0.0.1000 |
|
1.0.466 |
20.0.2140 |
December 1, 2023 |
Windows: 25.0.0.973 |
|
1.0.433 |
20.0.2014 |
September 28, 2023 |
Windows: 25.0.0.939 |
|
1.0.409 |
20.0.1923 |
June 23, 2023 |
Windows: 25.0.0.917 |
|
1.0.368 |
20.0.1766 |
March 17, 2023 |
Windows: 25.0.0.864 |
|
1.0.350 |
20.0.1708 |
January 20, 2023 |
Windows: 25.0.0.802 |
|
1.0.276 |
20.0.1533 |
August 18, 2022 |
Windows: 25.0.0.693 |
|
1.0.265 |
20.0.1510 |
July 29, 2022 |
Windows: 25.0.0.673 |
Backup the Virtual Appliance
Before upgrading the Virtual Appliance, it is crucial to back up the database. Failure to do so can result in irreversible data loss. For more information on comprehensive backup guidelines, reference Database Backup Recommendations.
Host Build 1.0.757 and Earlier
For customers on Host build 1.0.757 and earlier and using the Virtual Appliance internal MySQL server, you are required to run the following query on the server before upgrading.
SET PERSIST innodb_fast_shutdown=0;
Access the Virtual Appliance Database to Run Query
Here is a quick overview of the instructions on how to access the Virtual Appliance. You can find more detailed instructions in the PrinterLogic Knowledge Base.
- Download and install a MySQL editor of your choice (e.g. MySQL, MySQL Workbench, HeidiSQL, PHPMyAdmin).
- Run the MySQL Editor.
- Set the host to the IP address of your Virtual Appliance.
- Set the user / username to admin.
-
Set the password to the password that was designated during the Virtual Appliance configuration.
Find the database password in the
secrets.envfile on the share drive. It is listed as theDB_PASSWORDparameter.
- Customers on host build 1.0.756 or older, please contact our support team to upgrade to the latest version.
- Customers on host build 22.0.862 and earlier must do an incremental upgrade to 22.0.913 before upgrading to the latest version.
- Customers on host build 22.0.893 and newer can upgrade right to the latest version.
Host Upgrade
1. Create New Virtual Appliance
- Download the latest host upgrade file for your hypervisor. Access the latest release files from the Current Downloads topic.
- Gracefully shut down the Virtual Appliance Guest operating system (OS).
- Run a backup of the Virtual Machine.
-
In the hypervisor console, make a clone of the persistent storage disk containing your Virtual Appliance data.
This is generally the second disk created when spinning up the Virtual Appliance.
- DO NOT delete the disk from storage.
- Note the name so you can attach the clone to the new host.
- Alternatively, you may detach the disk from the virtual machine (if it does not contain snapshots) and attach it to the new virtual machine, but we don't recommend this method.
- Using the file downloaded in Step 1, create a new Virtual Appliance that meets the minimum requirements above, but do not boot it up.
- Attach the cloned disk to the new Virtual Appliance.
- If you detached the persistent storage disk rather than cloning it, attach it to the new Virtual Appliance.
- Start the Virtual Appliance Guest OS.
2. Configure Network Settings
When upgrading the Host version, previous network settings do not carry over. The Virtual Appliance starts as a DHCP client, requiring configuration of TCP / IP settings via DHCP Reservation. Alternatively, you can use the steps below to configure a static IP and adjust the private IP range used by the Virtual Appliance services to avoid conflict with existing subnets in the environment.
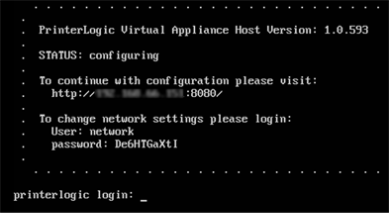
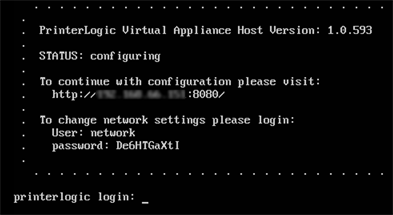
- In the hypervisor, open the Web Console to access the Virtual Appliance Linux terminal interface.
-
Log in to the terminal using the network user credentials supplied in the terminal banner.
- Enter
Yto change the network settings. - Enter
Yto change the network mode. -
Enter the TCP / IP settings.
The image below is just an example. Ensure you use the settings specific to your network.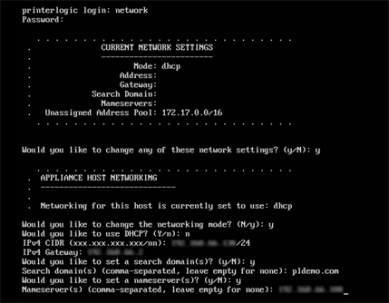
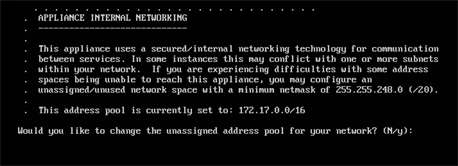
-
If the existing address pool does not conflict with any subnets in the environment, enter
N. Otherwise, enterYto set a different address range.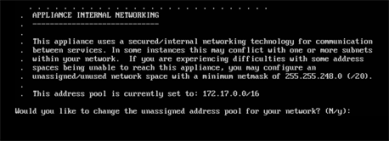
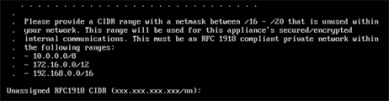
-
Configure the address range. If you need to adjust IP addresses, be sure to read and understand the network range options presented. Any range used must have a netmask < 20.
- Press any key to exit.
- In a web browser, navigate to
http://Your_Virtual_Appliance_IP:8080, adjustingYour_Virtual_Appliance_IPwith the actual IP Address. -
Complete the web setup wizard ensuring that you select the option to keep settings — Do not format the drive.
Document and save the Shared Storage password. It is only available during the web portion of the new Host configuration steps.


Once the setup is finished, you can now log into your upgraded Virtual Appliance.
-
Released: November 21st, 2024
Updated Application Version Included
-
New Mobile App Release
iOS: November 11th, 2024 -
Released: November 11th, 2024