Last updated: August 13, 2024
Install the Client & Web Extension
The Virtual Appliance Client is a software agent deployed to end-user Windows, Macintosh, or Linux workstations. The Client runs in the background as a service. For more details, see Virtual Appliance Client.
The browser extension ensures proper communication between the browser and your Virtual Appliance instance An instance is a collection of services and service groups that is associated with a customer. A customer's instance is created from an application template and is then deployed to a cloud or virtual server.. If you're on a Chromebook, you always need the ChromeOS extension.
Client workstation installation requires an operating system with a minimum of 100MB of free hard disk space. Print drivers may require additional space.
The instructions included in this section are for installing the web browser and the Client on your workstation to begin setting up your instance.
For more detailed instructions on how to deploy and manage the Client to the rest of the workstations reference Deploying the Client.
OS Installation Instructions
Windows devices using ARM processors are not currently supported for Admin Console machines and end user workstations.
- Windows
- macOS
- ChromeOS
- Ubuntu Linux
- Red Hat
There are several different methods to install the Virtual Appliance Client on your device. The steps below guide you through the process from the Admin Console. Alternatively, you may visit your Self-service Portal URL and follow the prompts to install the extension, then download and install the Client.
1. Generate Authorization Code
Installed Clients must be authorized to communicate with your Virtual Appliance instance using an authorization code. You may use an existing code or generate a new one.
See Device Authorization to learn more.
- Open a web browser and sign in to the Admin Console.
- Navigate to Tools
 Tokens Authorized Devices or Tools Authorized Devices depending on your permissions.
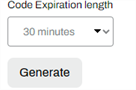
 - Use the Code Expiration length drop-down to select the expiration time.
-
Select Generate.

2. Download the Client
For these steps use the Windows Client MSI file.
- In the Admin Console, navigate to Tools
 Settings Client.
 - Scroll to the Deployable Client Packages section.
-
Select the file type button(s) for the desired package.


3. Install the Client
- After downloading the file, open a terminal window and navigate to the downloaded file location.
-
Run the following command.
Copy Codemsiexec /i PrinterInstallerClient.msi /qn HOMEURL=https://<HOME_URL_HERE> AUTHORIZATION_CODE=<AUTH_CODE_HERE>Replace
<HOME_URL_HERE>with your instance's URL and replace<AUTH_CODE_HERE>with your authorization code. - Once the installation completes, use the system tray icon (if enabled) or manually visit your Self-service Portal URL to verify the Client is installed and authorized.
- To manually reach your Self-service Portal URL, enter it or navigate to the Admin Console and select Tools PrinterLogic Portal...
- To manually reach your Self-service Portal URL, enter it or navigate to the Admin Console and select Tools
General Commands & Overrides
You can add the following parameter to control whether or not to install the PrinterLogic Extension with the Client. The options are:
NOEXTENSION=0— this parameter overrides any previous setting and includes the extension.NOEXTENSION=1— this parameter overrides any previous setting and excludes the extension.
By default, without the Extension parameter, the command includes the Client extension.
On workstations where the Client has been previously installed, without the Extension parameter, the command performs the same action as the last time the installer / uninstaller ran or whatever is already in the registry overrides.
Reference Client Commands and Override Options for Windows for scripts and variables to further adjust the Client to better suit your environment.
There are several different methods to install the Virtual Appliance Client on your device. The steps below guide you through the process from the Admin Console. Alternatively, you may visit your Self-service Portal URL and follow the prompts to install the extension, then download and install the Client.
1. Generate Authorization Code
Installed Clients must be authorized to communicate with your Virtual Appliance instance using an authorization code. You may use an existing code or generate a new one.
See Device Authorization to learn more.
- Open a web browser and sign in to the Admin Console.
- Navigate to Tools Tokens Authorized Devices or Tools Authorized Devices depending on your permissions.
- Use the Code Expiration length drop-down to select the expiration time.
-
Select Generate.
2. Download the Client
- In the Admin Console, navigate to Tools Settings Client.
- Scroll to the Deployable Client Packages section.
-
Select the file type button(s) for the desired package.
- Save the .pkg file in the
/tmpfile directory.
OR you may use this command to download the file and place it in the /tmp file directory.
curl -o /tmp/PrinterInstallerClientSetup.pkg https://<HOME_URL_HERE>/client/setup/PrinterInstallerClientSetup.pkgReplace <HOME_URL_HERE> with your instance URL.
3. Install the Client
- After downloading the file, open a terminal window and navigate to the downloaded file location.
-
Run the following command.
Replace
<HOME_URL_HERE>with your instance's URL and replace<AUTH_CODE_HERE>with your authorization code. - Once the installation completes, use the Status menu icon (if enabled) or manually visit your Self-service Portal URL to verify the Client is installed and authorized.
- To manually reach your Self-service Portal URL, enter it or navigate to the Admin Console and select Tools PrinterLogic Portal...
- To manually reach your Self-service Portal URL, enter it or navigate to the Admin Console and select Tools
Initialize the Safari Extension
If you are using the Safari browser for macOS, the browser extension must be enabled using the steps below before visiting the Self-service Portal.
-
Run the following command to initialize the PrinterLogic extension, then press [Enter] on your keyboard:
Copy Codeopen -gn /opt/PrinterInstallerClient/service_interface/PrinterInstallerClient.app
- Re-open Safari.
-
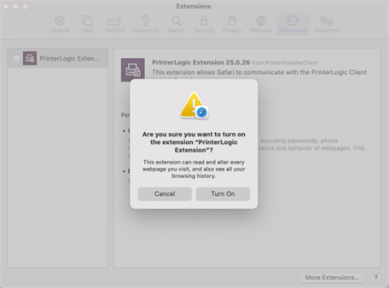
Open the Safari Settings.

-
Select the PrinterLogic Extension, and Turn On.
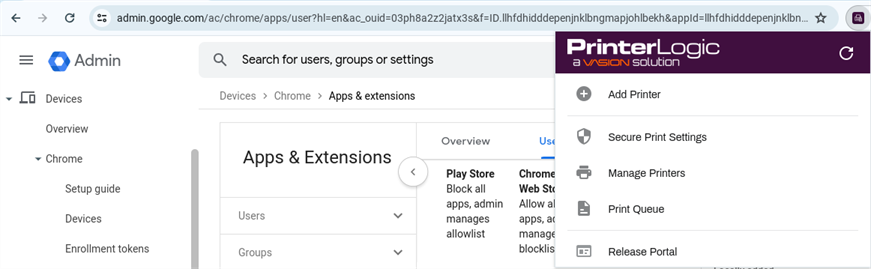
- In the web browser where you're signed into the Admin Console, navigate to Tools PrinterLogic Portal...
- When prompted, log in to your Self-service Portal to confirm the Client and extension are installed and enabled.


The browser extension only ensures full functionality of Virtual Appliance while using the browser. Clicking on the extension doesn't provide any additional options. Virtual Appliance features are only available through the Client in the Status menu.

General Commands & Overrides
Reference Client Commands and Override Options for Mac / Linux for scripts and variables to further adjust the Client to better suite your environment.
To install the Virtual Appliance Client the following is required:
- A Google Administrator account for a managed service.
- A Virtual Appliance authorization code.
- Install the ChromeOS Client.
The ChromeOS Client is only compatible with Google Identity service. It will not work with other IdPs.
1. Generate Authorization Code
Installed Clients must be authorized to communicate with your Virtual Appliance instance using an authorization code. You may use an existing code or generate a new one.
See Device Authorization to learn more.
- Open a web browser and sign in to the Admin Console.
- Navigate to Tools Tokens Authorized Devices or Tools Authorized Devices depending on your permissions.
- Use the Code Expiration length drop-down to select the expiration time.
-
Select Generate.
2. Create the Client
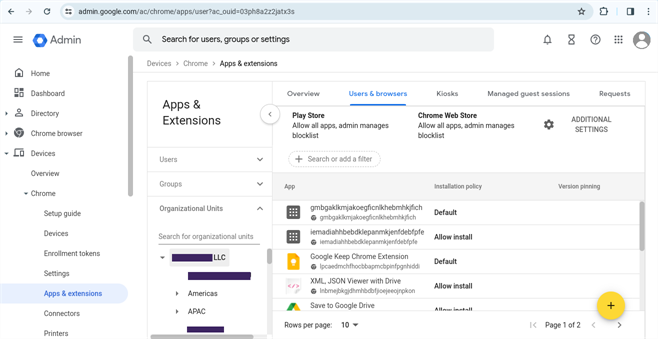
- Open a browser.
- Navigate to admin.google.com and sign in with an administrator account.
- From the side navigation select Devices Chrome Apps & Extensions.
-
Select Users & Browsers from the Apps & Extensions header.

- Select the Add button
 on the bottom-right corner.
 -
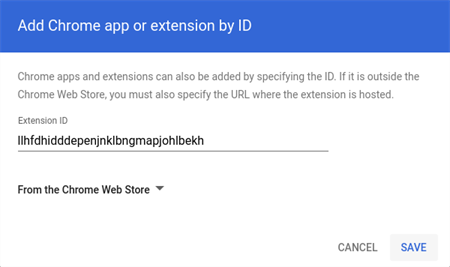
Select the second button from the top, Add Chrome app or extension by ID.
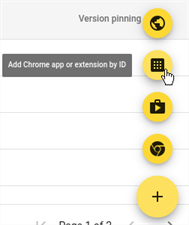
- Copy the following code and paste it in the Add Chrome app or extension by ID modal.
-
Select Save
Copy Codellhfdhidddepenjnklbngmapjohlbekh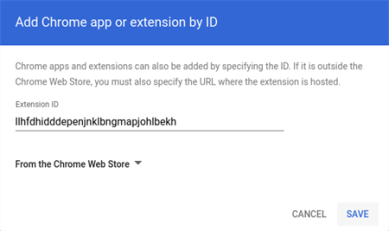

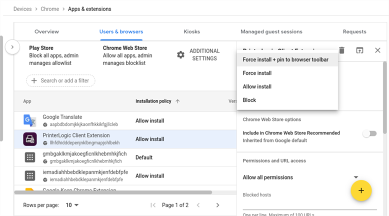
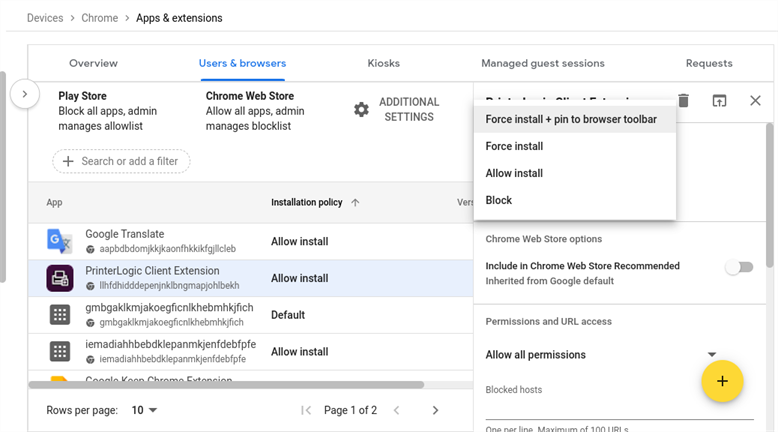
3. Configure the Client
- Select the PrinterLogic Client Extension.
-
On the right-side panel select the Allow Install drop-down and choose Force install + pin to browser toolbar.
-
Copy the following code:
Copy Code{
"pi url": {"Value":"<ENTER_URL_HERE>"},
"auth_code": {"Value":"ENTER_CODE HERE"}
} - On the right-side panel scroll down to the Policy for extensions section and paste the code. By default the section displays Enter a JSON value.
-
Once you paste the code, you can edit it directly on the browser. Replace
<ENTER_URL_HERE>with your instance URL and replaceENTER_CODE HEREwith your authorization code.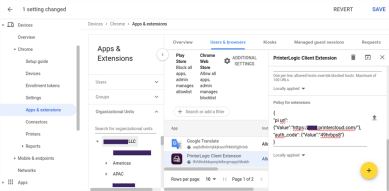
- Select Save from the top-right.

The ChromeOS client includes features designed specifically for ChromeOS; for example, spooling print jobs. The extension displays once the policy updates on the device.
We recommend the latest version of CUPS printer to successfully install the Client.
1. Generate Authorization Code
Installed Clients must be authorized to communicate with your Virtual Appliance instance using an authorization code. You may use an existing code or generate a new one.
See Device Authorization to learn more.
- Open a web browser and sign in to the Admin Console.
- Navigate to Tools Tokens Authorized Devices or Tools Authorized Devices depending on your permissions.
- Use the Code Expiration length drop-down to select the expiration time.
-
Select Generate.
2. Installation Instructions
Ubuntu LTS 18
Ubuntu/CUPS Update Commands (Optional)
sudo apt update
apt-get --reinstall install cups-daemon
Install and Configure the Client
-
Get the Client install .deb file from the server:
Replace
<HOME_URL_HERE>with your instance URL. -
Install the Client, set Home URL, and authorize the Client with the following command:
Copy Code64 bitsudo dpkg -i printerinstallerclient_amd64.deb || sudo apt-get -f install && sudo /opt/PrinterInstallerClient/bin/./set_home_url.sh https <HOME_URL_HERE> && sudo /opt/PrinterInstallerClient/bin/use_authorization_code.sh <AUTH_CODE_HERE>Replace
<HOME_URL_HERE>with your instance URL and replace<AUTH_CODE_HERE>with your authorization code.If you are on a 64-bit HP ThinPro device, install the Client with the following command:
Copy Codesudo dpkg -i printerinstallerclient_amd64.deb || sudo apt-get -f install && sudo /writable/opt/PrinterInstallerClient/bin/./set_home_url.sh https <HOME_URL_HERE> && sudo /opt/PrinterInstallerClient/bin/use_authorization_code.sh <AUTH_CODE_HERE>
Ubuntu LTS 20
Install Dependencies
-
Install APT dependencies.
Copy Codeapt-get install --no-install-recommends --no-install-suggests -y \
cups \
libc-bin \
libcups2 \
libgssapi-krb5-2 \
libtcl8.6 \
libtk8.6 \
libappindicator3-1 \
libssl1.1 \
net-tools -
Download and install Virtual Appliance dependencies.
Copy Codewget http://security.ubuntu.com/ubuntu/pool/main/libf/libffi/libffi6_3.2.1-8_amd64.deb
sudo dpkg -i libffi6_3.2.1-8_amd64.deb
sudo apt-get -f install
Install and Configure the Client
-
Download and install the Client.
Copy Codewget https://<HOME_URL_HERE>/client/setup/printerinstallerclient_amd64.deb
sudo dpkg -i printerinstallerclient_amd64.deb
sudo apt-get -f installReplace
<HOME_URL_HERE>with your instance URL. -
Stop the Client.
Copy Codesudo systemctl stop printer-installer-client
sudo killall -s SIGKILL PrinterInstallerClientService
sudo killall -s SIGKILL PrinterInstallerClientInterface
sudo killall -s SIGKILL PrinterLogicIdpAuthentication
sudo killall -s SIGKILL system_tray_icon
#If the device is configured as the Service Client, the commands below stop the additional services running.
sudo killall -s SIGKILL PrinterLogicServiceManager
sudo killall -s SIGKILL PrinterLogicServicePrinterApp
sudo killall -s SIGKILL PrinterLogicServiceIdentitySync
sudo killall -s SIGKILL PrinterLogicServiceSNMP
sudo killall -s SIGKILL PrinterLogicServiceOffNetworkClient
sudo killall -s SIGKILL PrinterLogicServiceOffNetworkServer -
Add the LD_Library_Path for dependencies.
Copy Codesudo sed -i 's/^\$EXE \&/LD_LIBRARY_PATH="$INSTALL_DIRECTORY\/service_interface\/lib${LD_LIBRARY_PATH:+:$LD_LIBRARY_PATH}" $EXE \&/' /opt/PrinterInstallerClient/service_interface/run_service.sh -
Set the Home URL.
Copy Codesudo /opt/PrinterInstallerClient/bin/set_home_url.sh <HomeURL_Scheme> <HomeURL>Replace
<HomeURL_Scheme>withHTTPSand replace<Home URL>with your instance URL. -
Set the authorization code.
Copy Codesudo /opt/PrinterInstallerClient/bin/use_authorization_code.sh <AuthCode>Replace
<AuthCode>with your authorization code.
General Commands & Overrides
Reference Client Commands and Override Options for Mac / Linux for scripts and variables to further adjust the Client to better suite your environment.
Requirements
- We recommend installing CUPS 2.0 or newer.
- Virtual Appliance authorization code
CUPS is required if you are using Pull Print / Direct Secure Release Print.
1. Steps to Install CUPS
- Open a browser and navigate to cups.org.
- Download the newest version of CUPS.
- Open a terminal and enter
cd Downloadsto change to the downloads directory. - In the downloads directory enter
tar -xzf cups2.x.tar.gzchange thexto the latest version number(s) to extract the files. - Enter
cd cups2.xto navigate to the newly extracted cups directory. - Enter
./configure. - Enter
make. - Enter
make install.
Verify the CUPS installation by typing cups-config --version.
2. Generate Authorization Code
Installed Clients must be authorized to communicate with your Virtual Appliance instance using an authorization code. You may use an existing code or generate a new one.
See Device Authorization to learn more.
- Open a web browser and sign in to the Admin Console.
- Navigate to Tools Tokens Authorized Devices or Tools Authorized Devices depending on your permissions.
- Use the Code Expiration length drop-down to select the expiration time.
-
Select Generate.
3. Installation Instructions
Red Hat 7
-
Get the Client install .rpm file from the server:
Copy Codewget https://<HOME_URL_HERE>/client/setup/printerinstallerclient_x86_64.rpmReplace
<HOME_URL_HERE>with your instance URL. -
Install the Client, set Home URL, and authorize the Client with the following command:
Copy Code64 bitsudo yum -y localinstall printerinstallerclient_x86_64.rpm | sudo /opt/PrinterInstallerClient/bin/set_home_url.sh https <HOME_URL_HERE> && sudo /opt/PrinterInstallerClient/bin/use_authorization_code.sh <AUTH_CODE>Replace
<HOME_URL_HERE>with your instance URL and replace<AUTH_CODE_HERE>with your authorization code.
You can confirm the Client is installed by looking for the tab in the lower-left corner.
If the client Icon is not visible, it may be auto-hidden.
Red Hat 8
-
Get the Client install .rpm file from the server:
Copy Codewget https://<HOME_URL_HERE>/client/setup/printerinstallerclient_x86_64.rpmReplace
<HOME_URL_HERE>with your instance URL. -
Install the Client, set Home URL, and authorize the Client with the following command:
Copy Code64 bitsudo yum -y localinstall printerinstallerclient_x86_64.rpm | sudo /opt/PrinterInstallerClient/bin/set_home_url.sh https <HOME_URL_HERE> && sudo /opt/PrinterInstallerClient/bin/use_authorization_code.sh <AUTH_CODE>Replace
<HOME_URL_HERE>with your instance URL and replace<AUTH_CODE_HERE>with your authorization code.
You can confirm the Client is installed by looking for the tab in the lower-left corner.
If the client Icon is not visible, it may be auto-hidden.
General Commands & Overrides
Reference Client Commands and Override Options for Mac / Linux for scripts and variables to further adjust the Client to better suite your environment.
Installing / Enabling Browser Extensions
The Windows Client automatically installs the Chrome and Edge browser extensions during the Client installation and displays a prompt to enable the extension in the browser window. On macOS, the Safari browser extension installs with the Client but needs to be initialized and enabled.
Below are the steps to manually install, initialize, and enable browser extensions.
- Navigate to your Self-service Portal URL. If the extension is not installed or enabled, a prompt will appear to guide you through the process.
-
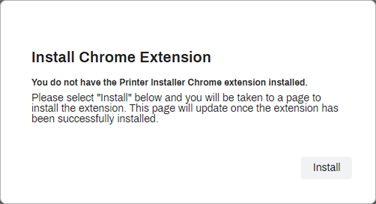
In the Install Chrome Extension modal select Install.

-
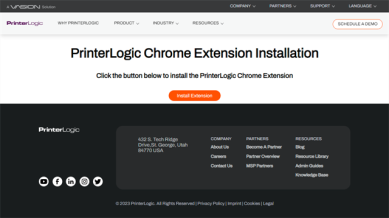
In the Printerlogic page select the Install Extension button.
-
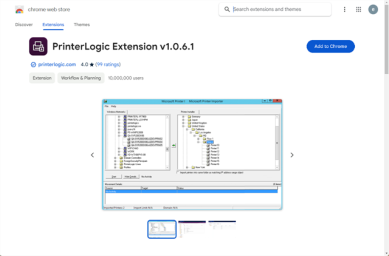
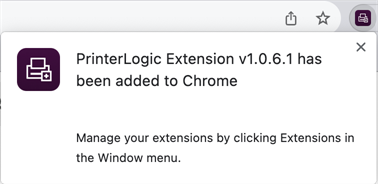
In the Chrome Web Store Extensions page select Add to Chrome.
-
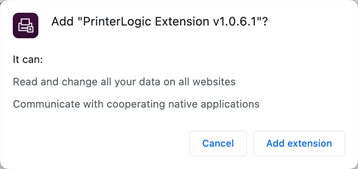
In the Add extension confirmation modal select Add extension.


The browser extension only ensures full functionality of Virtual Appliance while using the browser. Clicking on the extension doesn't provide any additional options.Virtual Appliance features are only available through the Client in the system tray or the Start menu.
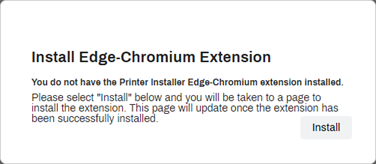
- Navigate to your Self-service Portal URL. If the extension is not installed or enabled, a prompt will appear to guide you through the process.
-
In the Install Edge-Chromium Extension modal select Install.
-
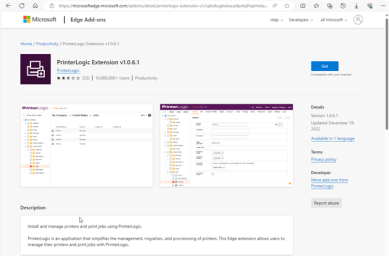
In the Printerlogic Edge Extension Installation page select the Edge Extension button.

-
In the Microsoft Store | Edge Add-ons page select Get.
-
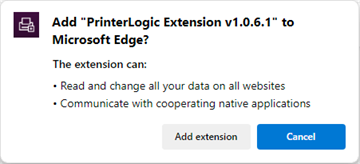
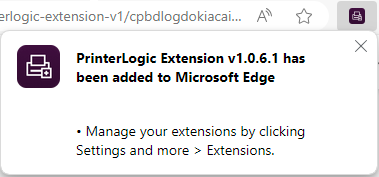
In the Add extension confirmation modal select Add extension.


The browser extension only ensures full functionality of Virtual Appliance while using the browser. Clicking on the extension doesn't provide any additional options.Virtual Appliance features are only available through the Client in the system tray or the Start menu.
Firefox Extension
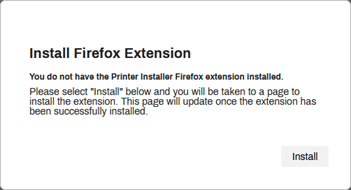
- Navigate to your Self-service Portal URL. If the extension is not installed or enabled, a prompt will appear to guide you through the process.
-
In the Install Firefox Extension modal select Install.
-
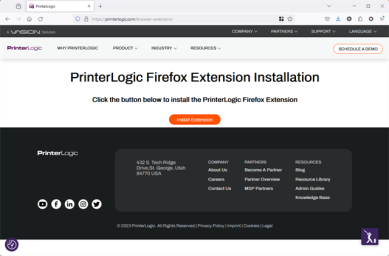
In the PrinterLogic page select Install Extension.
-
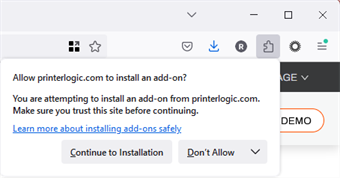
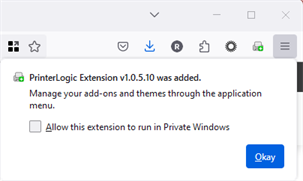
In the Add-on installation confirmation modal select Continue to Installation.
-
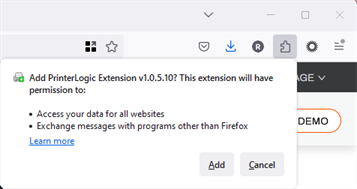
In the Add PrinterLogic Extension modal select Add.

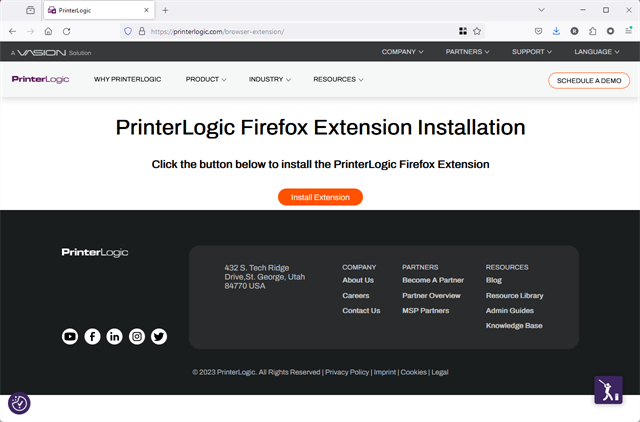


The browser extension only ensures full functionality of Virtual Appliance while using the browser. Clicking on the extension doesn't provide any additional options.Virtual Appliance features are only available through the Client in the system tray or the Start menu.
Safari Extension
The PrinterLogic Safari extension installs along with the client and is not available in the app store.
-
Once you've installed the Virtual Appliance Client, open a terminal window on the device.
-
Run the following command to initialize the PrinterLogic extension, then press [Enter] on your keyboard:
Copy Codeopen -gn /opt/PrinterInstallerClient/service_interface/PrinterInstallerClient.app
- Re-open Safari.
-
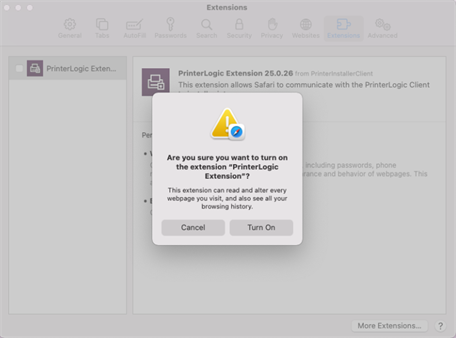
Open the Safari Settings.
-
Select the PrinterLogic Extension, and Turn On.
- In the web browser where you're signed into the Admin Console, navigate to Tools PrinterLogic Portal...
- When prompted, log in to your Self-service Portal to confirm the Client and extension are installed and enabled.
The browser extension only ensures full functionality of Virtual Appliance while using the browser. Clicking on the extension doesn't provide any additional options.Virtual Appliance features are only available through the Client in the Status menu.
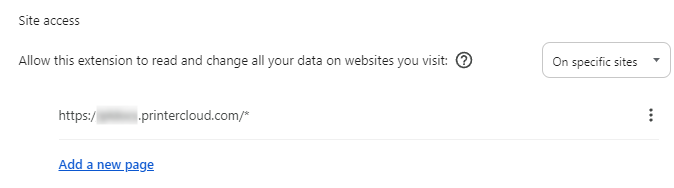
Adjusting Extension Permissions
Due to varying security measures among different browsers and unique URLs for your instance, the browser extensions install with the default "Read and change site data" set to "All sites." Some browsers allow you to change this after installation in the Site Access section of the browser's Manage Extensions window.
- In a browser window, navigate to your installed browser extensions.
- Select the PrinterLogic Extension.
- In the Site Access section, change the option to Specific Sites.
- Enter your instance URL.
- Select Add or Save.
-
Released: November 21st, 2024
Updated Application Version Included
-
New Mobile App Release
iOS: November 11th, 2024 -
Released: November 11th, 2024