Last updated: April 10, 2024
Configuring the Virtual Appliance Internal Service Client
A Service Client is a designated device within the network that runs additional services for advanced features like Off-Network Printing, the Control Panel Application (CPA), and SNMP. The Virtual Appliance has a built-in Internal Service Client, but it is limited to SNMP, LDAP Identity Sync, and Internal Routing used in Off-Network Printing.
Some advanced features require an External Service Client which can be a workstation or server with the PrinterLogic Client installed. If the service you're configuring requires an External Service Client, reference Service Client.
The use of ARM processors is currently not supported for Service Client machines and end-user workstations.
If you use the internal Virtual Appliance service client, it will be necessary to add an additional minimum of 2 CPUs / 4 GB RAM. See the Requirements & Supported Environments for a complete list.
The following is a list of services that can run on an Internal or External Service Client:
|
Services |
Internal Service Client |
External Windows/Mac/Linux OS Service Client |
|---|---|---|
|
Email Printing |
No |
Yes (Must be a Windows Service Client) |
|
Printer Apps |
No |
Yes |
|
SNMP |
Yes |
Yes |
|
Off-line Printing |
No |
Yes |
|
Simple Badge Release |
No |
Yes |
|
LDAP Identity Sync |
Yes |
Yes |
|
Google IdP/ID Sync |
No |
Yes |
|
External Gateway |
No |
Yes |
|
Internal Routing |
Yes |
Yes |
Configure the Internal Service Client
When configuring the Virtual Appliance's Internal Service Client, a modification to the secrets.env file is required, and the FQDN of the Virtual Appliance is acquired from the same file.
- Access the network share for the Virtual Appliance.
-
Navigate to the appliance-storage folder, and open the secrets.env file.
When editing the secrets.env file, an editor like Notepad ++, Sublime Text, or Visual Studio Code must be used to ensure the file uses Unix line endings (LF only) and is saved in UTF-8 format with no byte-order mark.
- In the secrets.env file, add the following line near the bottom: REPLICAS_CLIENT=1.
- Take note of the Virtual Appliance's FQDN found on the line PRINTERCLOUD_DOMAIN. This will be entered into the Service Client object's IP Address or Hostname field later.
- Save and close the secrets.env file.
- Log into the Admin Console.
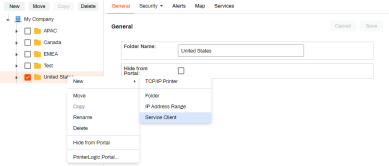
- In the tree view, navigate to the Service Client object. If the existing object has already been configured as an External Service Client, a new one can be added by clicking New
 Service Client in the tree view.
 - Name the Service Client object, and Add the FQDN gathered from the secrets.env file to the IP Address or Hostname field on the General tab.
- If updating an existing Service Client object, click Save in the upper right. For new Service Client objects click the Add Service Client button in the pop-up window.
- Reboot the Virtual Appliance for the changes to take effect.
This enables the PrinterLogicManager service to run on the Virtual Appliance, and features using those services are ready to be configured.
To verify the service is running:
- Access the network share for the Virtual Appliance.
- Navigate to appliance-storage
 logs
logs  client.
 - Within the client folder, find the PrinterLogicServiceManager.log file.
If the client folder is not available or you receive and error stating "connection unavailable" when clicking the client folder, upgrade to host build 22.0.818 or later. Our support team can assist with a workaround for this issue if upgrading the host build right away is not an option.
The PrinterLogicServiceManager.log file shows if the Internal Service Client is running, and if any other advanced features are enabled on that Service Client object.
-
New Mobile App Release
iOS: November 11th, 2024 -
Released: November 11th, 2024
-
Released: October 22nd, 2024
Updated Application Version Included
