We've Moved!
We've unified our Vasion Print (formerly PrinterLogic) and Vasion Automate documentation into a single, streamlined resource to better serve you. Visit our new unified documentation site: docs.vasion.com
Note: This legacy site will not be updated after January 6, 2025, and will remain available for reference until May, after which all traffic will automatically redirect to docs.vasion.com/a/Get_Started/Automate.htm.

Last updated: January 07, 2025
Vasion Print (formerly PrinterLogic) Portals
Vasion Print (formerly PrinterLogic) has two web portals to service end users:
- The Self-service Portal, where end users install their printers
- The Release Portal, where held jobs are released.
Here we provide an overview for each portal.
Self-service Portal Overview
This web portal is where end users can install printers and drivers onto their devices with a few clicks. It drastically cuts down on IT resources and support calls for printer installations. You can add maps, configure Portal Security, and add custom fields to further simplify the installation process. If you want to restrict printer self installation, check out Printer Deployment, where printers automatically install on end users devices.
Access the Self-service Portal
To access the Self-service Portal ensure the Vasion Print (formerly PrinterLogic) Client and browser extension are installed on the workstation and the extension is enabled. Use any of the following options:
- Select the Vasion Print (formerly PrinterLogic) icon in the System Tray (Windows) / Tool Bar (Mac).
- Select the Add Printer icon from the Start Menu (Windows).
- Use your Admin Console URL, but remove the
/adminfrom the end. - On the Admin Console, navigate to Tools
 PrinterLogic Portal....
 - Use the link displayed at the top of the Portal Settings. Navigate to Tools
 Settings Portal.
Tree Structure and Maps
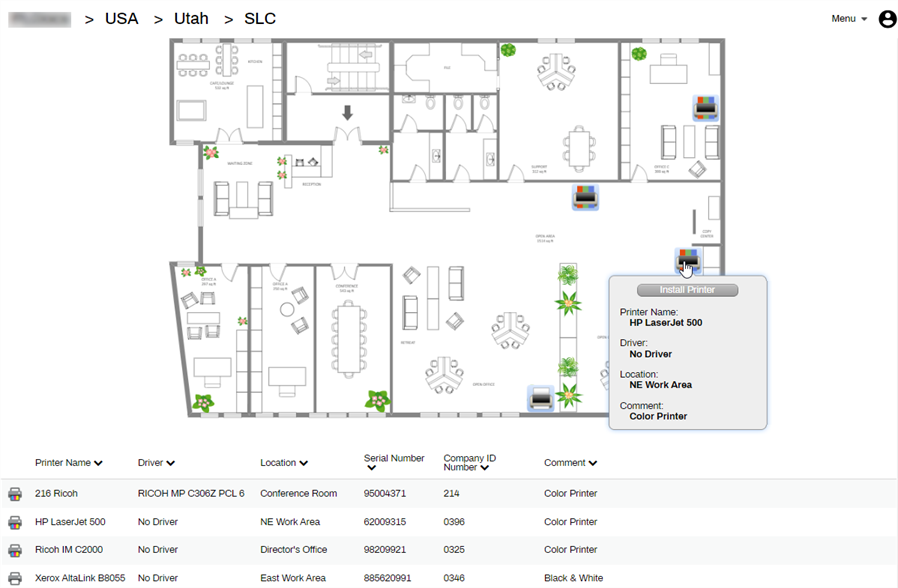
By default, the printer tree structure displays the same as the Admin Console. You can use Portal Security to define which folders and printers end users can see when they access the Self-service Portal. Configure associations based on users, groups, IP Ranges, and more. If there is a folder or printer you do not want visible for any users, select the Hide From Portal option on the printer's General tab.
Maps are a key component of the Self-service Portal. You can assign each folder its own map so you can include multiple sites and floors. Once you upload a map or floor plan, drag printer icons onto the map relative to their physical location to provide a visual reference for end users and keep self-installation simple.
Custom Fields
If you have any custom fields you would like to display on the Self-service Portal, go to Tools ![]() Settings
Settings ![]() General to enable them. For more details, see Custom Printer Fields.
General to enable them. For more details, see Custom Printer Fields.
Menu
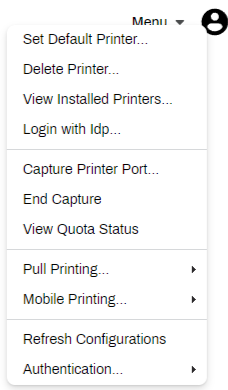
Use the Menu drop-down in the upper-right to see all the Client options enabled on the instance. For more details, see Shortcut Options.
Menu options:
- Set Default Printer — sets the default printer for the workstation.
- Delete Printer — removes a printer from the workstation.
- View Installed Printers — provides a list of printers installed on the workstation.
- Capture Printer Port / End Capture — assign a TCP / IP printer to a port on your workstation. This allows you to print documents using legacy applications on the specified port.
- View Quota Status — option only displays for environments with Quota Management enabled. Users can see what is remaining of the print quota assigned to them.
- Pull Printing:
- Secure Print Settings — displays a list of the printers installed on the workstation and whether they have Secure Print enabled.
- Print Job Management — opens the Release Portal web page. See below.
- Email Printing:
- Print Job Management — opens the Release Portal web page. See below.
- Set Email Printer — sets the printer where auto-release email print jobs are sent by the end user.
- Refresh Configurations — triggers a manual Client check-in with the instance.
- Authentication — this option only displays for environments that have CPA badge or PIN authentication enabled.
- Manage PIN — this option only displays if the PIN settings on the CPA is set to the Database option. The end user can select this option to set their PIN. For more details, see PIN Mangement Options
- Manage Badge — this option only displays if the badge settings option on the CPA is set to Database. The end user can select this option to access the badge self-registration options. For more details, see Badge Self-Registration Options
See Self-service Portal Setup to learn how to set up your Self-service Portal.
Release Portal Overview
The Release Portal is only available if the print environment is using the Pull Printing or Direct Secure Release features. The Release Portal is the web interface that shows any held jobs. Held jobs remain in queue until the user authenticates and releases them to the printer.
Requirements
Secure Release and Mobile App Release require licensing additional licensing. If you are interested in this feature, reach out to your Vasion Print (formerly PrinterLogic) representative. Workstations require the installation of the Vasion Print (formerly PrinterLogic) Client and to enable the browser extension to access the Release Portal.
Access the Release Portal
Here are a few ways to access the Release Portal:
- Navigate to the Menu drop-down in the Self-service Portal and select Pull Printing or Mobile Printing, then Print Job Management.
- Add
/releaseto the end of the Self-service Portal URL. - Right-click on the system tray / toolbar icon and select Pull Printing or Mobile Printing, then Print Job Management.
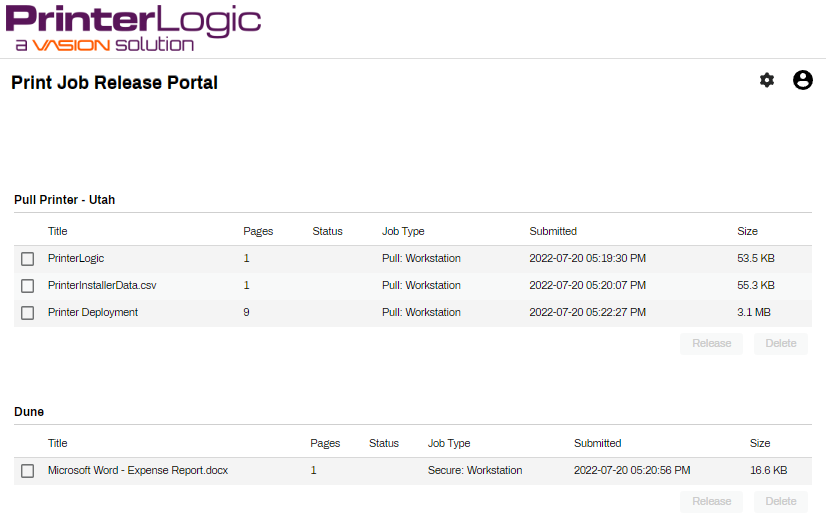
Held Jobs
How the print job is held and released depends on the type of printer selected for the destination.
Pull Printing, considered the one-to-many option, uses a pull printer object as a virtual print queue to hold the job. The pull printer object is installable on end user workstations and appears like a regular printer. Jobs sent to it are automatically held, and these held jobs can be released to any printer object with the Allow Pull Print jobs to be released to this printer setting enabled. For more details, see Pull Printing.
Secure Release Print is also a method of holding a print job but is considered a one-to-one option. Meaning a print job can be printed from a workstation and then held to be released at a specific printer. To allow this function, the printer must be configured as a Secure Release printer within the Admin Console. For more details, see Secure Release Printing.
Release Held Jobs
Held print jobs display in the Release Portal under the associated printer object. With Pull Printing, you choose the printer where you want to release the job. With Direct Secure Release, jobs can only be released to the printer they were initially sent to.
To release a held job:
- Navigate to the Menu drop-down in the Self-service Portal and select Pull Printing or Mobile Printing, then Print Job Management.
- Select the box next to the held print job.
- Select the Release button.
Additional Pull Printing Steps
After selecting Release:
- In the Select a printer modal, search or browse for the printer where you want to release the job(s).
- Use the Select button to start the print job.
Delete held jobs by selecting the box next to the print job, and select the Delete button below the held jobs list.
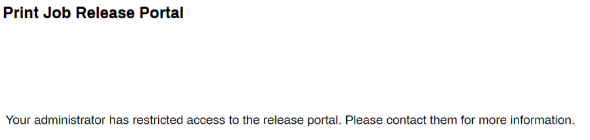
Disable the Release Portal
You can disable the Release Portal for your instance in the Admin Console. This option is helpful in environments utilizing different release mechanisms (CPA, Simple Badge, etc.).
- In the Admin Console, navigate to Tools Settings Portal.
-
In the Options section, select the box for Restrict Release Portal Access.

- Select Save

Please note, if you are signed into the Admin Console on the device, you'll still be able to access the Release Portal with the restrict setting enabled. Log out of the Admin Console then visit your Release Portal to verify the change. Users visiting the Release Portal for your instance see the following message.
-
Week Ending In Jan 4th, 2025
-
Released: Dec 27th, 2024
-
Released: Dec 23rd, 2024
-
Android/iOS: Dec 23rd, 2024
-
Released: Dec 9th, 2024