Portal Security

PrinterLogic SaaS has two web portals for end users. The Self-service Portal, where they install their printers, and the Release Portal, where held jobs are released. For a brief overview see Self-service Portal.

Portal Security applies to the Self-service Portal. Administrators can define which folders and printers end users see when accessing the portal. You can configure associations based on users, groups,and more so end-users can only see and install specific printers and drivers based on their location or operational role.

Portal Security Settings

To view and configure the Portal Security options navigate to Tools then Settings then Portal.

Enable or disable any options to allow or restrict end user access to specific folders, printer objects, Client installation, and how users can access the Self-service Portal. Below is a brief overview of the settings.

Self-service Portal settings

PrinterLogic Portal URL
Shows the Self-service Portal for your instance. For example, https://mycompany.printercloud.com.
Auto open to folder with printers in the same subnet as the end user

This settings automatically opens the the folder containing the most printers in the same subnet as the end user's. The Client knows the local IP address of the user and does a database search to find the printers in the same subnet. If printer objects from multiple folders are in the same subnet, the system opens the parent folder common to all of those folders.

The printer port values must be IP addresses for this feature to function correctly.

Auto open to folder containing the IP Address Range object the end user is a member of
This setting opens the Self-service Portal tree structure to the location of a specific IP Address Range object. This feature takes precedence if the option above is enabled, and both apply to the end user.
Enable Advanced Portal Security: Do not show folders and items that a user does not have rights to view / install
This setting enables the view permissions for a folder or printer to determine whether a folder or printer displays in the portal for a specific user.
Override Operating System User with PrinterLogic SaaS Portal User
This setting overrides the user's workstation network credentials with the credentials used to sign in to the Self-service Portal. When enabled, users are able to install a restricted printer on devices not logged in to the network since the credentials supplied to log in to the Self-service Portal have the correct permissions.
Enable "Install Client" link

This setting allows an end user to install the Client on the workstation, if the Client is not already installed. When the end user accesses the Self-service Portal and the Client is not installed, the following modal automatically launches:

Install Priner Installed Client or Log In modal

Enable "Driver Model" column

This setting displays the Driver column next to Printer Name, which shows the printer model driver name in the Self-service Portal.

Self-service Portal with the Driver column enabled.

Enable "Automatic Self-service Portal and Release Portal" login

This setting automatically logs in the user when they access the portals based on the user who is authenticated on the workstation. By default, this setting is not enabled, so that users are required to log in each time they want to access one of the portals.

Please note that enabling this feature requires you to acknowledge that the security is enforced by the workstation's user account, which can be compromised if a connected device is not locked when left unattended.

Password Protect
This setting requires end users to enter the password specified here to access the portals. By default, this option is not enabled.
Header
You can upload your company's logo to display in the header section of the

Common Security Setting Configurations

  • Enable the two auto open options to have the Self-service Portal automatically open to the folder where the end user's printers are located.
  • Enable the Advance Portal Security option if you configure portal security to restrict which printer objects the end users see in the Self-service Portal portal. See Configuration Steps below.
  • Disable the override operating system user option if you want to restrict users from installing printers on a workstation that is not part of your network. For example when an end user attempts to install a printer on a personal device that is not recognized as having network access, they receive an error that prevents printer installation, even if they use their authorized credentials to sign in to the Self-service Portal.
  • Enable the automatic portal login option if you want end users to quickly access the Self-service Portal and Release Portal based on the network-approved workstation without requiring them to sign in to the portal.

Configure Portal Security for Printer Objects

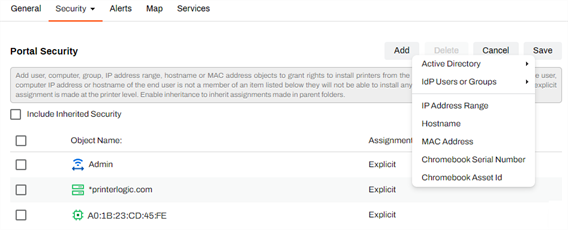
If you need to limit access to folders or printer objects in a multi-level tree structure, decide at which level you want to start restricting access in the Self-Service Portal. By deselecting the 'Include Inherited Security' option, access is restricted from that level downwards, affecting all folders and printer objects below it. Any specific permissions you add will apply to all folders and printer objects at lower levels.

Here are some definitions of the group and permission assignments:

  • The Everyone group is available by default. Folders and printers with this group are seen by all users on the Self-service Portal.
  • Explicit assignment means the user, computer, or group was added directly to that folder / printer object.
  • Inherited assignment means the user, computer, or group is inherited from a parent folder higher in the tree structure.
  • By default, the Include Inherited Security is selected on all folders and printer objects.

Configuration Steps

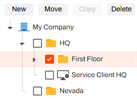
  1. In the Admin Console, select a folder or object from the tree structure.

    Tree structure with a folder selected

  2. Select Security then Portal Security.
  3. Unselect the Include Inherited Security option.
  4. Select Add.
  5. Select from one of the following options:
    1. Active Directory — use this option if you have Active Directory connected to specify access from one of the following options:
      1. User, Computer or group.
      2. Containers, or OU.
    2. IdP — use this option if you have an IdP configured to specify access from one of the following options:
      1. Users.
      2. Groups.
    3. Hostname — use this option to specify access from specific domain name(s).
    4. MAC Address — use this option to specify access from specific device(s).
    5. Chromebook Serial Number — use this option to specify access using device serial numbers.
    6. Chormebook Asset ID — use this option to specify access using device asset IDs.
  6. Once the user(s), computer(s), and / or group(s) area dded, select Save.

Portal Security tab showing security objects configured and Add options