Last updated: May 06, 2024
Tree View Overview
The Admin Console shows folders, printers, and objects in a hierarchical tree view for organizational purposes. The Admin Console is where you manage the tree, and the Self-service Portal mirrors the same structure. Configuring Portal Security changes the tree view on the Self-service Portal by restricting what folders and printers end users see. If you're not using Portal Security or the Hide from Portal setting, the tree view is the same.
Recommendations for the tree view setup are:
- Setting up folders by region or location.
- Splitting up regions by sites or states.
- Splitting up sites by offices or floors.
When it comes down to it, you are the best resource for configuring the tree view in your environment, so set it up in the way that works best for your needs. The goal of the tree view is to create an easily navigatable system for managing your printer objects. Tree structures are not set in stone and are easily adjustable from the Admin Console.
Tree Management
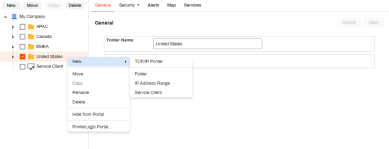
By right clicking on an object or folder in the tree view, these same button options appear.
- New: Click this option to add a printer object, folder, IP address range, or Service Client.
 Options:
- TCP/IP Printer: Click this option to set up a new printer object in the tree view.
- OM Plus Managed Printer: Click this option if you are using OM Plus to route your print jobs through OM Plus Delivery Manager.
- Folder: Click this option to add a new folder to the tree view. You cannot add any folders to the root level as there is only one root level folder.
- IP Address Range: Click this option to set up a new IP address range object in the tree view.
- Service Client: Click this option to add a new Service Client.
- Reference Service Client for more information.
- Move: Select an object or folder from the tree view and click this option to move the object to a new location.
- This option is unavailable when the root folder is selected.
- Copy: Select a printer object from the tree view and click this option to create another item with the same settings.
- Only printer objects can be copied.
-
Delete: Select an object or folder from the tree view and click this option to remove it.
If deleting a printer object that has a CPA installed, you should uninstall the CPA before deleting the printer. If the system believes a CPA is installed on the printer, a warning will be presented and acknowledged before deletion is allowed.
Quick Access Options
In addition to the settings above, right clicking on an object in the tree view also provides:
- Rename: Right click on the object and select this option to rename.
- Hide from Portal: Right click on a printer object or folder and select this option to hide it from the Self-service Portal.
- Show on Portal: Right click on a hidden printer object or folder and select this option to make it visible in the Self-service Portal.
- This option is also available by unchecking the Hide from Portal option on the printer object's General tab.
- PrinterLogic Portal: Right click on the object and select this option to open the Self-service Portal.
- Print Job Records: Right click on a printer object and select this option for quick access to the Print Job Records report.
- You can also access these reports by clicking the Reports menu in the Admin Console and selecting Print Job Records.
Tree Slider
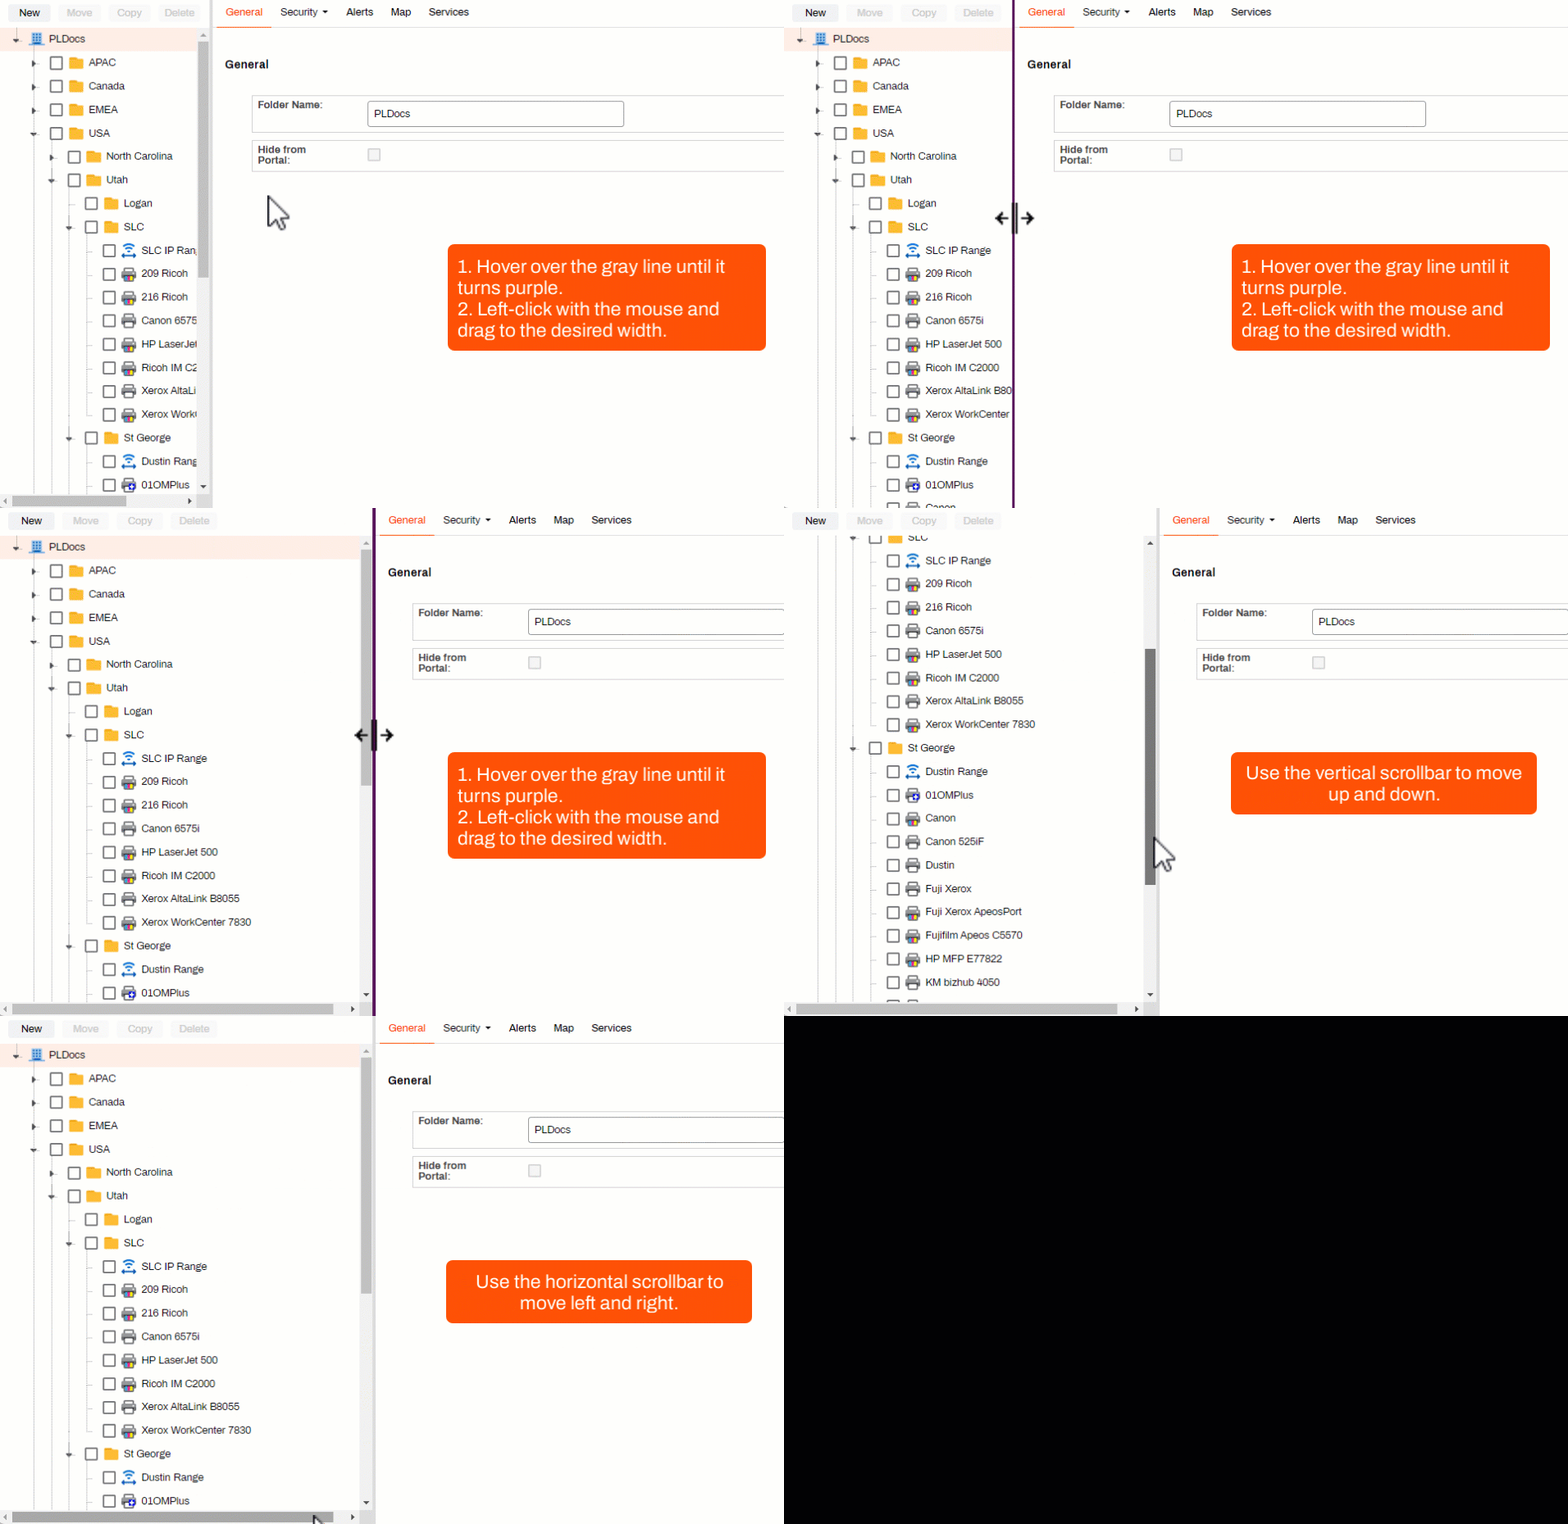
As you expand folders and sub-folders in the tree view, object names can lengthen further than the frame. The tree slider lets you expand the tree view so more information becomes visible.
To adjust the tree slider:
- Hover the mouse icon over the gray bar to the right of the tree view.
- When the bar turns purple, click and hold the left mouse button.
- Drag the tree slider to the desired width.
- Use the vertical or horizontal scroll bars as needed.

-
Release Date: 17 May, 2024
-
Windows Client Release Notes Updated
Release Date: 16 May, 2024
-
Mac/Linux Client Release Notes Updated
Release Date: 16 May, 2024
-
Chrome OS Client Release Notes Updated
Release Date: 24 April, 2024
-
Topic on additional options.
-
A new topic has been added for HP devices using ONCP
-
A setting has been added to only print attachments.

