We've Moved!
We've unified our Vasion Print (formerly PrinterLogic) and Vasion Automate documentation into a single, streamlined resource to better serve you. Visit our new unified documentation site: docs.vasion.com
Note: This legacy site will not be updated after January 6, 2025, and will remain available for reference until May, after which all traffic will automatically redirect to docs.vasion.com/a/Get_Started/Automate.htm.

Last updated: January 07, 2025
Service Client
A Service Client is a Vasion Print (formerly PrinterLogic) client that has been promoted to provide additional service functions within the instance. The Service Client machine can be a workstation or a server always available on your network.
Windows devices using ARM processors are not currently supported for Admin Console machines and end user workstations.
Minimum Machine Requirements
The following are MINIMUM specs for the Service Client machine. You may need to increase these specs depending on the services you're running. Monitor the CPU and RAM utilization and allocate additional resources as needed.
- Workstation:
- Windows 10, 11; Server 2016, 2019, 2022 is highly recommended.
- Mac with an Intel processor, or you can use an Ubuntu LTS box 20.04.
- 20GB space on the Hard Drive.
- 8GB RAM.
- Dual-core processor.
- Visual C++ Redistributable for Visual Studio 2015-2022 bundle is required.
- Both the x86 and x64 redistributable packages must be installed. You can download these packages from the Microsoft Download Center.
Additional CPA Requirements
Additional requirements for the Printer Apps Service for the CPA Control Panel Application. An application installed on compatible MFP devices that aids in the release of held print jobs.:
- Service Client machine should be placed as close to the devices it's managing as possible
- Add an additional 2GB RAM to the minimum listed above for every 100 printers
- If SSO is used RAM should be monitored and increased as needed due to increased memory usage during check-in times.
Designate the Service Client
- Select a machine to set up as the Service Client that meets the minimum specs listed above.
-
Install and authorize the Client on the machine. For details about installing the Client, see Install the Client & Web Extension.
We highly recommend that the Service Client runs the latest version since some features may require it.
- Note the machine(s) IP address (preferred) or Hostname.
Create Service Client
- Sign in to the Admin Console.
- Select the folder where you want to place the Service Client.
-
Select the New button at the top of the folder structure, or
-
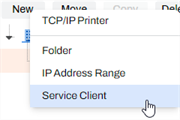
Right-click on the folder and select New
 Service Client.
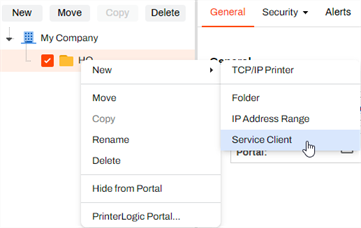
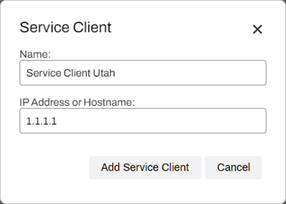
- In the Name field, give the Service Client object an identifiable name.
- In the IP Address or Hostname enter the IP Address or FQDN of the Service Client object host machine.
-
Select Add Service Client.
If you use HTTPS, use the FQDN to reduce potential communication issues. This is especially important for CPA manufacturers such as Ricoh, Toshiba, and Kyocera.


Refresh the Service Client Machine
On the machine designated as the Service Client, refresh the Client and confirm the processes are running by doing the following:
-
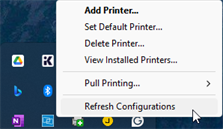
Locate the Vasion Print (formerly PrinterLogic) icon in the system tray and right-click to open the context menu, or

-
Open the start menu, search / locate and open the Printer Installer folder.
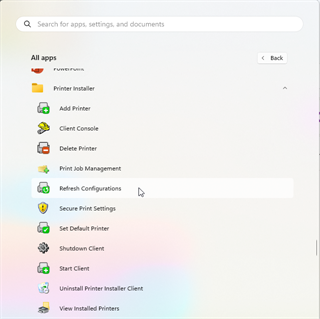
- Select Refresh Configurations.
- Open Task Manager and select the Details tab.
- In the Search field type "printer" to locate the Client processes.
-
Confirm the PrinterLogicServiceManager.exe process is running along with the three PrinterInstallerClient processes.


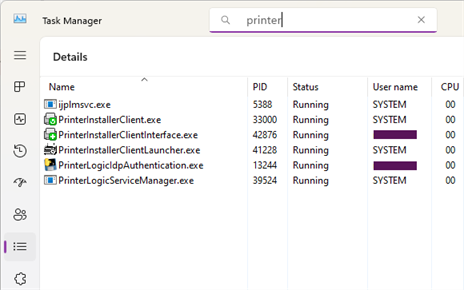
You can view each Service Client service you enable in the Task Manager.
Enable Automatic Updates
Vasion Print (formerly PrinterLogic) frequently updates the services for the Service Client features to include improvements and bug fixes.
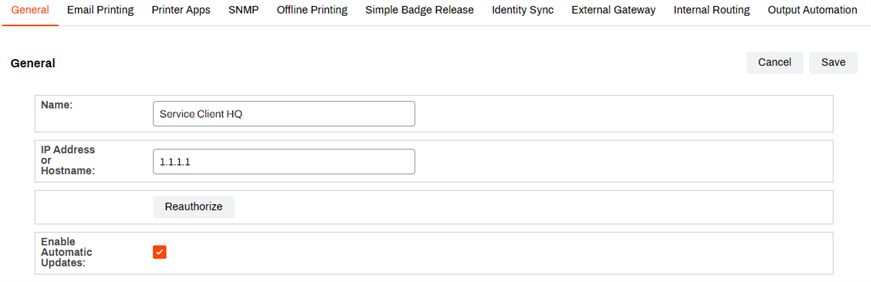
While we do not recommend disabling automatic updates, you can do so by unchecking the Enable Automatic Updates option found on the General tab of the Service Client.
When this setting is not enabled, the following services will still function, but won't be updated automatically:
- Email Printing
- Printer Apps (CPA)
- SNMP
- Offline Printing
- Simple Badge Release
- Identity Sync
- Internal Routing / External Gateway (ONP)
- Output Automation
If you choose to pause automatic updates, set up a regular cadence for enabling the setting.
When you are ready to update the services, do the following:
- Navigate to the Service Client's General tab.
- Check the box for Enable Automatic Updates.
- Select Save
- Allow 10-15 minutes for the services to update before disabling the setting again.
- Uncheck the box for Enable Automatic Updates.
- Select Save
Reauthorization Steps
Use the following steps to generate a new authorization token for a Service Client if it's missing, or if the PrinterLogicServiceManager.exe service is crashing.
Reauthorize the Service Client only if you've checked the URL, client authorization, and folders first. Complete the steps below within two minutes or the reauthorization fails.
- On the machine set up as the Service Client, navigate to C:\Program Files (x86)\Printer Properties Pro\Printer Installer Client\ServiceHost/Config.
- Verify if there is an existing token.json file. If there is, delete the file.
- Open the Task Manager.
- Select the Details tab.
- Right-click on PrinterInstallerClientLauncher.exe and select End Process Tree. There are three PrinterInstallerClient processes running for the Client. If the other two services don't close, then close them individually.
- In the Vasion Print (formerly PrinterLogic) Admin Console, navigate to the Service Client object.
- Select the Service Client and in the General tab, select Reauthorize.
- Select Okay to close the message.
- Back on the Service Client machine, select the Services tab in the Task Manager.
- Right-click on PrinterInstallerLauncher service and select Start.
Once the services start, the machine pulls down a fresh token.
Troubleshooting Help
A quick way to do this is to right-click the Client icon in the system tray of the Service Client machine and select Refresh Configurations.
Verify the Client is installed, authorized and pointing to the correct instance. A quick test is to click the system tray icon to open the Self-service Portal. If it opens to the correct URL, you can sign in, and see / install printers from the portal, then the client is authorized.
If you're prompted for an authorization code in the Self-service Portal, see Device Authorization for steps on how to create one.
If the Self-service Portal opens to an incorrect URL, you'll need to set the home URL. See Update the Client Home URL.
Navigate to C:\Program Files (x86)\Printer Properties Pro\Printer Installer Client\ServiceHost. and check the following:
If the Service Host folder is not created, check the machine's hostname or IP address and compare with what you entered for the Service Client in the Admin Console.
If the folder is created, check the config folder in it. A token.json file is saved here when the Service Client is authorized.
If the folder is created, but the token.json file is not there, you need to reauthorize the Service Client, see Reauthorization Steps. Please note that the Service Client authorization is different from the Client authorization.
-
Week Ending In Jan 4th, 2025
-
Released: Dec 27th, 2024
-
Released: Dec 23rd, 2024
-
Android/iOS: Dec 23rd, 2024
-
Released: Dec 9th, 2024