Last updated: May 06, 2024
Install Chrome OS Client
The PrinterLogic Client requires the use of the Chrome OS Client and can be deployed from within the Google Admin Console by system administrators.
These steps are NOT for installing the full PrinterLogic Client on Windows, Mac, or Linux workstations. For information on those steps, see the appropriate operating system installation instructions found in this section.
The Chrome OS client includes features designed specifically for Chrome OS; for example, spooling print jobs. The image below shows the client as it appears in the Chrome OS user interface.

The Chrome OS Client is designed to function much in the same way as the PrinterLogic Client you can install on Windows, Mac, and Linux workstations. For more information on the PrinterLogic Client, see PrinterLogic Components.
Important Extension Notice
In January 2023, Google phased out its previous extension technology, Manifest 2.0. Google now only support Manifest 3.0. Microsoft Edge Chromium followed the same migration timeline. Because of this change PrinterLogic customers who use our Chrome Browser Extension, Edge Chromium extension, or our Chrome OS Client must run Version 88 or later of the Chrome or Chromium-based Microsoft Edge browser. Additionally, you will need to be running the most current version of our extensions. Our extensions update automatically and will be compatible with Google's latest standard.
What is browser extension "Manifest"?
- An extension manifest gives the browser information about the extension, such as the most important files and the capabilities the extension might use.
How is Manifest v2 different from v3?
- Manifest v3 includes improvements to privacy, security, and performance. For details, refer to the Overview of Manifest V3 provided by Chrome.
Do I need to update the extensions manually?
- The extension will automatically update.
What happens if I don't update the browser version in time?
- The release of the new PrinterLogic Chrome, Edge Chromium, and Chrome OS extensions on Dec 12 will not function with browsers older then version 88 of chromium
- Chrome Browser: The Self-service Portal will loop and prompt the end-user to install the PrinterLogic client because the extension is not communicating with the client. End-users will be unable to self-install printers from the portal.
- Edge Chromium Browser: Self-service Portal will loop and prompt the end-user to install the PrinterLogic client because the extension is not communicating with the client. End-users will be unable to access and self-install printers from the portal.
- Chrome OS Client (Extension): Chromebooks and Chrome OS devices will not be able to access the Self-service Portal, receive printer deployments, or authenticate end-users.
What can I do to resolve the issue if I don't update in time?
- Update the Chrome and Chromium Edge Browser and Chrome OS devices to version 88 or later. Updating will resolve the communication issue and allow the extensions to function as expected.
Create Chrome OS Client
Follow the steps below to download and install the Chrome OS Client.
- Open a browser.
- Log in to the Google Admin Console at admin.google.com. Google may require you to verify your identity.
-
Click the Main Menu and select Devices
 Chrome.
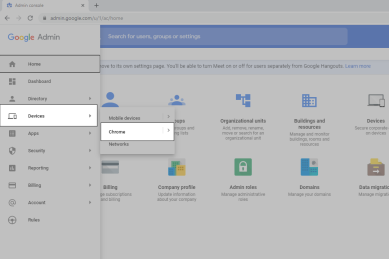
-
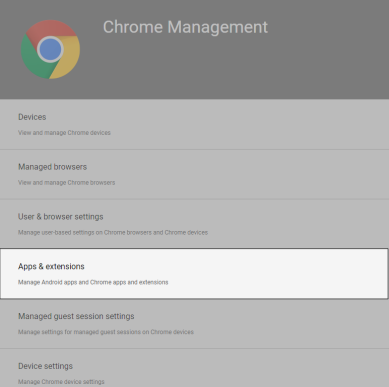
In the Chrome Management page, click Apps & extensions.
-
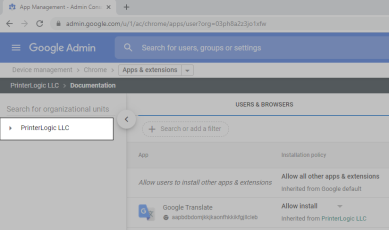
In the Apps & extensions page, select the appropriate organizational unit in the Google Admin tree view.
-
Click the Add button and then select the Add by Chrome app or extension ID button.

-
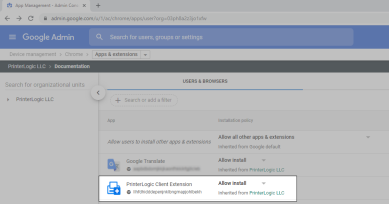
In the Add by Chrome app or extension ID window appears, enter the following into the Extension ID field.
llhfdhidddepenjnklbngmapjohlbekh
Copy Codellhfdhidddepenjnklbngmapjohlbekh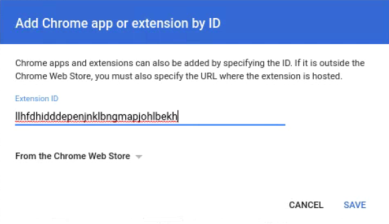
-
Click Save.


The PrinterLogic Client Extension appears in the Users & Browsers tab.
Configure Chrome OS Client
-
Click on the PrinterLogic Client Extension to configure it.
-
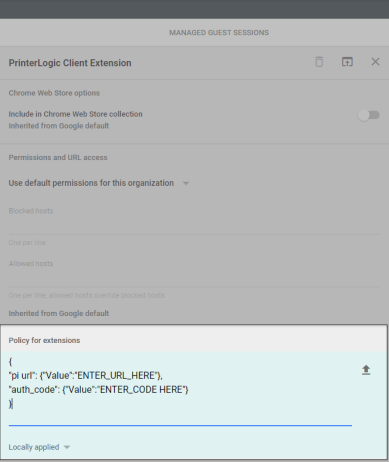
Copy the following JSON query:
{
"pi url": {"Value":"<ENTER_URL_HERE>"},
"auth_code": {"Value":"ENTER_CODE HERE"}
}
Copy Code{
"pi url": {"Value":"<ENTER_URL_HERE>"},
"auth_code": {"Value":"ENTER_CODE HERE"}
} -
Paste the copied JSON query into the Policy for extensions section.
By default, the Policy for extensions section will display Enter a JSON value.
-
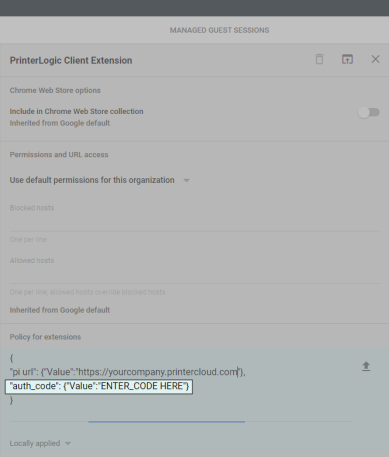
In the Policy for extensions field, replace <ENTER_URL_HERE> with the full URL of your PrinterLogic instance (See image below):

Replace
<ENTER_URL_HERE>with the name of your PrinterLogic instance as it appears when visiting the Self-service Portal.
EMEA instances include printercloud5.com
APAC instances include printercloud10.com
Canada instances include printercloud15.comIf you don't have a PrinterLogic instance, navigate to printerlogic.com to start your demo of the product..
- Generate a non-expiring authorization code (Device Authorization) in the PrinterLogic Admin Console.
-
In the Policy for extensions field, replace <ENTER_CODE_HERE> with the authorization code.
- Close the Google Admin right side window pane.
-
Force Install+ Pin the PrinterLogic Chrome OS extension.

- Click Save.
- Close the Google Admin window.


The PrinterLogic client extension appears on the Chromebook browser once the policy updates on the device.

-
Windows Client Release Notes Updated
Release Date: 16 May, 2024
-
Mac/Linux Client Release Notes Updated
Release Date: 16 May, 2024
-
Release Date: 10 May, 2024
-
Chrome OS Client Release Notes Updated
Release Date: 24 April, 2024
-
Topic on additional options.
-
A new topic has been added for HP devices using ONCP
-
A setting has been added to only print attachments.