We've Moved!
We've unified our Vasion Print (formerly PrinterLogic) and Vasion Automate documentation into a single, streamlined resource to better serve you. Visit our new unified documentation site: docs.vasion.com
Note: This legacy site will not be updated after January 6, 2025, and will remain available for reference until May, after which all traffic will automatically redirect to docs.vasion.com/a/Get_Started/Automate.htm.

Last updated: January 07, 2025
Scan to Cloud
Scan To Cloud for CPA, and Mobile Scanning for the PrinterLogic App, follow similar configurations. The global scan settings and installation of the Scan To Cloud app on the printer are specific to Scan To Cloud for CPA, and the Enable Mobile Scanning section is specific to the PrinterLogic App.
Requirements
- Scan To Cloud requires customers to opt in to the Unified Login experience. See Unified Login Experience.
- For Scan To Cloud on the printer, the Control Panel Application (CPA) 2.0 must to be installed on the printer.
- The Vasion Print (formerly PrinterLogic) Mobile Scanning feature does not require CPA installation.
- The latest Identity Provider (IdP) Settings version.
- Scan To Cloud requires a connection to a 3rd party storage provider. See the list below.
Vasion Automate has a 15 min inactivity timeout. Please be aware that the inactivity timeout applies to the Global Scan Settings screen
Configure the Cloud Storage Connection
If not already done, use one of the links below to configure the cloud storage connection. You enable the scanning when you configure the cloud storage connection.

Configure Global Default Settings
Access the global scan settings from the menu. Go to Tools ![]() Settings
Settings ![]() Scanning and expand the Scan Settings section. These options are for Scan To Cloud using the CPA.
Scanning and expand the Scan Settings section. These options are for Scan To Cloud using the CPA.
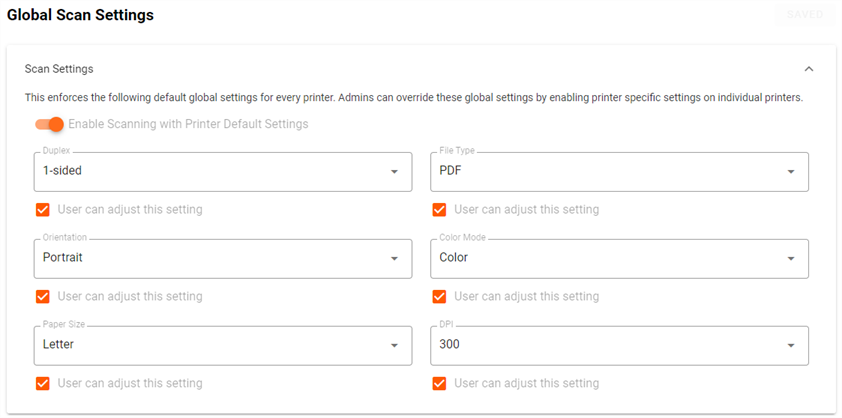
Scan Settings
Each setting is categorized as an input or output value, delineating how you position documents on the scanner (input) versus how they appear post-scanning (output). It's important to understand the category and how the values are applied, to configure the settings correctly.
|
Input Values |
Output Values |
|
|---|---|---|
|
|
|
If you want to modify the default printer settings, go to the Scan Settings section and use the drop-down set the appropriate scan settings. Select Save on the top-right corner.
These settings apply globally to all printers. You can set printer-specific settings in the printer Apps tab.
Enable Mobile Scanning
The following steps are only required if you are using the Mobile Scan feature for the Vasion Print (formerly PrinterLogic) app. If you are only configuring Scan To Cloud for CPA, continue to the next section.
To enable this feature for your end users:
- Log into your Admin Console.
- Navigate to Tools
 Settings Scanning.
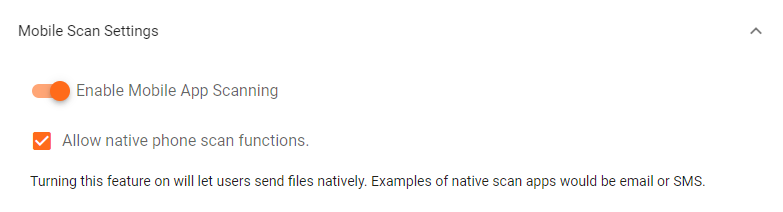
 - Expand the Mobile Scan Settings drop-down.
- Select the toggle for Enable Mobile App Scanning.
- Optional: Select the option for Allow native phone scan functions.
- This setting allows scanned jobs to be sent natively via apps like email and SMS.
The Scan option in the mobile app begins showing shortly after the setting is enabled.
For steps on using the mobile app's Scan feature, reference Mobile Scan. If you configured cloud storage and are using preset scan locations, continue with the steps below.
Preset Scan Locations
You can set up multiple connections to your preferred storage provider, but can only configure a connection to a folder once. When you connect preset scan locations, you assign a unique name which is displayed on the Scan to Storage screen, Preset Destination drop-down. For Mobile Scanning, the unique name displays in the Export options for users.
To configure folder destinations, you must have already created the folders in the cloud storage location.
You can only set up a destination folder once. I you try to configure multiple scan locations to the same folder, Scan To Cloud will not function as expected.
Cloud Drive
- Select Preset Scan Locations.
- Select Cloud Drive.
- Select Add Configuration.
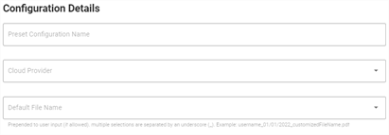
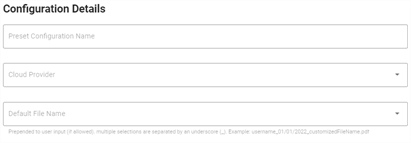
- In Configuration Details Complete the following:
- Preset Configuration Name — enter a name to identify the scan destination.
- Cloud Provider — use the drop-down to select the storage provider where the folder is located.
- Default File Name — you can define what name is applied to the file when it's scanned. Choose from the following:
- Select one or more options from the list. If you select more than one, they display in the order they are selected.
- Manually enter a default file name. You can enter a manual input and preset selections.
Leave the field blank. End users are allowed to enter or modify this name at the CPA, if needed.
- Select Next.
-
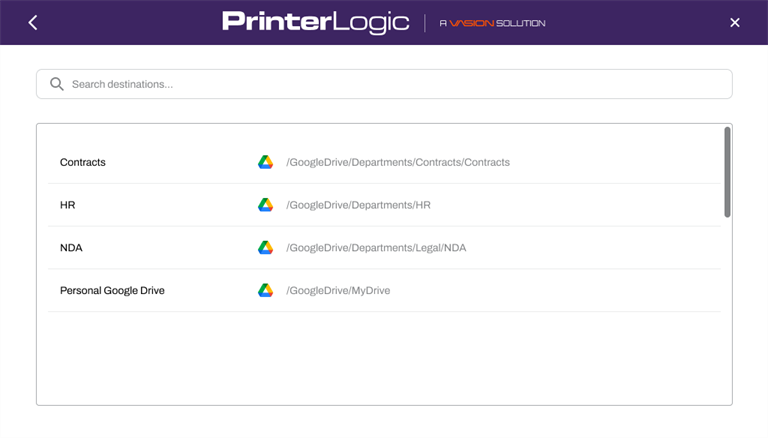
In Folder Destination, select the folder you want to use for this preset location. If you have many folders, you can use the Search Drive field to quickly locate your folder.

- Select Next.
-
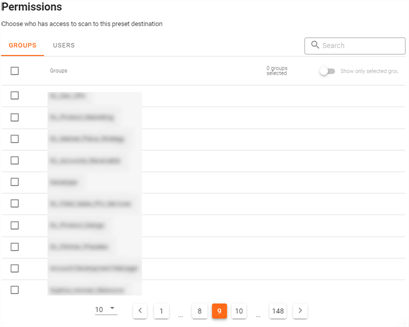
In Permissions select any users or groups you want to have access to the preset destination.
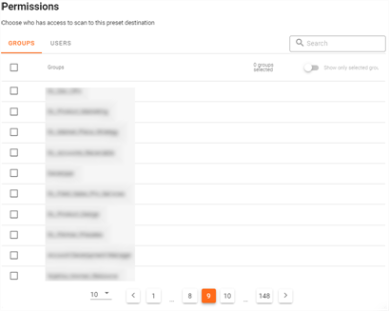
- Select Save Configuration.

After configuring the Cloud Connection and Preset Scan Location(s), the storage location(s) appears on users' mobile devices when they use the Export option.
Install Scan To Cloud
The following steps are only for customers using the Scan To Cloud feature for CPA.
- In the Admin Console, go the printer where you want to install Scan To Cloud.
- Select the Apps tab.
- Ensure correct manufacturer, CPA version, and Service Client are selected.
- In the Install Embedded Application section, check the Scan To Cloud option.
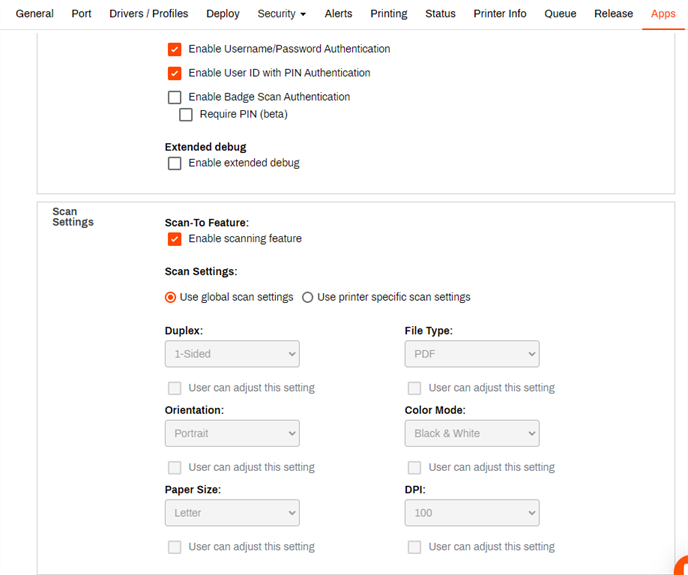
- In the Scan Settings section, select from the following:
- Use global scan settings — this is the default option. the settings applied are what is configured in the global scan settings.
- Use printer specific scan settings — this enables the drop-downs so you can adjust the settings as needed.
- Select Save on the top-right corner.
-
Week Ending In Jan 4th, 2025
-
Released: Dec 27th, 2024
-
Released: Dec 23rd, 2024
-
Android/iOS: Dec 23rd, 2024
-
Released: Dec 9th, 2024
Scan To Cloud currently integrates with OneDrive, SharePoint, Google, and Box. Within those providers, you can set preset file destinations for specific departments or user groups based on their typical scanning needs. Your end users can simply scan to the exact folders they need. For example, a Legal team can scan NDAs, legal forms, contracts, and client information to specific folders assigned that are only visible to their team.
Not yet. OCR functionality will be supported in a future release of Simplified Scanning. At that time, users can convert their scanned documents into searchable and editable text to improve the searchability and accessibility of documents saved in cloud storage locations
There is no maximum file size set when scanning. However, if the file exceeds the amount of storage space available in the cloud storage folder or exceeds the limits set by the administrator, the file will not upload. Check the maximum file size for the cloud storage provider you use.
After you have scanned your document(s), wait a few minutes. You will receive an email from Vasion letting you know the file was scanned successfully, with an attachment of the file ready to download.