We've Moved!
We've unified our Vasion Print (formerly PrinterLogic) and Vasion Automate documentation into a single, streamlined resource to better serve you. Visit our new unified documentation site: docs.vasion.com
Note: This legacy site will not be updated after January 6, 2025, and will remain available for reference until May, after which all traffic will automatically redirect to docs.vasion.com/a/Get_Started/Automate.htm.

Last updated: December 11, 2024
Direct Email Printing
Through Direct Email Printing, users send or forward emails directly to a printer, where they are released. Unlike Email Printing, Direct Email Printing does not hold the job, and after authenticating the user through Active Directory / LDAP, the release happens automatically.
Requirements
Ensure all of the General Requirements are completed.
In addition, Direct Email Printing also requires the following:
- LDAP Domain authentication method. IdPs are not supported.
- Each user's email address must be stored as an attribute in the Active Directory user object.
Aliases might not work properly with Office 365 / Exchange. See the Troubleshooting Help section.
Configure Direct Email Printing
1. Configure the Service Client
- In the Admin Console, select the Service Client.
- Select the Email Printing tab.
-
Check the box for Enable Email Printing.
-
Use the None Selected button to browse and select the desired pull printer.
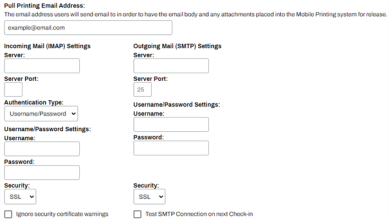
- In the Pull Printing Email Address field, assign an email address to the pull printer. This email is the address of the account created in the requirement.
- Configure the Outgoing Mail (SMTP) Settings.
- Enter the Server, Port, and Username / Password.
- In the Security drop-down, select from SSL, TLS, or None.
- Select the box for Test SMTP Connection on next Check-in.
- In the Incoming Mail (IMAP) Settings, enter the Server and Server Port information.
The Authentication Type you select depends on what email service you use.
2. Email Account Connection
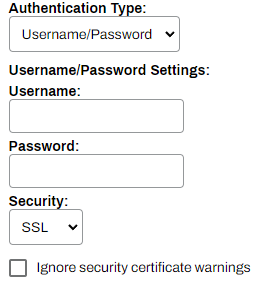
The Authentication Type you select for the Incoming Mail (IMAP) Settings depends on what email service you use. For IMAP configurations, follow the IMAP Configuration steps below. For Office 365 and Microsoft Exchange accounts, use the OAuth 2.0 Configuration steps below.
IMAP Configuration
OAuth 2.0 Configuration
Configure OAuth 2.0 in the Entra ID (Azure AD) portal before completing the steps below. If you're not the Entra ID (Azure AD) administrator for your organization:
- Send them the link to Configure OAuth 2.0.
- The steps in Collect Application & Directory ID define where to find the Application and Directory IDs you'll need.
- Define the email to use (Step 2 below). The email requires access to Entra ID (Azure AD). You'll need to login using that email in Step 8 below.
After configuring OAuth in Entra ID (Azure AD) and collecting the IDs, follow the steps below to finish the Service Client Email Printing configuration.
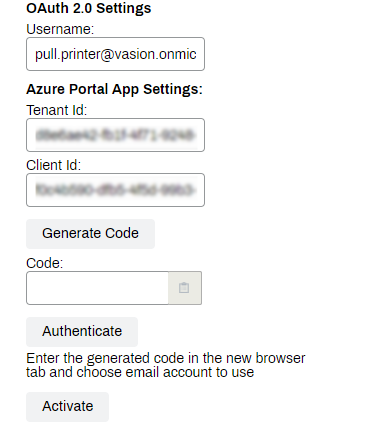
- In the Authentication Type field, select OAuth 2.0.
- In the OAuth 2.0 Settings Username field, enter an email address with access to the Entra ID (Azure AD) portal.
- Copy and paste the Entra ID (Azure AD) Directory (tenant) ID into the Vasion Print (formerly PrinterLogic) Tenant ID field.
- Copy and paste the Entra ID (Azure AD) Application (client) ID into the Vasion Print (formerly PrinterLogic) Client ID field.
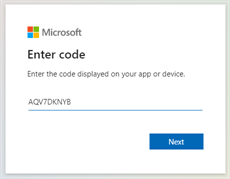
- Select the Generate Code button, then copy the provided code.
- Select the Authenticate button.
-
In the authentication browser window, paste the code, then select Next.
- Login with the same user account tied to the email entered in the Username field.
- Select the Consent on behalf of your organization box, then select Accept.
-
Under the Activate button, verify the activation was successful, then select Save.
3. Attachment Settings
The formats supported for email attachment printing depends on whether or not you have LibreOffice installed on your server.
Without LibreOffice Installed
With LibreOffice Installed
The following steps guide you through configuring Email Printing with attachments.
- Check the box for Enable Office-type File Attachment Printing.
- Optional: Select Only Print Attachments. This ignores the email body and only prints files attached to the email.
- Leave LibreOffice selected in the Select your office suite drop-down.
- In the Path to LibreOffice Executable field, enter the path to the executable file. Example: C:\Program Files\LibreOffice.
- Select Save
4. Enable Direct Email Printing
- Select the box for Enable Direct Email Printing on the Service Client's Email Printing tab.
- If you are not configuring Direct Guest Email Printing simultaneously, leave the other settings unchecked.
- Select Save
5. PKI Encryption (Optional)
The last section on the Service Client's Email Printing tab is for Public Key Infrastructure (PKI) Encryption. Follow the steps below if you wish to configure PKI Encryption for Email Printing in your environment.
PKI Encryption
Install Win32 OpenSSL v3.2.2 .exe on the Windows Service Client device.
- On the Service Client device, navigate to https://slproweb.com/products/Win32OpenSSL.html.
- Select and download the EXE link.
- Run the downloaded file and proceed through the installation process.
- Add OpenSSL to the PATH variable.
- Select Start and type Path.
- Select Edit the system environment variables.
- Under the Advanced tab, select the Environment Variables button.
- Under the System Variables section, select Path then select Edit.
- Select Edit in the new pop-up box.
- Double-click the next available empty line and enter the path to the OpenSSL bin folder, for example,
C:\Program Files (x86)\OpenSSL-Win32\bin.
- After installing OpenSSL, reboot the machine.
- After the device reboots, access the Service Client's Email Printing tab in the Admin Console.
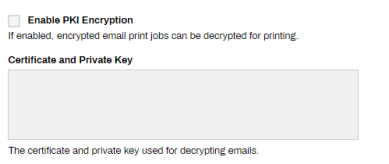
- Select Enable PKI Encryption in the Admin Console.
-
Copy and paste the proper certification key and select Save.
- Restart the Service Client.
6. Confirm Email Printing Service is Running
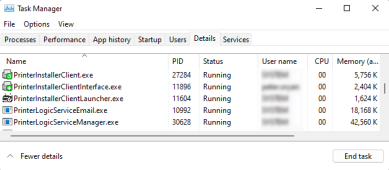
After saving the Email Printing configurations, verify the service (PrinterLogicServiceEmail.exe) is running. The steps below are for confirming the service on a Windows Service Client machine.
- On the Service Client machine, open Task Manager.
- Select the Processes or Details tab.
- Verify the following services are running.
- The three Vasion Print (formerly PrinterLogic)Client services. PrinterInstallerClient.exe, PrinterInstallerClientInterface.exe, and PrinterInstallerClientLauncher.exe.
- The Service Client PrinterLogicServiceManager.exe.
- The Email Printing PrinterLogicServiceEmail.exe.
Services for other features enabled on the Service Client object also display.
7. Configure Domain & Default Setting
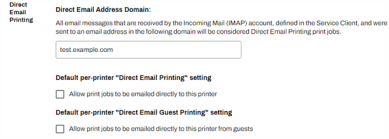
The following settings help you customize the Direct Email Printing user experience. Default (All) to enable Direct Email Printing for all printers or Printer-Specific to just enable specific printers. Choose the option best suited for your environment.
On the Admin Console, navigate to Tools ![]() Settings
Settings ![]() Printing and go to the Direct Email Printing section.
Printing and go to the Direct Email Printing section.
Here is a brief overview of the settings.
- Direct Email Address Domain
-
Enter the email domain of the email address(es) you want to use for the printer(s). The domain entered here appears after the direct email address in the Direct Email Printing section of printer object's Printing tab.
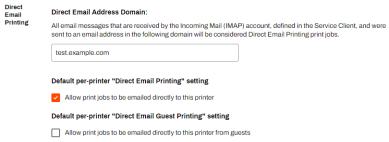
- Default per-printer "Direct Email Printing" setting
- Check the box to set the default setting to allow authenticated users to email print jobs directly to the printers.
- Default per-printer "Direct Email Guest Printing" setting
- Check the box to set the default setting to allow guests to email print jobs directly to the printers.
Default (All)
8. Configure Printer Email Prefix & Per-Printer Settings
Default (All)
- Navigate to the Direct Email Printing section on the desired printer object's Printing tab.
-
In the Direct Email Address field, enter the email prefix decided for the printer.
Gmail handles aliases using +. If the pull printer email address assigned on the Email Printing tab is printercloud@gmail.com, and the printer's object's name is reception, the Direct Email Address field would be printercloud+reception@gmail.com. See Direct Email Printing using Gmail for more information.
- Verify the following settings are selected:
- Use Default Direct Email Printing setting.
- Allow print jobs to be emailed directly to this printer.
- Select Save
- Repeat for each printer object.
Print jobs sent to the printer object's direct email address will now print out at that device using the default settings.
Printer-Specific
- Navigate to the Direct Email Printing section on the desired printer object's Printing tab.
-
In the Direct Email Address field, enter the email prefix decided for the printer.
Gmail handles aliases using +. If the pull printer email address assigned on the Email Printing tab is printercloud@gmail.com, and the printer's object's name is reception, the Direct Email Address field would be printercloud+reception@gmail.com. See Direct Email Printing using Gmail for more information.
- Select Use printer-specific Direct Guest Email Printing setting.
- Select the box for Allow print jobs to be emailed directly to this printer.
- Select Save
- Repeat for each desired printer object.
Print jobs sent to the printer object's direct email address will now print out at that device using the printer's settings.
Troubleshooting Help
If you are seeing alias is automatically stripped from the To: field, set up a distribution group:
- Remove the alias from the original account.
- Create a distribution list called <printername>@<domain>.com. Example: HPXXX@example.com.
-
Set the only member of the list to the main mailbox. Example: example@example.com.
The main mailbox set for the pull printer on the Service Client's Email Printing tab.
Mail should be delivered to the main mailbox, with <printername>@<domain>.com in the To: field.
-
Week Ending In Jan 4th, 2025
-
Released: Dec 27th, 2024
-
Released: Dec 23rd, 2024
-
Android/iOS: Dec 23rd, 2024
-
Released: Dec 9th, 2024
Yes. If the setting option for Only Print Attachments is enabled on the Service Client Email Printing tab, only the attachments will print. If the email does not contain any attachments, the email body will print.


