We've Moved!
We've unified our Vasion Print (formerly PrinterLogic) and Vasion Automate documentation into a single, streamlined resource to better serve you. Visit our new unified documentation site: docs.vasion.com
Note: This legacy site will not be updated after January 6, 2025, and will remain available for reference until May, after which all traffic will automatically redirect to docs.vasion.com/a/Get_Started/Automate.htm.

Last updated: January 07, 2025
LDAP Domain
To use Active Directory or Oracle for identity management within your organization, LDAP domain set up is required to enable certain functionality, like email printing, Mobile App printing, and secure release printing. It is also required if you'd like to authenticate access to the Admin Console using Active Directory and / or LDAP accounts.
When using LDAP, and using real-time authentication for things like the Admin Console, the Control Panel Application (CPA), or the Mobile App
|
Location |
Domain Name |
IP Address |
|---|---|---|
|
United States |
printercloud |
35.160.78.54 |
|
Frankfurt, Germany |
printercloud5 |
35.156.186.96 |
|
Sydney, Australia |
printercloud10 |
52.65.56.219 |
|
Canada |
printercloud15 |
3.98.74.218 |
For other LDAP attributes such as badge information and email addresses, you can enable Identity sync on a local network Service Client that allows LDAP communication, which would sync up to the cloud. You can use this option for some LDAP attributes, but you cannot use it for real-time authentication.
LDAP Configuration
Set up the Connection
- In the Admin Console, select Tools
 Settings General.
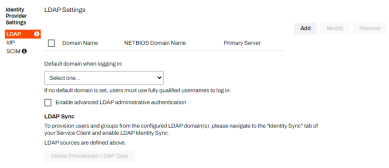
 - Scroll down to the Identity Provider Settings section and select LDAP.
-
Select Add..
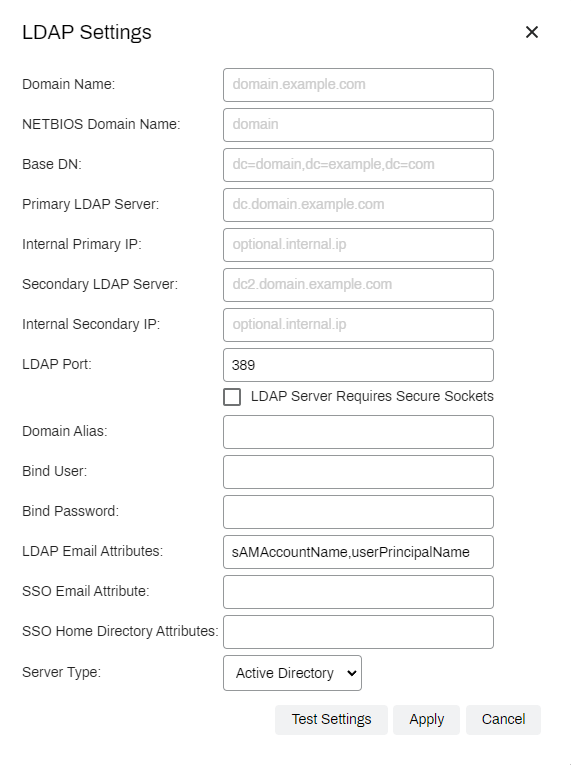
- In the LDAP Settings modal, fill in the required fields. Any time the instance requires LDAP authentication the LDAP settings apply. For example, if logging into the Admin Console using LDAP credentials,the Self-service Portal with LDAP credentials, and any advanced features like CPA, the Mobile App, or Email Printing.
- Domain Name — enter your LDAP Domain Name. The NETBIOS Domain Name and Base DN fields should fill in automatically.
- Primary LDAP Server — enter the external (public) IP address or FQDN that is port-forwarded to your primary LDAP server.
- Internal Primary IP — enter the internal (private) IP address or FQDN of your primary LDAP server. It's not required but may be necessary, depending on your network security.
- Secondary LDAP Server — enter the external (public) IP address or FQDN that is port-forwarded to your secondary LDAP server. It's not required but may be used, if needed.
- Internal Secondary IP — enter the internal (private) IP address or FQDN of your secondary LDAP server. It's not required but may be used, if needed.
- LDAP Port — port 389 for LDAP. If you check the box for LDAP Server Requires Secure Sockets, the port number will automatically change to 636.
- Domain Alias — enter an alias only if you are using multiple domains so you can identify this configuration.
- Bind User and Bind Password — enter the username and password of a user account (preferably a service account with Read-Only access) that is used for LDAP queries.
- LDAP Email Attributes — contains the Active Directory attribute where the user's email address is stored. This is used in conjunction with the Email Printing module.
- SSO Email Attribute — optional, enter the attribute to use for MFP user functionality such as scan to email.
SSO Home Directory Attribute — optional, enter the attribute to use for MFP user functionality such as scan to home directory.
Not all manufacturers support this functionality. Contact Customer Support at support@printerlogic.com for a list of supported manufacturers.
- Server Type — select the server type you are using.

Test the LDAP Connection
When you finish completing the LDAP Settings fields, select the Test Settings button. Once the test completes, the results display in a table format with the following details:
- Status indicator — successful tests display a green check mark, failed tests display a red "X" and skipped tests display a caution triangle.
-
Status — complete or Skipped.
The Skipped status appears if a settings is left without a value or if the value in the field cannot be found.
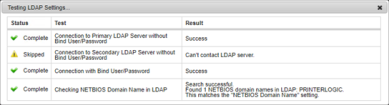
- Test — a description of the test.
-
Result — displays the result of the test. If the test is skipped or it failed, it displays the reason.
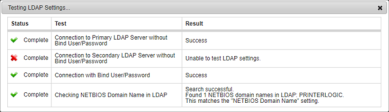
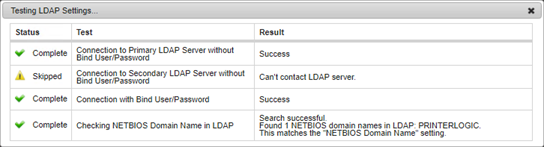

When the tests are successful, select Apply.
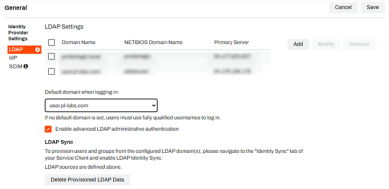
In the LDAP Settings section of the General settings, you can optionally configure the following:
- Default domain when logging in — use the drop-down to select the new LDAP domain. This is the domain the system uses when an end user attempts to log in with only a username and does not specify a domain.
For example, the user only needs to enter john.smith, for the system to attempt to log them in as mydomain\john.smith. If multiple domains are configured, the end user would still have to type in the non-default domain followed by the username. For example, xyzcorp\john.smith.
-
Enable Advanced LDAP Administrative Authentication — with this option checked, you can add users or groups without the Windows Active Directory interface. For example, Mac, Linux workstations, or when multiple domains are configured.

When you finish configuring the LDAP settings, select Save at the top-right corner of the page.
Delete Provisioned LDAP Data
For legal reasons, Product Support cannot remove provisioned LDAP users and groups from the database, and leaves this action to the discretion of the IT Admin. This process requires obvious interaction to remove the user and groups to ensure deletion is the desired outcome.
- In the Admin Console, navigate to Tools Settings General.
- In the Identity Provider Settings section select the LDAP option.
- In the LDAP Sync section select the Delete Provisioned LDAP Data option.
- Type DELETE into the text field.
-
Select Delete.
This action deletes all LDAP users and groups from the database for all configured AD domains and requires you to provision them again. You cannot undo this action.
The RBAC, Portal Security, and Printer Deployment rules associated with these users and groups will continue to function unless the admin manually deletes them.

-
Week Ending In Jan 4th, 2025
-
Released: Dec 27th, 2024
-
Released: Dec 23rd, 2024
-
Android/iOS: Dec 23rd, 2024
-
Released: Dec 9th, 2024
No, it does not. This function will only remove provisioned data from the Vasion Print (formerly PrinterLogic) database. You must complete that process within the LDAP server if you need to remove a user.