Last updated: July 18, 2024
HP - Off-Network Cloud Printing (ONCP)
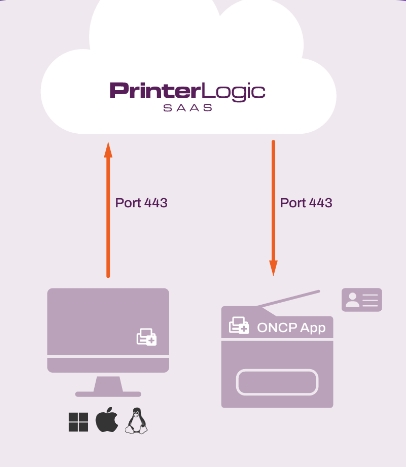
Off-Network Cloud Printing (ONCP) requires zero on-premise infrastructure while allowing anyone to print—no matter their network. It offers zero-trust network authentication and better print availability, with printing handled and stored entirely on the cloud. Off-Network Cloud Printing continues to bridge the gap between network security and flexible user printing but relieves organizations of service client maintenance and oversight.
Key Points
- The use of ONCP requires licensing for the Advanced Security bundle and must be enabled by a representative. Contact your CSM for details and assistance.
- ONCP is currently only available for Fujifilm, Fuji Xerox, HP, Kyocera, Lexmark, and Ricoh MFP devices.
ONCP exclusively provides support for RAW printing and is accessible solely within Virtual Appliance instances operating on Windows, Mac, and Linux systems.
Prerequisites
- You must contact HP or your HP-certified reseller to install the Vasion HP ONCP app from the HP Command Center. They then need to:
- Claim and add their printers to the HP Command Center.
- Add the Vasion ONCP app as a solution.
- Add the app to the customer's account.
- Manage and deploy the ONCP application to printers.
-
Create a Service Client ensuring that on the Printer Apps tab, that Printer Apps is enabled and that the HTTPS certificate matches the hostname.
The Service Client is solely necessary for installing the ONCP App on the printer. Once the app is installed, it's entirely optional to keep the Service Client running. However, if the Service Client serves other essential functions or integrates with different services, it should remain operational for those specific purposes.
- Ensure that the PrinterLogicServicePrinterApp.exe service is running on your Service Client machine.
- If your Service Client is using Windows OS, ensure Visual C++ Redistributable for Visual Studio 2015 (32-bit/64-bit) or newer is installed on the Service Client.
- Both the x86 and x64 redistributable packages must be installed. These packages can be found in the Microsoft Download Center.
- All devices, to include Service Client, printers, etc., must be allowed to reach DNS server and resolve names.
- Be using a supported printer found on the Supported Printers List. Filter your results by selecting the Off-Network Cloud Printing option from the Feature drop-down.
- Ensure the following allow list URLs are open:
- Oncp-ofn.<Instance URL>
- Oncp-pgw.<Instance URL>
- Ensure needed ports are open based on your printer manufacturer found on the ONCP Setup Requirements topic.
Set Environment Variables
After reaching out to your Vasion representative, the following environment variables must be set in the Virtual Appliance before configuring any steps.
- Access your Virtual Appliance persistent storage.
- Navigate to \\<Instance URL>.com\appliance-storage\.
- Open the secrets.env file.
- Ensure the following flags are set.
- REPLICAS_STORAGE=1
- REPLICAS_ONCP_PGW=1
- REPLICAS_ONCP_REG=1
- REPLICAS_ONCP_HOLD=1
- REPLICAS_ONCP_OFN=1
Enable the HP Workpath Platform on the Printer
If HP Workpath is not already enabled on the printer, follow these steps to enable it:
- Open the printer's web page in a browser, or physically sign in on the printer, as an Administrator.
- On the Security tab, select General Security in the menu if it is not already selected.
- In HP Workpath platform, select Enable.
- Select Restart.
Claim the Printer and Install the Vasion Solution
The following steps outline the process that HP or an HP-certified reseller must complete to add the Vasion ONCP app to your printers.
Add the Vasion ONCP App
- Open the printer's web page in a browser, or physically sign in on the printer, as an Administrator.
-
Select the HP Command Center application on the printer.

-
Select Continue.
-
Wait for the login information to display on the printer's console.

-
Make a note of the displayed code and return to your computer.
A mobile device may also be used to complete this step by scanning the displayed QR code and following the steps provided.
- Claim the printer by signing in to hpcommandcenter.com/claim and enter the code you got on the printer.
-
Now navigate to the HP Command Center.
You can quickly do this by removing the subdirectory "claim" from the URL in the browser address bar from the previous step.
- Select Accounts and select the Demo Pool account.
-
In Solutions, search for and select Vasion ONCP, then select Manage.

-
Select Install.

-
Select the printers you wish to install, then select Next then Install.


Once the printer is installed in the HP Command Center with the Vasion ONCP solution you can proceed to the following steps to enable and install the ONCP feature.
Enable ONCP At A Global Level
- In the PrinterLogicAdmin Console select Tools
 Settings General.
 - Scroll down to the Off-Network Printing section.
-
Select the option for Allow Cloud Printing.
A default global setting can also be configured here to set Cloud Printing as the method for all print jobs.
-
(Optional) Configure the Off-Network Priority printing based on the on-screen descriptions and your desired outcome.
The Option for "Off-Network Primary" is not applicable to ONCP, and should not be selected.
- Click on Save.

Enable ONCP At A Local Printer Level
If you have set Cloud Print as your default global method in the General Settings for all printers, this step is not necessary.
- In your Tree View select the printer object you want to enable ONCP on.
- Select the Off-Network tab.
- In the Off-Network Enabling section select the option for Use Printer-Specific Off-Network Printing Setting.
- In the drop-down field, select Cloud Print as your printing method.
- Click on Save.

Install ONCP On Single Device
- Select the printer object you have set for Cloud Print.
- Select the Apps tab.
- Select the printer manufacturer.
- Select CPA 2.0.
-
Select the Service Client running the printer app service.
Cloud Print is not dependent on the CPA and can be installed as a stand-alone app or in conjunction with the CPA.
- Select the option for Off-Network Cloud Printing.
-
Select the option desired for printer admin credentials. These can be set at a default level configured in Tools
Settings General in the Control Panel Application section, or at a Printer Specific level on the current screen. In either case, ensure that the correct user credentials are entered. - Click on Save.
- Now either physically go to the printer or remote to it's console and select the Vasion ONCP app to establish the web socket connection.
- You can now close the ONCP app on the printer.
- The ONCP app is now ready for use.

Install ONCP Using the CPA Manager
For information on installing ONCP in bulk see the CPA Manager topic.
Troubleshooting
An incorrect admin username and password is a frequent cause of failed installations. To resolve this issue, you can conveniently modify the credentials used for CPA installation on the Apps tab on the individual printer, or through the Modify feature in the CPA Manager. If the same admin name and password are used for multiple manufacturers, you can select several manufacturers simultaneously within the CPA Manager and change the credentials in bulk.
While this may seem evident, it is important to consider that the Service Client machine could be shut down or in an error state.
To easily check the status, you can refer to the Task Manager on the device. Navigate to the Processes tab and ensure that the PrinterLogicServicePrinterApp.exe process is running.

If neither the PrinterLogicServiceManager.exe or PrinterLogicServicePrinterApp.exe processes are running on the Service Client device, check the following:
- Verify that the installed client is authorized and configured to connect to the correct instance. You can quickly test this by clicking the system tray icon to open the Self-service Portal. If it opens to the correct URL, and you can sign in, view, and install printers from the portal, then the client is authorized.
- Refer to Device Authorization if prompted for a code for the Self-service Portal.
- If the system tray icon opens to an incorrect URL, refer to the instructions to Additional Client Management Options.
- Navigate to C:\Program Files (x86)\Printer Properties Pro\Printer Installer Client\ServiceHost.
- If the ServiceHost folder is not present, verify the hostname or IP address of the device and compare it to what you entered in the Admin Console.
- If the ServiceHost folder exists, check the config folder within it. You should find a JSON token if the Service Client is authorized.
- If the folder exists but no JSON token is found, it may be necessary to reauthorize the Service Client.
- Please note that Service Client authorization is different from client authorization.
 Service Client Reauthorization Steps
These steps provide the Service Client with a new token if it's missing or the PrinterLogicServiceManager.exe service is crashing.
Before proceeding with reauthorization, ensure that you have checked the URL, client authorization, and folders as mentioned earlier. Only if those checks have been performed should you proceed with the reauthorization process. It is crucial to complete the following steps within two minutes, as the reauthorization will fail otherwise.
- On the machine set up as the Service Client, navigate to C:\Program Files (x86)\Printer Properties Pro\Printer Installer Client\ServiceHost\Config
- Verify if there is an existing token. If there is, delete the json token.
- Open Task Manager.
- Select the Details tab.
- Right-click on PrinterInstallerClientLauncher.exe and select End Process Tree.
- There are three PrinterLogic services running for the client. If the other two services don't close with End Process Tree, they will need to be closed individually.
- In the PrinterLogic Admin Console navigate to the Service Client Object.
- On the Service Client's General tab, click Reauthorize.
- Click Okay in the prompted message.
- Back on the Service Client machine, select the Services tab in Task Manager.
- Right click on PrinterInstallerLauncher service and select Start.
When the services start back up the Service Client machine pulls down a fresh token.
By default, the Visual C++ Redistributable for Visual Studio 2015 (32-bit/64-bit) or newer is typically already installed. However, it is essential to have these components installed on the Service Client to generate the required items for a successful installation. Both the x86 and x64 redistributable packages must be installed. These packages can be found in the Microsoft Download Center. Without it, the Service Client will be unable to initiate the app service, leading to repeated attempts to start and subsequent failures.
A quick way to do this is to right-click the Client icon in the system tray of the Service Client machine and select Refresh Configurations.
Before proceeding, it is crucial to double-check two key aspects:
- Verify that the IP address assigned to the printer is accurate within the admin console.
- Ensure that you can successfully ping the printer from the Service Client machine.
Confirming these details will help ensure a smooth and error-free process.
-
Released: September 3rd, 2024
-
Updated Supported ChromeOS Version
Supports ChromeOS 109+
-
New Mobile App Releases
Released: August 26th, 2024 -
New Host and Application Builds
Released: 8/20/2024
Updated Client Versions Included
-
Set Up Using VMM
Now Supporting Linux KVM Environments