Last updated: May 06, 2024
Folders
The first step when setting up your instance is to create folders for your printers and printer objects. Folders organize your printers in the Admin Console and the Self-service Portal. You have complete control and flexibility in how you manage your folders.
Here are some recommendations for the tree view setup:
- Setting up folders by region or location.
- Splitting up regions by sites or states.
- Splitting up sites by offices or floors.
You are the best resource for configuring the tree view in your environment and setting it up to fit your needs best. You can also easily make changes as necessary as your business needs evolve.
Create a New Folder
Use one of the following methods to create new folders.
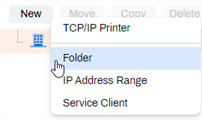
New Button
- Select the location where you want to create the new folder.
- Select the New button.
-
Select Folder.
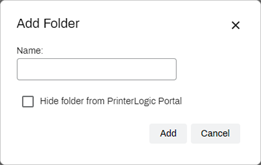
- In the Name field, give the folder a unique name. This the name also displays in the Self-service Portal.
- If you want to hide this folder so it doesn't display in the Self-service Portal, select Hide folder from PrinterLogic Portal. See Portal Security for more information.
-
Select Add.


Context Menu
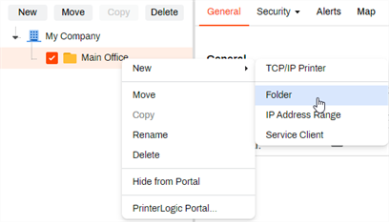
- Right-click on the location where you want to create the new folder.
- Select New.
-
Select Folder.
- In the Name field, give the folder a unique name. This the name also displays in the Self-service Portal.
- If you want to hide this folder so it doesn't display in the Self-service Portal, select Hide folder from PrinterLogic Portal. See Portal Security for more information.
-
Select Add.

Move a Folder
You can reorder the tree by moving folders to different locations within the tree as necessary to keep up with your business needs. When you move folders, the changes are reflected in the Self-Service Portal for end users to see. However, if you use a floor-plan map in the portal with folders displayed, you must manually add the folder to the map. You can use one of the following methods to move folders.
Drag and Drop
- Select the folder you want to move.
- Click and hold down the left mouse button and drag it to the new folder location.
- Release the left mouse button when you see the green check mark.
The green check mark indicates a valid location. A red X indicates the folder is not yet over a valid location.
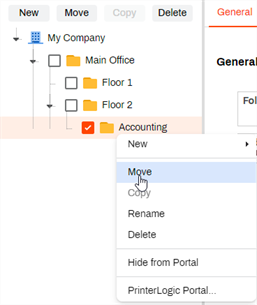
- Select the folder you want to move.
- Right-click on the folder.
-
Select Move.
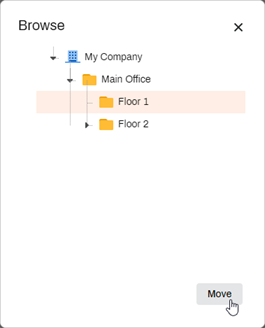
- In the Browse modal, select the new folder location.
-
Select Move.


Move Multiple Folders
- Select the folders you want to move.
- Press and hold [Shift] or [Ctrl] key on your keyboard.
- Check the boxes next the folders you want to move.
-
Select Move from the options in the center of the screen.
- In the Browse modal, select the new folder location.
-
Select Move.

-
Release Date: 17 May, 2024
-
Windows Client Release Notes Updated
Release Date: 16 May, 2024
-
Mac/Linux Client Release Notes Updated
Release Date: 16 May, 2024
-
Chrome OS Client Release Notes Updated
Release Date: 24 April, 2024
-
Topic on additional options.
-
A new topic has been added for HP devices using ONCP
-
A setting has been added to only print attachments.