Last updated: January 29, 2024
Cache Drivers
The Cache Manager is a file share that directs all cache locations to download drivers and other print-related items. This solution improves printer installations in environments with low bandwidth or remote sites.
Overview
An administrator with access to the Admin Console may configure a file share as the Cache Manager. The Cache Manager can be any Windows operating system (OS) device on the network with the PrinterLogic client installed. Define the device in the Cache section on Tools ![]() Settings
Settings ![]() General.
General.

The Cache Location is the computer at the remote site that stores drivers, profiles, and other objects. The Cache Location Value (UNC path to a share) is set on an IP address range object's General tab and only applies to users within the IP address range.
Larger organizations typically have regional cache locations, the idea being that geographical proximity results in faster download speeds and a reduced load on the primary server file share.
For example, EMEA offices could use a cached location in Germany, or APAC offices could use one in Tokyo.

Cache Location Files
- Driver files
- Driver profile files
- PrinterInstallerClient.msi (Client installation file)
- PrinterInstallerClientUpdater.exe (Client update file)
Users self-installing printers receive an error stating that the printer could not be installed if the driver/driver profile files haven't synced with the Cache Location and are unavailable.
The Cache Manager copies all cache files to the Cache Locations as soon as they are created in the Admin Console, as long as the IP address range's Synchronize data files to the specified cache location option is enabled. A new printer object may take a couple of minutes to copy over completely.

The Cache Manager locally copies the cache files to the C:\Program Files (x86)\Printer Properties Pro\Printer Installer Client\cache folder before distributing them to the Cache Locations.
Caching does not require configuration such as LDAP, SNMP, or SMTP to function.
PrinterLogic supports the following caching devices:
- Riverbed Appliance
- WAN Accelerator
- Other caching devices, such as a file share
Create Caching Share
Part of setting up caching is creating and configuring a file share. The Cache Manager uses this share as the location where drivers, profiles, etc., are copied. This location is where end-user workstations connect to get the files.
The recommended best practice is to set up the share before you set up the Cache Manager or Cache Location. Additionally, you should set up a single Cache Location and test it before configuring additional cache locations.
Create Share Folder
- Log in to the server on which you would like to set up the share to be used for caching.
- Open Windows Explorer and click Local Disk (C:).
- Right-click in Windows Explorer and select New
 Folder.
 - Enter the name of the new folder.

Folder Share Properties
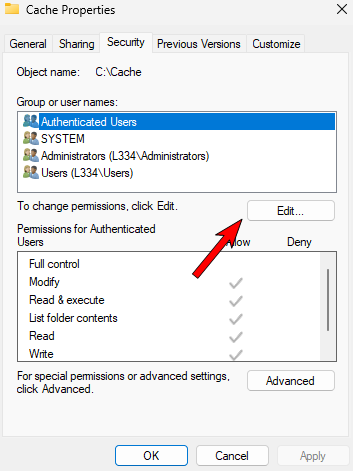
- Right-click the new folder and select Properties.
-
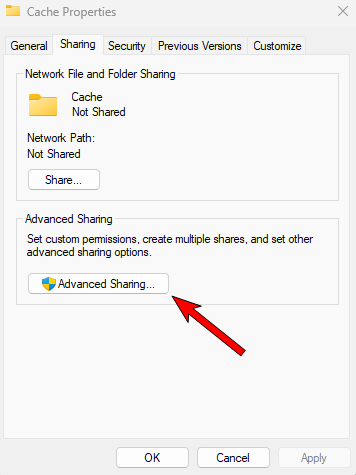
Click the Sharing tab and select Advanced Sharing.
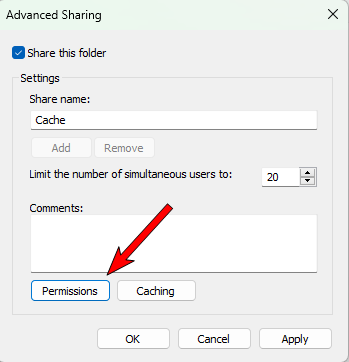
- Check the Share this folder box
- (Optional) In the Share name field, type a name for the share. By default, the name of the folder displays as the name of the share, but you can change it to any value.
-
Click Permissions.
-
If the Everyone group has not been added by default, add the group and set the Read permission to Allow.
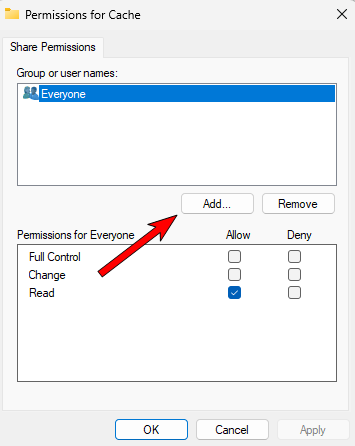
- Next, add the Cache Manager computer. Click Add.
-
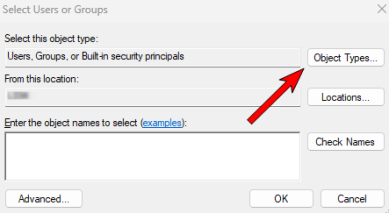
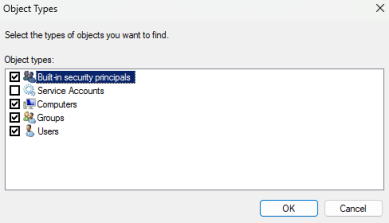
Click Object Types.
-
Check the Computers box and Click OK.
- Enter the Cache Manager computer name followed by a $ (computer$) and then click OK.
- Click Apply.
- Click OK on the Share Permission tab, and again on the Advanced Sharing tab.


Folder Security Properties
-
In the folder Properties window click the Security tab and click Edit.
-
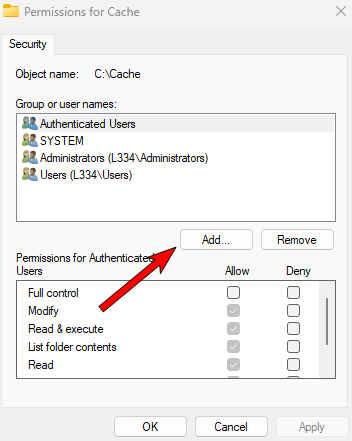
Click Add.
-
Click Object Types.
-
Check the Computers box and click OK.
- In the Enter the object names to select field, type Everyone. If you do not want to include everyone, another object name you could enter is the user domain. You can use this object name in the Security tab only and not in the Sharing tab.
- Click OK.
- In the Permissions for <Object Name> field, click the Allow for the Full Control line item and click Apply.
- Click Okay.
- In the Properties window, click Okay to close out.


Enable Caching
The Cache Manager must be configured on a Windows OS device with the PrinterLogic client installed.
- In the Admin Console, navigate to Tools Settings General.
- In the Cache section, check the box for Enable end-user redirections to cache.
- Set the Cache Manager name. Use the Fully Qualified Domain Name rather than an alias for the Cache Manager computer.
- Click Save.
- Log in to the specified Cache Manager computer.
- Right-click the PrinterLogic system tray, and click Refresh.
The computer will now behave as a Cache Manager.
Set Cache Location
- Log in to the Admin Console.
- In the tree view, select an IP address range object.
- Click the General tab.
- In the Cache Location field, set the Cache Location path.
- Click Update cache files now.
After you have designated a computer as the Cache Manager, PrinterLogic copies the cache files to the computer's local file system and then copies the cache to all the cache locations specified in the IP address range objects.
When end-users request a file in the cache, the PrinterLogic server redirects the client to the location specified in the client's IP address range. The client then obtains the file from the cache location.
-
Release Date: 17 May, 2024
-
Windows Client Release Notes Updated
Release Date: 16 May, 2024
-
Mac/Linux Client Release Notes Updated
Release Date: 16 May, 2024
-
Chrome OS Client Release Notes Updated
Release Date: 24 April, 2024
-
Topic on additional options.
-
A new topic has been added for HP devices using ONCP
-
A setting has been added to only print attachments.