Last updated: January 29, 2024
Custom Fields
Custom fields let you add additional text fields to printer objects in the Admin Console, and can display those fields on the Self-service Portal. The fields let you further customize the information included on printer objects. You can also choose whether or not the fields show with the printer on the Self-service Portal.
Overview
Custom fields are mainly used for adding or describing additional printer information. Enable the option for Appears on Portal to make the fields show with printer objects on the Self-service Portal along with the default columns: Printer Name, Driver, Location, and Comment. These are useful if further description of the printer is needed.
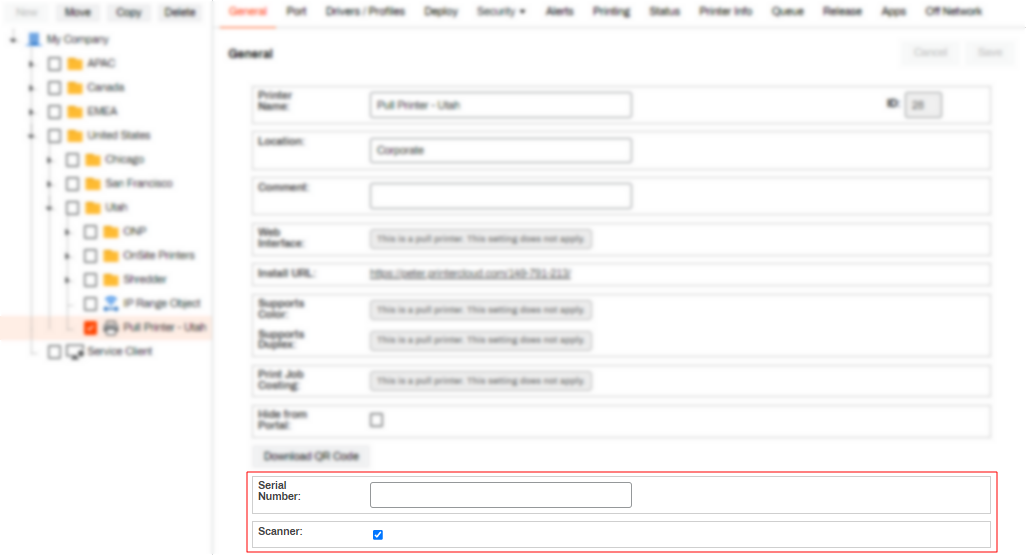
Custom fields can be used without showing on the Self-service Portal and will display with the printer object in the Admin Console. For example, listing printer serial numbers or other information that is not necessarily needed by the end user, but is helpful for administrators.

Create and name the custom field on Tools ![]() Settings
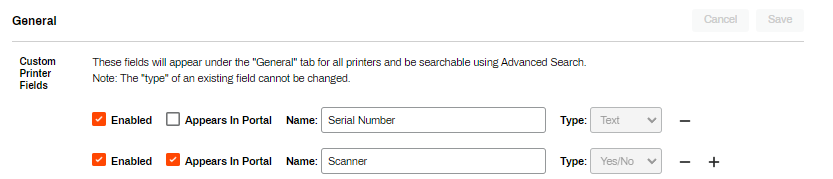
Settings ![]() General in the Admin Console. The Custom Printer Fields section contains one line item which is disabled by default. For the custom field to appear in the Admin Console, check the Enabled box. The custom field displays in the General tab for that printer object and is where the value can be entered. Check the Appears on Portal box if you want the field to display on the Self-service Portal.
General in the Admin Console. The Custom Printer Fields section contains one line item which is disabled by default. For the custom field to appear in the Admin Console, check the Enabled box. The custom field displays in the General tab for that printer object and is where the value can be entered. Check the Appears on Portal box if you want the field to display on the Self-service Portal.
The Type drop down lets you pick the entry type. Select Text, Numeric, or Yes/No. The Yes/No option creates a check box for the field for the field value.
Create a Custom Field
- Navigate to the Custom Printer Fields section on Tools
 Settings General in the Admin Console.
 - Edit the existing default field or for a new custom field click the plus sign (+).
- Enter in the Name of the custom field. This displays on the printer object's General tab.
- Use the Type drop-down to select the type of the custom field.
- Text and Numeric fields are text-based. Yes / No fields are a check box.
- Check the Enabled box for the field to appear on the printer object.
- Check the Appears on Portal box for the field to display on the Self-service Portal.
-
Click Save.
Once you save a custom field, you will not be able to modify the Type.
- Click Back to Tree View.
- Navigate to any printer object's General tab.
-
Complete the custom field entry information.

- Click Save.
-
Release Date: 17 May, 2024
-
Windows Client Release Notes Updated
Release Date: 16 May, 2024
-
Mac/Linux Client Release Notes Updated
Release Date: 16 May, 2024
-
Chrome OS Client Release Notes Updated
Release Date: 24 April, 2024
-
Topic on additional options.
-
A new topic has been added for HP devices using ONCP
-
A setting has been added to only print attachments.