Last updated: May 06, 2024
Microsoft Edge (Chromium) Extension
The PrinterLogic Edge Extension is used to ensure proper communication takes place between the Microsoft Edge Browser and your PrinterLogic instance. This extension allows the installed client to communicate with and access the features within the Self-service Portal when using the Edge Browser.
The Edge extension is necessary to have in place for anyone in an organization logging into the Self-service Portal, and for some features within the Admin Console.
The Edge extension is now included in the PrinterLogic client installation. If using Edge for the installation process, there are some specific steps that need to be followed to have it install correctly.
The extension is also available at the Microsoft Store.
Although the Extension is included in the Client during installation, the end-user will still need to confirm the extension due to browser security manually. However, IT Admins may be able to auto-enable the extension using a GPO. More details are found in specific Chrome and Edge Chromium Knowledge Base articles.
Important Extension Notice
In January 2023, Google phased out its previous extension technology, Manifest 2.0. Google now only support Manifest 3.0. Microsoft Edge Chromium followed the same migration timeline. Because of this change PrinterLogic customers who use our Chrome Browser Extension, Edge Chromium extension, or our Chrome OS Client must run Version 88 or later of the Chrome or Chromium-based Microsoft Edge browser. Additionally, you will need to be running the most current version of our extensions. Our extensions update automatically and will be compatible with Google's latest standard.
What is browser extension "Manifest"?
- An extension manifest gives the browser information about the extension, such as the most important files and the capabilities the extension might use.
How is Manifest v2 different from v3?
- Manifest v3 includes improvements to privacy, security, and performance. For details, refer to the Overview of Manifest V3 provided by Chrome.
Do I need to update the extensions manually?
- The extension will automatically update.
What happens if I don't update the browser version in time?
- The release of the new PrinterLogic Chrome, Edge Chromium, and Chrome OS extensions on Dec 12 will not function with browsers older then version 88 of chromium
- Chrome Browser: The Self-service Portal will loop and prompt the end-user to install the PrinterLogic client because the extension is not communicating with the client. End-users will be unable to self-install printers from the portal.
- Edge Chromium Browser: Self-service Portal will loop and prompt the end-user to install the PrinterLogic client because the extension is not communicating with the client. End-users will be unable to access and self-install printers from the portal.
- Chrome OS Client (Extension): Chromebooks and Chrome OS devices will not be able to access the Self-service Portal, receive printer deployments, or authenticate end-users.
What can I do to resolve the issue if I don't update in time?
- Update the Chrome and Chromium Edge Browser and Chrome OS devices to version 88 or later. Updating will resolve the communication issue and allow the extensions to function as expected.
Prerequisites
- PrinterLogic Client version 25.0.0.481 or later.
- PrinterInstaller service version 5.0.6155 or later.
- Edge Browser version .88 or newer.
- Using Windows OS. (Mac OS is not supported currently)
Installing the Extension
- Open your Edge browser.
- Navigate to your PrinterLogic Self-service Portal.
-
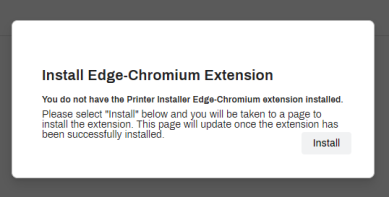
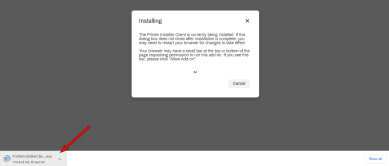
You will be prompted to install the extension.
-
Click the Edge Extension button. This page will also display the option for the Chrome extension for Edge which is only used in Web Stack and older Virtual Appliance builds.

-
Follow the on screen prompts to finish the installation.

-
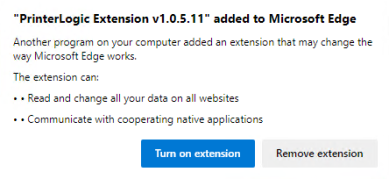
The PrinterLogic Extension will now be displayed in your browser extensions.
The Microsoft Edge Extension is only used to ensure full functionality while using the Edge (Chromium) browser. There are no available options by clicking on the extension. PrinterLogic features are only available through the Client in the system tray or the Start menu.
-
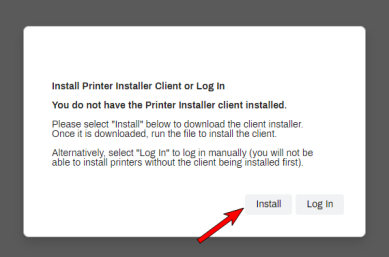
If the PrinterLogic Client is not already installed, when you navigate back to the Self-service Portal, you will be prompted to Install the PrinterLogic Client. Click Install to begin.
-
The client download process will begin.
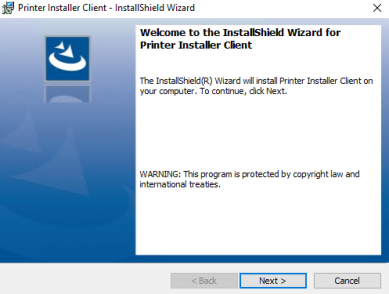
- Once the file is downloaded, run the file as an administrator to install the client.
-
Follow the prompts displayed in the installation wizard.
-
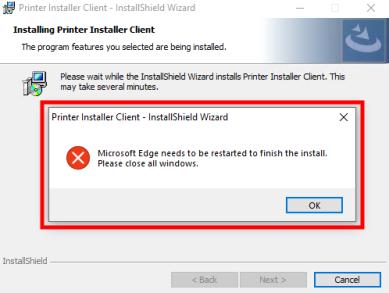
During the installation process of the client, a prompt will appear in the browser to close all windows. Click on OK.
-
If this is an installation on a new machine, the PrinterLogic Client Icon will also now be displayed in the system tray.

If this is a new machine installation, you may be prompted to provide an authorization code (Device Authorization) depending on how the machine was configured by the administrator.
-
Browse to your Self-service Portal, and sign in using the correct Identity Provider credentials set by your admin.
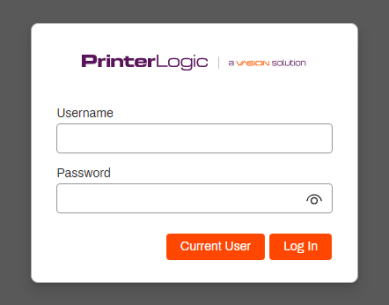
- At this point, you will now be able to self install printers.


-
Release Date: 17 May, 2024
-
Windows Client Release Notes Updated
Release Date: 16 May, 2024
-
Mac/Linux Client Release Notes Updated
Release Date: 16 May, 2024
-
Chrome OS Client Release Notes Updated
Release Date: 24 April, 2024
-
Topic on additional options.
-
A new topic has been added for HP devices using ONCP
-
A setting has been added to only print attachments.