Last updated: November 14, 2024
Xerox - CPA 1.0
Follow these steps to install the first-generation Control Panel Application (CPA) on Xerox printers.
Installation Instructions
Ensure all of the universal requirements are completed and functional prior to CPA setup.Additional Port Information
All communication runs over port 443.
Installation Steps
If the Version field does not appear in the interface, the manufacturer does not support CPA 1.0. You will need to follow the appropriate CPA 2.0 topic.
These are the steps to install the CPA on a single printer using the printer object's Apps tab. Reference CPA Manager to install the CPA on multiple printers at once.
- In the Admin Console tree structure, select a printer.
- Select the Apps tab.
- In the Manufacturer field, select the desired manufacturer.
- In the Version field, select CPA 1.0.
- Select Save
- Select Install Application on Printer.
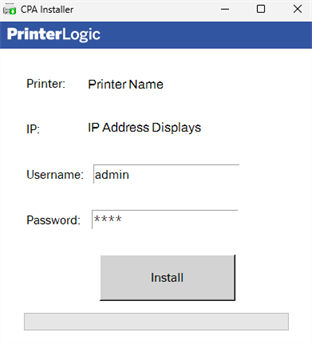
- The CPA Installer downloads and generates a modal requesting the credentials for the printer web interface.
- Enter the credentials and select Install.
CPA 1.0 does not require a Service Client to install the CPA. The Service Client drop-down on the Apps tab is only used when installing Copy/Scan Tracking on a printer.
Copy/Scan Tracking
Copy/Scan Tracking uses SNMP to track and report the number of copies and scans on a supported multi-function printer. The Print Job Records report provides details on the number of scans and copies on the selected printer for auditing and reporting purposes.
The Service Client drop-down field and Install Copy/Scan Tracking on printer setting on the printer object's Apps tab are separate from the CPA v1 installation. Reference the Copy/Scan Tracking topic for prerequisites and steps.
![]()
Uninstall the CPA
You can uninstall the CPA using the Admin Console, Embedded Web Server (EWS), or from the device.
From the Admin Console
- Navigate to the printer's Apps tab.
- Select the Uninstall Application from Printer button.
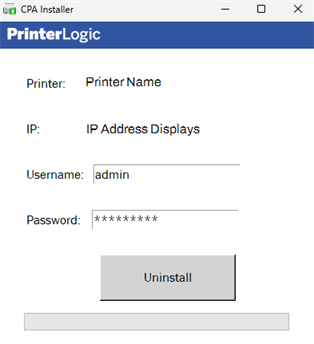
The CPA Installer / Uninstaller downloads and generates a modal requesting the credentials for the printer web interface.
- Enter the credentials and select Uninstall.
The CPA is uninstalled when the process completes.
From the EWS/Web Interface
- Access the EWS UI/Web Interface for the printer using the Web Interface link on the printer's General tab in the Admin Console.
- Navigate to Properties
 Apps Custom Apps Weblet Management. (This path may vary between models)
 - Locate the Virtual Appliance CPA.
- Select Delete.
From the Printer
- Access the Control Panel of the device.
- Navigate to Tools App Settings Weblet Settings Weblet Management. (This path may vary between models)
- Locate the Virtual Appliance CPA.
- Select Delete.
-
New Mobile App Release
iOS: November 11th, 2024 -
Released: November 11th, 2024
-
Released: October 22nd, 2024
Updated Application Version Included