Last updated: February 22, 2024
Virtual Appliance Host Upgrade
This document provides the steps to upgrade the Host for your Virtual Appliance. These steps will be general directions of what will need to be done. They are not specific to any hypervisor.
Minimum System Requirements
Depending on the configured features and user count, the minimum requirements for the Virtual Appliance may increase. Use the recommendations below when creating your Virtual Appliance, but continue to monitor the CPU and RAM utilization and allocate additional resources as needed.
- Four 3.5-4.0 GHz processors. Add two 3.5 GHz processors for each additional 15,000 users.
- 16GB RAM for up to 15,000 users.
- Add 2 CPUs / 8GB RAM for each additional 15,000 users.
- Add a minimum of 2 CPUs and 4GB RAM if using the Internal Service Client.
- Add 2 CPUs and 4GB RAM per 500 CPA/Simple Badge Release installations.
- 80GB free hard disk space for the host disk.
- There should be 50GB of free hard disk space on the persistent storage disk (add 4GB for every 100 printers).
- There is a requirement for NTLMv2 to connect to the appliance-storage shared folder of the PrinterLogic Virtual Appliance.
You should completely back up your Virtual Appliance database before performing any upgrade procedure.
If upgrading from host build 1.0.593 or earlier, please contact PrinterLogic support at support@printerlogic.com. FOR CUSTOMERS USING THE MySQL SERVER THAT IS CONTAINED IN THE Virtual Appliance, you must perform the following prerequisite BEFORE upgrading to this host build:
- Before upgrading to this host version, the following query must be run on the existing internal MySQL server immediately before doing the host upgrade:Copy Code
SET PERSIST innodb_fast_shutdown=0;
More detailed instructions can be found in the PrinterLogic Knowledge Base.
- Download and install a MySQL editor of your choice (e.g. MySQL, MySQL Workbench, HeidiSQL, PHPMyAdmin).
- Run the MySQL Editor.
- Set the host to the IP address of your Virtual Appliance.
- Set the user/username to admin.
- Set the password to the password that was designated during the configuration of the Virtual Appliance.
Database password can be found in the secrets.env file on the share drive. This will be listed as the DB_PASSWORD parameter.
Backup the Virtual Appliance
Before any upgrades, it is crucial that you take immediate action to back up your Virtual Appliance. Failure to do so could result in irreversible data loss. PrinterLogic strongly emphasizes the importance of adhering to the comprehensive guidelines outlined in the Virtual Appliance Database Best Practices.
Host Upgrade
If your host version is 1.0.757 or older, you must first update to 22.0.818 before proceeding to newer versions. If you are on host build 1.0.711 or older, we suggest incremental upgrades to at least host build 1.0.757 and then upgrade to 22.0.818 before upgrading to a newer host.
- Download the latest host upgrade file for your hypervisor. They can be found in the Host Upgrade documents.
- Gracefully shut down Guest OS of existing Virtual Appliance.
- Run a Backup of the VM.
-
In your hypervisor console, make a clone of the persistent storage disk that has your PrinterLogic Virtual Appliance data contained on it. DO NOT delete the disk from storage. Also, ensure you note its name so you can attach the clone to the new host. Alternatively, you can detach the disk from the VM (if it does not contain snapshots) and attach it to the new VM, but it is HIGHLY RECOMMENDED that you use the option of cloning the storage drive for safety.
This is generally the second disk you create when initially creating your Virtual Appliance. - Create a new Virtual Appliance in your Hypervisor console using the file you downloaded in step 1, but do not boot it yet.Ensure you create the new Virtual Appliance using at least the minimum requirements for RAM, CPU, etc. as is listed above in the System Requirements section.
-
Attach the disk that you cloned in a previous step. If you chose to detach the old disk instead, then add an additional hard disk, and ensure you select the existing hard disk you detached in a previous step.
-
Start the new Virtual Appliance Guest OS.
When upgrading your host, the TCP/IP settings will also be lost. It will be necessary to configure the new host with the same network settings that were used before. Step 8 will assist you with this configuration process. -
Configure the Virtual Appliance Network Settings.
-
The Virtual Appliance starts as a DHCP client. It’s possible to leave it that way and configure the TCP/IP settings via DHCP Reservation. Otherwise, use the steps below to configure a static IP and to optionally change the private IP range that the Virtual Appliance uses by default so that it doesn’t conflict with existing subnets in the environment.
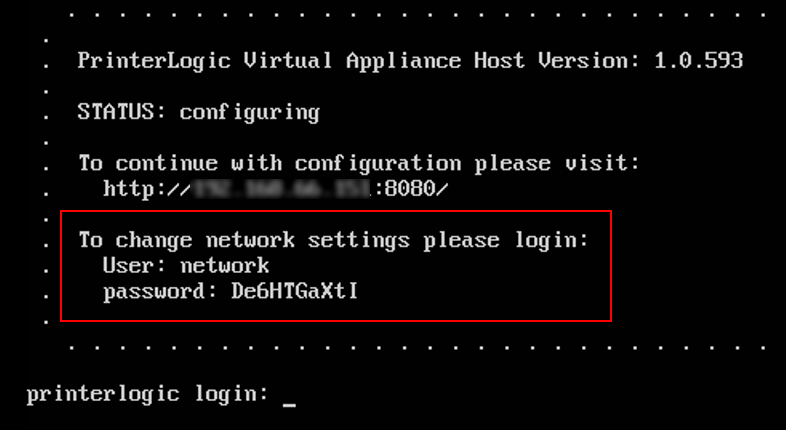
- In the hypervisor where the Virtual Appliance runs, open the web console to access the Virtual Appliance Linux terminal interface.
- Login with the credentials supplied in the terminal banner for the network user.

- Enter "Y" to change the network settings.
- Enter "Y" to change the network mode.
-
Enter the TCP/IP settings.
The image below is just an example. Ensure you use the settings specific to your network.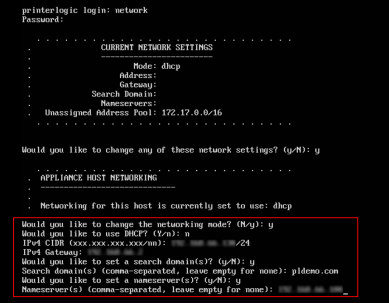
-
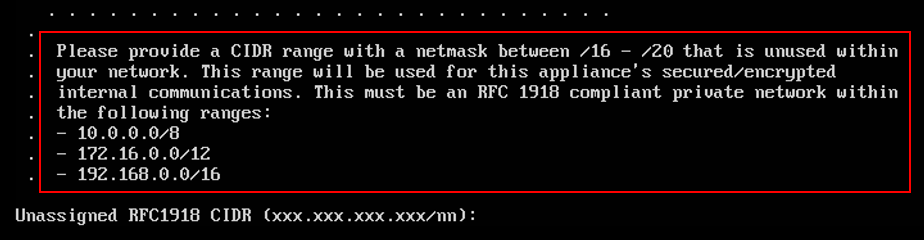
If the existing address pool does not conflict with any subnets in the environment, enter “N”. Otherwise, enter “Y” to set a different address range.
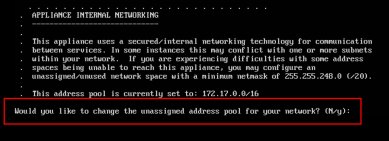 If needing to adjust IP addresses, be sure to read and understand the network range options you are presented with. Any range used must have a netmask < 20.
-
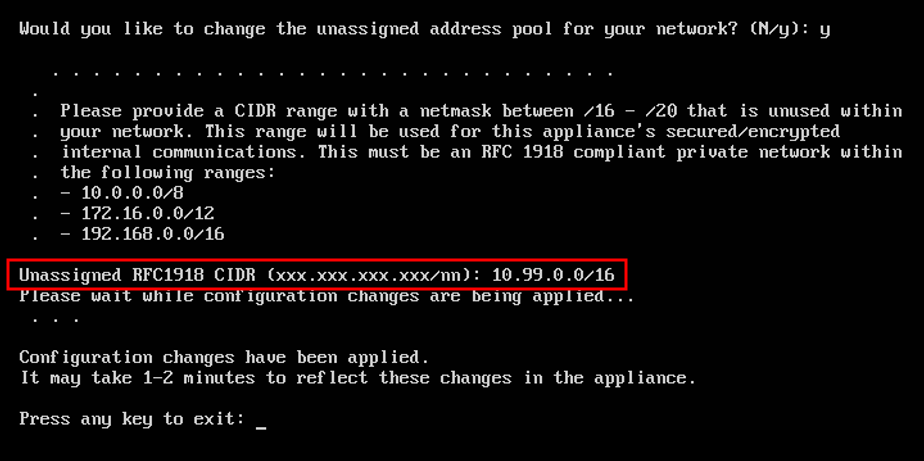
If needing to adjust the IP address ranges, configure the address range.
The image below is just an example. Ensure you use the settings specific to your network.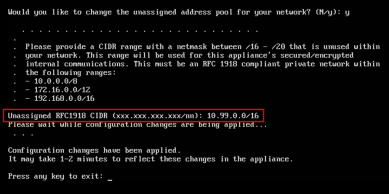
- Press any key to exit.
-
-
In a web browser, browse to the IP address or URL you made note of in step 6, and run through the web setup wizard as you did when you first created the previous Virtual Appliance, ensuring that you select the option to keep settings - Do not format the drive.
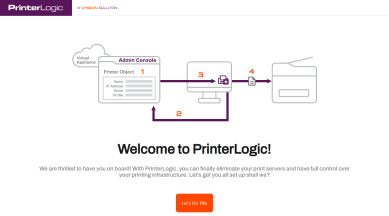
- Once the setup is finished, you can now log into your upgraded Virtual Appliance.


Conclusion
While your organization is recommended to determine RPO and RTO objectives, we advise a minimum of daily backups rolling over 14 days via automated jobs.
By following these best practices, you can ensure virtual machines' successful and efficient backup with MySQL databases. Implementing these recommendations will enhance data protection, minimize the risk of data loss, and simplify disaster recovery processes. As IT admins, your proactive approach to data management ensures the continuity and reliability of your organization's systems.
For further assistance or any questions, contact the PrinterLogic Support Team.
-
Chrome OS Client Release Notes Updated
Release Date: 24 April, 2024
-
Virtual Appliance Setup using Azure
New Release 22 March, 2024 -
Virtual Appliance Latest Updates
New Release 28 February, 2024 -
Updating Your Virtual Appliance License File
New Release 28 February, 2024