Last updated: February 12, 2024
Schedule a Report
Scheduling a report in PrinterLogic is beneficial for administrators who would like to:
- Receive a Print Job Records report automatically via email.
- Send a Print Job Records report automatically to additional email recipients.
The Report Scheduler is available for all report types in the Print Job Records report. For more details, see Print Job Records Report The Report Scheduler is not available for any of the following reports:
For a report to run correctly, make sure you either disable pop-up blockers, or you add an exception for the server domain. For more information, refer to the documentation from the operating system manufacturer.
The following steps provide details on scheduling a report to run at a designated date and time for a specific group of people.
- In the Admin Console, navigate to Reports
 Print Job Records.
 -
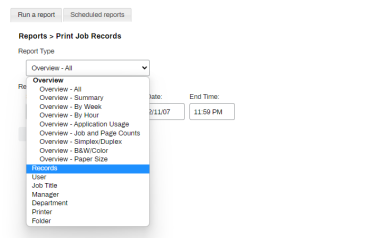
In the Run a report tab, select the Report Type.
-
Click Schedule Report to display the Schedule a Report window.
- Virtual Appliance customers may see a notification SMTP settings need to be configured. SMTP settings are found on Tools
 Settings
  General.
- Virtual Appliance customers may see a notification SMTP settings need to be configured. SMTP settings are found on Tools
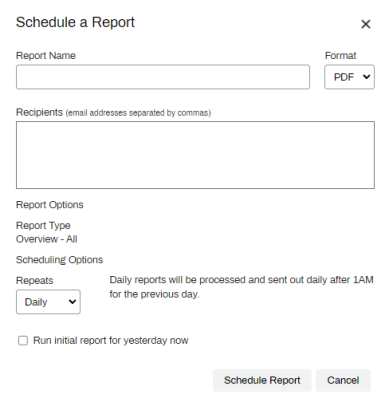
- There are three main templates in the Schedule a Report window. Select the drop-down below for the chosen Report Type.
 Overview Reports
- Give the report a name.
- In the Format drop-down, select PDF or CSV.
- Add the Recipients of the report. Separate out multiple email addresses with commas.
- In the Repeats drop-down, select from Daily, Weekly, Monthly, Yearly.
- Optional: Check the box for Run initial report for (x) now if you want the report for the previous time frame defined in the Repeats drop-down.
- Click Schedule Report.
If you selected the Run initial report for (x) now, that report will be sent to the recipients after the report is scheduled.
 Records and Filtered Reports
- Give the report a name.
- In the Format drop-down, select PDF or CSV.
- Add the Recipients of the report. Separate out multiple email addresses with commas.
- Depending on the report selected in Report Type, filtering options display for that report.
- These fields are optional, and can be left blank for a larger data pull.
- The Records report type is displayed below and includes all of the filtering fields seen in the other reports.
- In the Repeats drop-down, select from Daily, Weekly, Monthly, Yearly.
- Optional: Check the box for Run initial report for (x) now if you want the report for the previous time frame defined in the Repeats drop-down.
- Click Schedule Report.
If you selected the Run initial report for (x) now, that report will be sent to the recipients after the report is scheduled.
 Folder Report
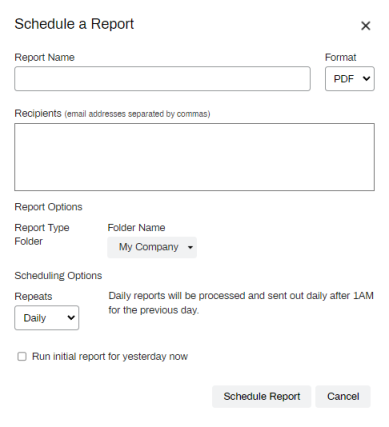
- Give the report a name.
- In the Format drop-down, select PDF or CSV.
- Add the Recipients of the report. Separate out multiple email addresses with commas.
- In the Folder Name drop-down, select the folder you want to pull data for.
- In the Repeats drop-down, select from Daily, Weekly, Monthly, Yearly.
- Optional: Check the box for Run initial report for (x) now if you want the report for the previous time frame defined in the Repeats drop-down.
- Click Schedule Report.
-
New Mobile App Release
iOS: November 11th, 2024 -
Released: November 11th, 2024
-
Released: October 22nd, 2024
Updated Application Version Included


