We've Moved!
We've unified our Vasion Print (formerly PrinterLogic) and Vasion Automate documentation into a single, streamlined resource to better serve you. Visit our new unified documentation site: docs.vasion.com
Note: This legacy site will not be updated after January 6, 2025, and will remain available for reference until May, after which all traffic will automatically redirect to docs.vasion.com/a/Get_Started/Automate.htm.

Last updated: January 14, 2025
Scan to Email
Here are the details you need to enable and configure Scan To Email.
Key Points
Here are some important things to know about Scan To Email.
- Scan To Email has a file size limitation of 20MB.
- Due to operating system limitations, TIFF file attachments may not open natively on Android mobile devices.
Requirements
- The latest Identity Provider (IdP) Settings version.
- The Control Panel Application (CPA) 2.0 must to be installed on the printer.
- Ensure you add the applicable regional URL(s) to your inbound email allow list so that emails reach the user(s). For more details, see Mail Flow Rules.
Enable Scan To Email
Enable Scanning and configure the global Printer Default Settings
Configure Global Default Settings
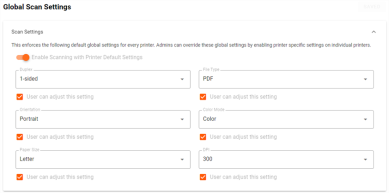
Access the global scan settings from the menu. Go to Tools ![]() Settings
Settings ![]() Scanning and expand the Scan Settings section.
Scanning and expand the Scan Settings section.
Scan Settings
Each setting is categorized as an input or output value, delineating how you position documents on the scanner (input) versus how they appear post-scanning (output). It's important to understand the category and how the values are applied, to configure the settings correctly.
|
Input Values |
Output Values |
|
|---|---|---|
|
|
|
Enable Scanning
To enable scanning set the Enable Scanning toggle to on.
If you want to modify the default printer settings, go to the Scan Settings section and use the drop-down set the appropriate scan settings. Select Save on the top-right corner.
These settings apply globally to all printers. You can set printer-specific settings in the printer Apps tab.
Configure Scan To Email
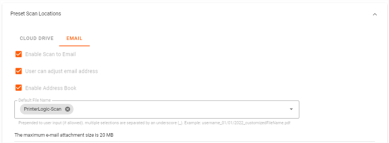
- Select Preset Scan Locations.
- Select the Email tab.
- Enable Scan To Email — check this box to enable.
- You can optionally configure the following:
User can adjust email address — end users can manually enter the email address destination. When this option is not enabled, the scan goes directly to the end user currently signed in to the CPA.
With this option enabled, end users can send to emails out of your network.
- Enable Address Book — end users can access the address book and select an email from the list, sourced from the email field in your identity provider. You can leave the previous option disabled to ensure end users can only send scans within your network.
- Default File Name — you can set a default file name for the email attachment and the email subject line. Select one or more options from the drop-down, manually enter values, or leave it blank.
- Select Save on the top-right corner.
When you use the Scan to Email feature, emails received display no-reply@vasion.com as the sender.
Install Scan To Email
- In the Admin Console, go the printer where you want to install Scan To Email.
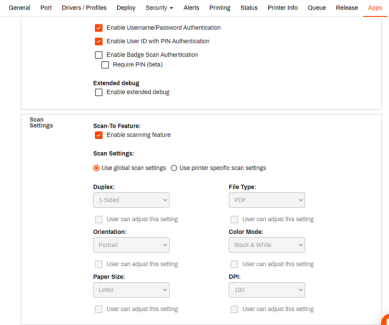
- Select the Apps tab.
- Ensure correct manufacturer, CPA version, and Service Client are selected.
- In the Install Embedded Application section, check the Scan To Email option.
- In the Scan Settings section, select from the following:
- Use global scan settings — this is the default option. the settings applied are what is configured in the global scan settings.
- Use printer specific scan settings — this enables the drop-downs so you can adjust the settings as needed.
- Select Save on the top-right corner.
Troubleshooting Help
This is likely happening because you’ve exceeded the maximum email attachment size. The current file size maximum is 20MB in this version of Scan To Email. Any scans larger than that size cannot be sent via email. We recommend doing a few separate scans and sending them in separate emails.
-
Week Ending In Jan 4th, 2025
-
Released: Dec 27th, 2024
-
Released: Dec 23rd, 2024
-
Android/iOS: Dec 23rd, 2024
-
Released: Dec 9th, 2024
Scan To Email is available for Vasion Print (formerly PrinterLogic) customers within a Core license. Support for the Virtual Appliance will be available at a future date. PrinterLogic Webstack is not supported as the product reached its End-of-Life in February 2023.
No. SMTP is pre-configured within Scan To Email to handle email sending at this time, so there’s no need to manage the configurations for each of your MFDs. In future versions, admins can set up and configure SMTP directly from the Admin Console.
It depends on how you choose to configure your users’ permissions. In the general scan settings, enable the User can adjust email address to allow users to enter any email addresses and send to others inside and outside the organization’s email domain. You can also set up an address book of email addresses within your domain for a user to select from a list. This ensures scanned sensitive information is delivered to the right inboxes every time.


