Last updated: November 14, 2024
Admin Console Users
The Users window is only for user accounts that need access to the Admin Console.
Here we'll cover the basic ways to add the Admin Console user types:
- PrinterLogic (Local) users.
- Active Directory users.
- LDAP Lightweight Directory Access Protocol. As the name suggests, it is a lightweight client-server protocol for accessing directory services, specifically X.500-based directory services. LDAP runs over TCP/IP or other connection oriented transfer services. users.
- IdP users.
Users
The root account is the first account created in the instance and can only be updated, not removed. There are two types of accounts you can create, Administrator and Non-Administrator accounts. Once you create accounts, you can also update the password for the root and local user accounts, and set / modify role assignments. LDAP / AD and IdP user information only changes if it is updated within the identity provider, but you still assign product roles for them in the Users window.
Users Section
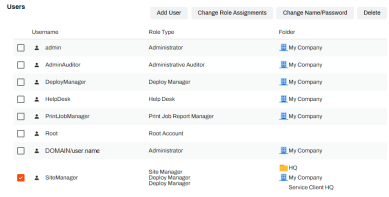
The Users section shows the following in a table format:
- Username — for Local accounts, it shows the username you entered. for LDAP and IdP accounts, it shows the source (LDAP / IdP) username.
- Role Type — shows the role assigned to the user. For details about the user roles and permissions see Role-Based Access Control.
-
Folder — shows the folder or printer object they are assigned.
Non-Administrator Users can have multiple role assignments to different locations in the tree. For example, they can be a site manager for one folder and a deploy manager for a different folder.
Roles Section
The Roles section displays the name along with a description of the role and its type, Standard or Custom. For full details about standard and custom roles, see Role-Based Access Control.
Add A New User
- PrinterLogic (Local) Users
- Active Directory Users
- LDAP Users
- IdP Users
To define password requirements for local accounts or remove local account access to your Admin Console, reference Local Account Settings.
- In the Admin Console, navigate to Tools
 Users.
 - In the Users section, select Add User.
- Select PrinterLogic User.
-
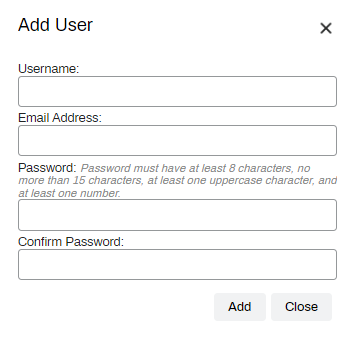
Complete the Add User modal.
- Select Add..
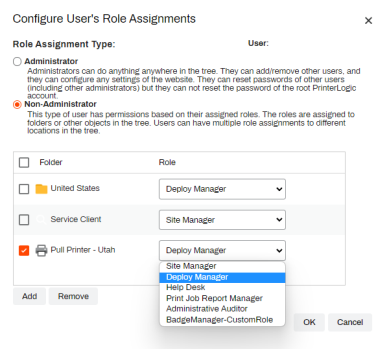
- In the Configure User's Role Assignments modal, select the following:
- Role Assignment Type — select the type of role you want to assign to this user.
- If you select Non-Administrator, do the following:
- Select OK.
- In the Admin Console, navigate to Tools
 Users.
 - In the Users section, select Add User.
- Select AD Group / User.
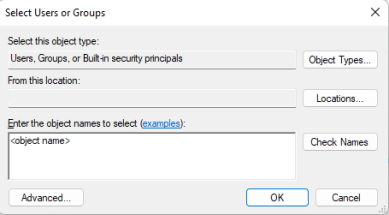
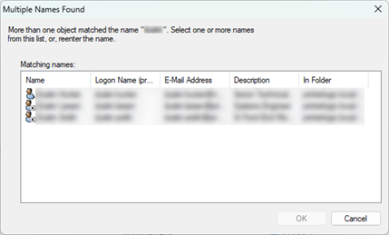
- In the Select Users or Groups window, do the following:
- Once the user / group is verified, select OK.
- In the Configure User's Role Assignments modal, select the following:
- Role Assignment Type — select the type of role you want to assign to this user.
- If you select Non-Administrator, do the following:
- Select OK.
The LDAP Users and Groups option only displays after configuring an LDAP domain.
- In the Admin Console, navigate to Tools
 Users.
 - In the Users section, select Add User.
- Select LDAP Group / User.
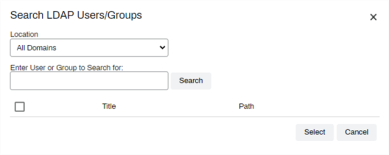
- In the Search LDAP Users / Groups modal, complete the following:
- Location — by default All Domains is selected. You can use the drop-down to select the location / domain to filter the search.
- Enter User or Group to Search for — enter the name of the user / group you want to add.
Select Search.
Select the user / group from the result list and select the Select button.
- In the Configure User's Role Assignments modal, select the following:
- Role Assignment Type — select the type of role you want to assign to this user.
- If you select Non-Administrator, do the following:
- Select OK.
The IdP Users and Groups option only displays after configuring an IdP.
- In the Admin Console, navigate to Tools
 Users.
 - In the Users section, select Add User.
- Select IdP Group / User.
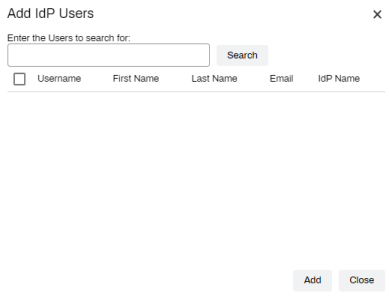
- In the Add IdP Users modal, complete the following:
- In the Configure User's Role Assignments modal, select the following:
- Role Assignment Type — select the type of role you want to assign to this user.
- If you select Non-Administrator, do the following:
- Select OK.
All the users listed here can access the Admin Console.
Change User Roles
- In the Users section of the Admin Console, select the box next to the desired user / group.
- Select Change Role Assignments.
- In the Configure User's Role Assignments modal do the following:
- To make the user an Admin Console administrator, select Administrator.
- For Non-Administrator roles, you can do the following:
- Select Add to assign new folders, printers, or IP address ranges, and Service Client objects.
- Once the object has been added, use the drop down box next to the folder to designate the Role Assignment.
- To change a role assignment, use the drop-down to select to change the role for the folder, printer, IP Address range, or Service Client.
- To remove a role for a specific object, select the object and select Remove.
- Select OK to save your changes.
-
New Mobile App Release
iOS: November 11th, 2024 -
Released: November 11th, 2024
-
Released: October 22nd, 2024
Updated Application Version Included
