Last updated: October 18, 2024
Printing Settings Tab
Locate and configure your default print settings by navigating to Tools ![]() Settings
Settings ![]() Printing.
Printing.
This tab includes pull printing, secure release printing, mobile printing, email printing, and purge settings for queue management. You can switch between the default settings configured here and the printer-specific settings available on the printer object's Printing tab. After enabling or configuring a field, click Save in the upper right.
Below is an overview of the settings on this tab.
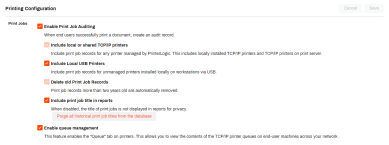
Print Jobs
The options in this section enable you to configure PrinterLogic to record print job records and to track print queues.
When end users successfully print a document, create an audit record. Print job records are not recorded if this option is not selected. Enabling this option allows the following settings to be enabled/disabled.
Include local or shared TCP/IP Printers: Click this option to log print jobs for any PrinterLogic-managed printer.
Include local USB printers: This option to log print jobs for USB-attached printers.
Delete old print job records: This option removes print job records more than two years old from the database.
Include print job title in reports: Print job titles will be stored in the database and available in reports if this option is selected. If not selected, titles are not stored in the database and, therefore, unavailable for reporting purposes.
Purge all historical print job titles from the database: This option will purge all stored titles if you have previously included them. For example, clicking the button will remove all historical print job titles from the database to prevent them from showing in reports.
This option enables the Queue Management feature in the Queue tab. If this setting is not enabled, the Queue tab will be unable to list job information.
This option only displays if PIV/CAC has been enabled in the environment. This feature enables whether or not PIV/CAC secure badge releasing of print jobs can be used.
Pull Printing
This section contains the default settings for both Pull Printing and Secure Release Printing.
Each printer object in the tree view has a Printing tab where you can enable the default or printer-specific Pull and Secure Release Printing settings. The default settings mentioned are configurable below.
This feature enables the "Release" tab on printers and the release portal, allowing users to hold print jobs sent to a printer from their workstation until released.
- This impacts printers using both the default and printer-specific Pull and Secure Release Printing settings.
This option allows the release of Pull Print jobs to the printers using the default settings.
- The number of printers with this feature enabled must match (or be less than) the number of Pull Printing licenses purchased.
- If this option is enabled, but you have more printers than Pull Printing licenses, an error will display upon logging into the Admin Console.
- You can disable Pull Printing for individual printers by selecting the Use printer-specific Pull Print setting and unchecking the Allow Pull Print jobs to be released to this printer box on the printer object's Printing tab.
- License details are available by selecting your username in the top right of the Admin Console and selecting My Account.
Printer object's Printing tab view:
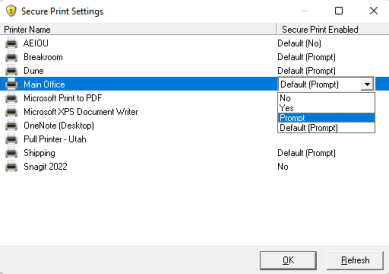
This drop-down option allows the release of Secure Release Printing jobs to the printers using the default settings. Select from
- No: Jobs will not be held.
- Yes Always: Jobs are always held and must be released.
-
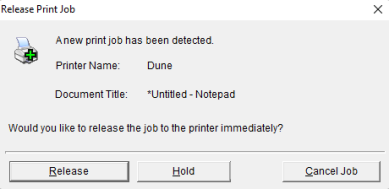
Yes Prompt: End-users will receive a prompt when printing.
Printer object's Printing tab view:
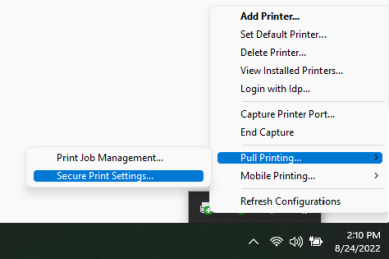
Allow End-Users to Override: This option allows end-users to choose which printers are configured for secure release via the system tray icon.
This feature enables users to have the ability to release secure print jobs even when the computer is offline (i.e. turned off).
- Regular Secure Release Printing jobs are held on the workstation until release. If the workstation is offline when the release is initiated the job is not sent.
- Offline Secure Release Printing sends a copy of the job to the Service Client. When the release is initiated, the job is sent from the Service Client to the printer.
- For documentation on setting up a Service Client, reference Service Client.
- For documentation on setting up Offline Secure Release Printing, reference Offline Secure Release Printing.
- Configure item level targeting for this feature:
- Clicking Show Filter...
- Click Add.
- Define the target.
- (Options: AD User, Group, Computer, Container, OU, IP Address Range, Hostname, MAC Address, and Chromebook options.)
- Click Save.
Email Pull Printing
This section configures the default options for Email Pull Printing. Email Pull Printing allows you to set specific printers to auto release jobs sent when using Email Printing.
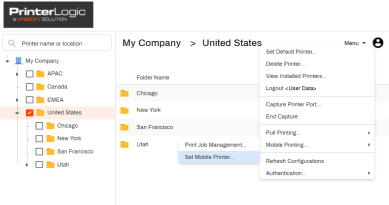
This option displays the Select Mobile Printer option in the Self-service Portal which enables the end-user to select the printer they want to use to auto release mobile print jobs.
- Access the Self-service Portal after the option is enabled.
-
Select the Menu, hover over Mobile Printing, then click on Set Mobile Printer.
-
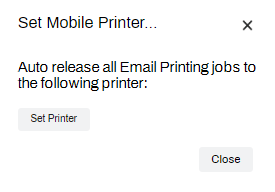
Click Set Printer.
- Use the next window to browse or search for the desired printer.
- Click Select.
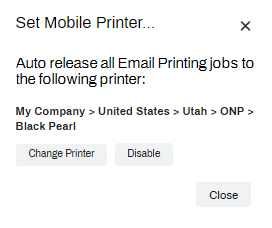
- At this point the printer has been defined and you can close out of the last pop-up.
This default option allows all printers to be selected as the mobile release printer.
This option allows the release of Email Pull Print jobs to the printers using the default settings.
- The amount of printers with this feature enabled must match (or be less than) the amount of Mobile Printing licenses purchased.
- If this option is enabled, but you have more printers than Mobile Printing licenses, an error will display upon logging into the Admin Console.
- You can disable mobile printing for individual printers by selecting the Use printer-specific Email Pull Print setting and unchecking the Allow Email Pull Print jobs to be released to this printer box on the printer object's Printing tab.
- License details are available by selecting your username in the top right of the Admin Console and selecting My Account.
- If only specific printers are desired, leave this option disabled, and manually enable the printers you want via the Printing tab.
This option sets a default paper size to be used by those printers associated with printer objects using the Email Pull Printing default setting in the Printing tab.
- Options: Letter, Legal, Tabloid, Index, A1-A8.
Direct Email Printing
These settings enable you to configure Direct Email Printing, which uses Active Directory to validate the user's email address and then send the email immediately to a release printer.
Direct Email Address Domain: The domain entered here will appear after the direct email address in the printer object's Printing tab's Direct Email Printing section.

Default per-printer "Direct Email Printing" setting: This option configures the default setting to allow print jobs to be emailed directly to this printer by authenticated users.
If the user cannot be validated, then the user will be considered a guest and will be required to use the Direct Email Guest Printing settings.
Default per-printer "Direct Email Guest Printing" setting: This option enabled the default setting to allow print jobs to be emailed directly to this printer from guests.
Purging
The purge settings work with the Enable queue management setting in the Print Jobs section higher up on the page. Using these fields, configure the length of time before active and held jobs are purged from the queue.
- Purge active print jobs after X hours: Any print job that has remained in a print queue for the specified period of time without successfully printing will be automatically removed.
- Purge held jobs after X hours: Any held job that has remained in the release system for the specified period of time will be automatically removed.
- ChromeOS print jobs will have a maximum number of 12 hours for purging print jobs.
-
Released: November 21st, 2024
Updated Application Version Included
-
New Mobile App Release
iOS: November 11th, 2024 -
Released: November 11th, 2024
