We've Moved!
We've unified our Vasion Print (formerly PrinterLogic) and Vasion Automate documentation into a single, streamlined resource to better serve you. Visit our new unified documentation site: docs.vasion.com
Note: This legacy site will not be updated after January 6, 2025, and will remain available for reference until May, after which all traffic will automatically redirect to docs.vasion.com/a/Get_Started/Automate.htm.

Last updated: January 07, 2025
Web Print
Web Print provides a secure solution for guest printing. It allows users to navigate to a web page, upload document(s), and print without the need for software or drivers to be installed on their machine. This ensures the security of your print environment while automating the printing process for guests.
Web Print does not require the Client, printers, or drivers installed on devices, making it an excellent solution for student printing or Bring Your Own Device (BYOD) environments.
For more information on using the Web Print Portal, see Web Print.
Key Points
When setting up Web Print, there are two user options to consider, which can impact the configuration.
Allow Authentication— Uses existing Identity Provider configurations in your environment to authenticate users.
- Web Print using the Print Now option immediately prints the job.
- Web Print using the Hold option does not require installing the Control Panel Application (CPA) Secure Release Print feature if using another release option (Mobile App, Release Portal, etc.).
Allow Guests — The guest option does not require users to authenticate to send or release Web Print jobs. Guest users enter their email address when using the portal, which generates an email with steps and a code to release their job on the printer.
- Guest Web Print using the Print Now option immediately prints the job.
- Guest Web Print using the Hold option requires the Secure Release Print CPA feature installed on the printer.
Portal Modal Prompts
The Portal modals that appear after a user selects Print display differently depending on the Secure Release Print settings configured for the printer. Adjust these as needed for your environment as you configure Web Print.
Adjust the default, Default per-printer Secure Release settings, on Tools ![]() Settings
Settings ![]() Printing in the Pull Printing section. Or adjust at the printer-specific level through the Allow secure release jobs to be sent to this printer dropdown on the printer object's Printing tab.
Printing in the Pull Printing section. Or adjust at the printer-specific level through the Allow secure release jobs to be sent to this printer dropdown on the printer object's Printing tab.
- No — jobs print immediately and cannot be held.
- Yes (Always) — jobs automatically hold and require the user to release them.
- Yes (Prompt) — the modal shown to the user provides the options to Hold or Print Now.
Logo
The logo that displays on your Web Print Portal is the same logo uploaded to the Tools ![]() Settings
Settings ![]() Portal page in the Admin Console.
Portal page in the Admin Console.
Reporting
Users and Guests printing with Web Print are included the Print Job Records Report with the Source defined as Web Print.
- Authenticated users display their user information in the reports.
- Guest emails prepend with guest_ in the reports.
Quota Management
If a managed user prints through Web Print, it deducts from their quota, and they will not be able to print if they exceed quota.
Printing Formats
Web Print supports the following formats.
- Microsoft Office (.doc, .docx, .xls, .xlsx, .ppt, .pptx).
- Microsoft Visio (.vdx, .vsd, .vsdx).
- Images (.jpg, .gif, .png, .bmp, .tif).
- OpenOffice / LibreOffice (.odt, .fodt, .ods, .fods, .odp, .fodp).
- Text (.csv, .rtf, .txt).
- PDF.
Requirements
- Web Print requires the Advanced Security Bundle. Reach out to your representative for more information.
- Allow List: print-api.app.printercloud.com, adjusted to your region, must be added to your firewall rules.
- EMEA: printercloud5.com, APAC: printercloud10.com, Canada: printercloud15.com, Singapore: printercloud20.com.
- Service Client running the Internal Routing Service or the Off-Network Cloud Print app installed on the Web Print printers.
- Off-Network Cloud Print enabled and configured.
Off-Network Cloud Print
You must configure Off-Network Cloud Print (ONCP) on the printers used for Web Print. Reference Configure Off-Network Cloud Print for configuration steps. Printers without ONCP configured are not available in the printer list as options.
Install Secure Release Print
Guest Web Print requires the Secure Release CPA installed on the printer. Install Secure Release Print from the printer apps tab (individually) or using the CPA Manager (bulk). If you are using the printer object apps tab, install Secure Release and Web Print at the same time. If using the CPA Manager, install Secure Release Print first, then add the Web Print option second using the Modify action.
Configure Web Print
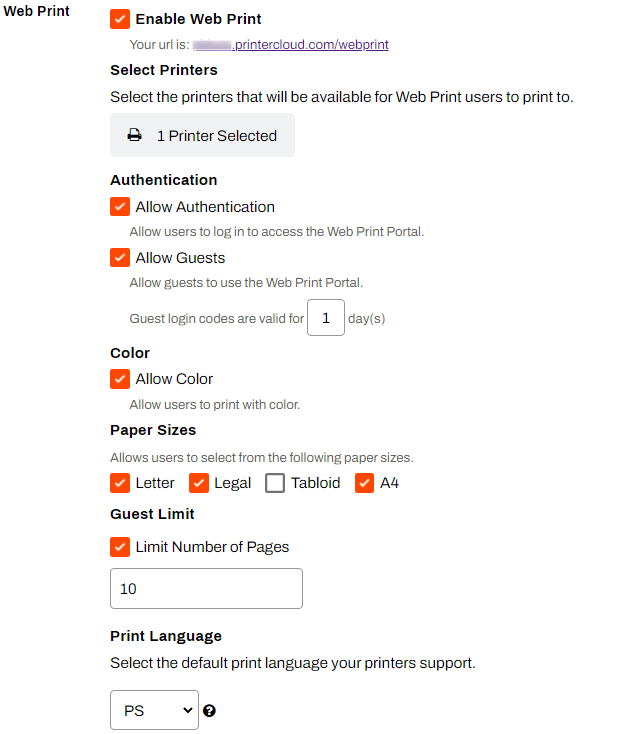
1. Select Printers, Authentication, & Preferences
- In the Admin Console, navigate to Tools
 Settings Printing.
 - Scroll down to the Web Print section. You'll configure the Web Print settings before enabling the portal.
-
Use the Select Printer(s) button to choose the Web Print printers.
Only printers configured for ONCP display as options.
- Select the Authentication method(s) for your environment.
- Allow Authentication — Allows users to log in to access the Web Print Portal.
- Allow Guests — Allow guests to use the Web Print Portal.
- Define the code validity length in the Guest login codes are valid for (x) days field.
- Optional: Select Allow Color to allow users to print in color. With this option deselected, all print jobs send in black & white.
- In the Paper Sizes section select the allowed paper sizes to display in the Web Print Portal.
- Options include Letter, Legal, Tabloid, and
- Options include Letter, Legal, Tabloid, and
- Optional: Select Limit Number of Pages.
- In the Max pages per day field, set the limit of daily printable pages per user.
- Optional: Use the Print Language dropdown to define the default print language.
- Options include PS, PCL5, PCLXL, PDF, and XPS.
Printers selected for Web Print display an additional option on the printer object's Port tab, allowing printer-specific print language definitions.

2. Enable Web Print
- In the Web Print section, select the Enable Web Print option.
-
Select Save


Once enabled, select the hyperlink below or enter it manually to visit your Web Print Portal. If you are not using the Allow Guests option, Web Print is ready to use.
Install Web Print Code Authentication
The steps below are for installing the Web Print Code Authentication option on the CPA. Guest Web Print requires Secure Release and Web Print Code Authentication installed on the printer so users can release held jobs.
If you are using the printer object's Apps tab (Single Install), install Secure Release and Web Print Code Authentication at the same time. If using the CPA Manager (Bulk Install), install Secure Release first, then add the Web Print Code Authentication option second using the Modify action.
Install from Apps Tab
For information on supported printers, prerequisites, and detailed steps for installing CPA v2 Secure Release, reference CPA 2.0.
- In the Admin Console tree structure, select the printer where you want to install the CPA.
- Select the Apps tab.
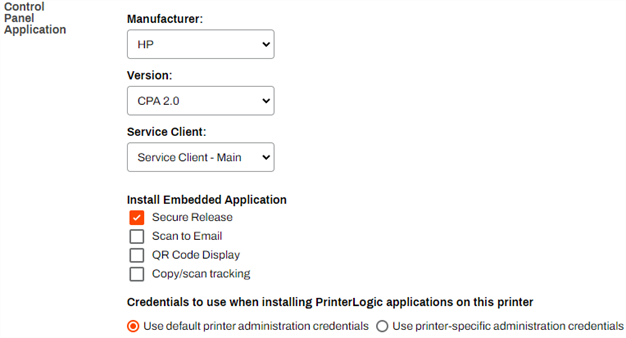
- In the Manufacturer field, select the printer manufacturer.
- In the Version field, select CPA 2.0. (If this field does not display, only CPA v2 is available for the manufacturer.)
- Select the Service Client you want to use to install the CPA.
- In the Install Embedded Application section, select the Secure Release option.
- Ensure the credentials in the Credentials to use... section, are accurate.
-
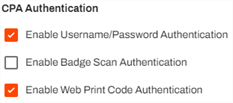
In the CPA Authentication section, check the box for Enable Web Print Code Authentication.
- Select Save

Secure Release and Web Print Code Authentication install on the printer.
Install from the CPA Manager
For more information on the CPA Manager, reference CPA Manager.
- In the Admin Console tree structure, select the Service Client running the printer apps service.
- Select the Printer Apps tab.
-
In the Printers list, select the desired printer(s).
You can only select printers from the same manufacturer if modifying multiple printers.
- Using the Actions dropdown, select Modify.
-
In the CPA Authentication section, check the box for Enable Web Print Code Authentication.
- Select Save
After the printer settings update, Web Print is ready for use.
Reference Web Print for steps on using the Web Print Portal.
-
Week Ending In Jan 4th, 2025
-
Released: Dec 27th, 2024
-
Released: Dec 23rd, 2024
-
Android/iOS: Dec 23rd, 2024
-
Released: Dec 9th, 2024