We've Moved!
We've unified our Vasion Print (formerly PrinterLogic) and Vasion Automate documentation into a single, streamlined resource to better serve you. Visit our new unified documentation site: docs.vasion.com
Note: This legacy site will not be updated after January 6, 2025, and will remain available for reference until May, after which all traffic will automatically redirect to docs.vasion.com/a/Get_Started/Automate.htm.

Last updated: January 07, 2025
Identity Providers
An IdP vouches for a person's identity through the use of an authentication token that Vasion Print (formerly PrinterLogic) uses for logging in to the Admin Console and portals, deploying printers, releasing print jobs, and more.
If you use an IdP, the Control Panel Application (CPA) only supports badge and PIN authentication.
Active Directory (No LDAP Domain connection) provides basic authentication to the Self-service Portal for Active Directory users on domain-joined devices with the Client installed. To use Active Directory or Oracle for identity management within your organization, an LDAP Domain connection is required to enable certain functionality, such as authenticating to the Admin Console or Mobile app and secure release printing. Environments using LDAP for Control Panel Application (CPA) authentication also require an Identity Sync configuration.
Enabling a different IdP disables LDAP as the primary Identity Provider. Vasion Print (formerly PrinterLogic) supports the concurrent use of multiple IdPs.
Vasion supports IdPs via a SAML 2.0 connection, OIDC, or JIT provisioning and it requires the following:
- Administrator or Root Admin role.
- Admin Console access to your SSO provider
- Full rights to read and add / register apps with your SSO provider
Because each provider is different, you should refer to your provider's documentation for specific configuration details.
Portal Access
To configure an IdP in Vasion Print (formerly PrinterLogic), you'll need access to the Admin Console and your organization's identity provider portal. If you can access both portals, select the desired IdP from the list below to get started.
In environments where the Vasion Print (formerly PrinterLogic) administrator is not an IdP administrator, you must identify the correct point of contact to assist. The admin starts and saves the IdP Settings template in the Admin Console, then provides the IdP administrator with the Service Provider Information from the template and the related configuration link from below.
If you are working with an IdP administrator, here are the steps to add the IdP Settings template to provide the IdP administrator with the correct information.
Access Service Provider Information
These steps are only for Vasion Print (formerly PrinterLogic) admins working with an IdP administrator. If you have access to the Admin Console and IdP administrator portal, follow the steps for the IdP from the supported list below.
- Open your Admin Console and sign in.
- Select Tools
 Settings
  General, and scroll down to the Identity Provider Settings section.
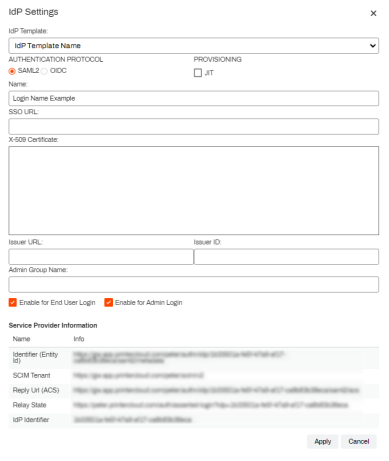
 - Select IdP, and then select Add.
- Select the identity provider you want to configure in the IdP Template drop-down.
- In the Name field, enter the name you want displayed on the login button for users, e.g. My Company, Login, Acme Corp, etc.
- Copy the values in the Service Provider Information data to send to your IdP administrator.
- Select Apply.
- Select Save in the upper-right of the General settings page.
Send the Service Provider Information values and the related IdP configuration link to your IdP administrator. When they have completed their side and sent back the SSO URL, X-509 Certificate, and Issuer ID/Issuer URLs (if applicable):
- Open your Admin Console and sign in.
- Select Tools
 Settings
  General, and scroll down to the Identity Provider Settings section.
 - Select IdP, and then select Modify.
- Add the SSO URL value to the SSO URL field.
- Press Tab on your keyboard to auto populate the Issuer URL and Issuer ID fields, or add them manually.
- Add the X-509 certificate, including the Begin/End headers to the X-509 Certificate field.
- Scroll down and select the desired enable setting(s).
- Enable for End Users Login — Allows end users to login using this IdP. (Self-service Portal)
- Enable for Admin Login — Allows Admin users to login using this IdP. (Admin Console)
- Both boxes can be checked when using a single IdP, or if the admin and end users use the same IdP to log in.
- Select Apply.
- Select Save in the upper-right of the General settings page.
For steps on assigning users and roles to the Admin Console reference Admin Console Users.
For details on how to configure your supported Identity Provider (IdP) select one of the following links below.
-
Week Ending In Jan 4th, 2025
-
Released: Dec 27th, 2024
-
Released: Dec 23rd, 2024
-
Android/iOS: Dec 23rd, 2024
-
Released: Dec 9th, 2024

