We've Moved!
We've unified our Vasion Print (formerly PrinterLogic) and Vasion Automate documentation into a single, streamlined resource to better serve you. Visit our new unified documentation site: docs.vasion.com
Note: This legacy site will not be updated after January 6, 2025, and will remain available for reference until May, after which all traffic will automatically redirect to docs.vasion.com/a/Get_Started/Automate.htm.

Last updated: January 07, 2025
Google Identity Sync
An Identity Provider (IdP) vouches for the identity of a person through the use of an authentication token. Vasion Print (formerly PrinterLogic) uses IdP for several things, including logging in to the Admin Console and portals, deploying printers, releasing print jobs, and more.
If you use an IdP, the Control Panel Application (CPA) only supports badge and PIN authentication.
Configure Connection
To add and configure app properties for the Vasion Print (formerly PrinterLogic) connection do the following:
- Add IdP Template.
- Create Authentication Project.
- Configure OAuth Consent.
- OAuth 2.0 Credentials - Desktop Client.
- OAuth 2.0 Credentials - Server.
- Create Provisioning Project.
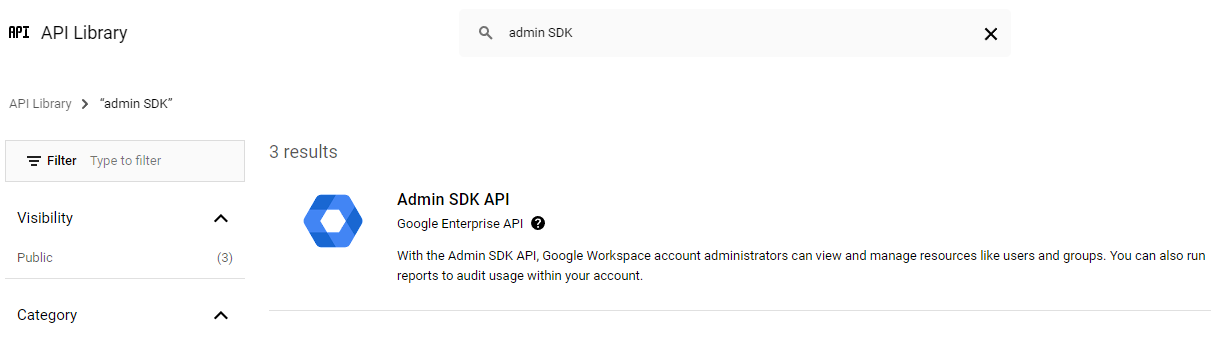
- Enable Admin SDK API Service.
- OAuth Consent Screen Provisioning.
- OAuth 2.0 Credentials Provisioning.
- Enable Google Identity Sync Service.
- Verify Provisioned Users.
- Add Vasion Print (formerly PrinterLogic) Admins.
Prerequisites
Before you start the setup for Google Identity Sync with OIDC, you must configure a Service Client to use the Identity Sync Service.
1. Add IdP Template
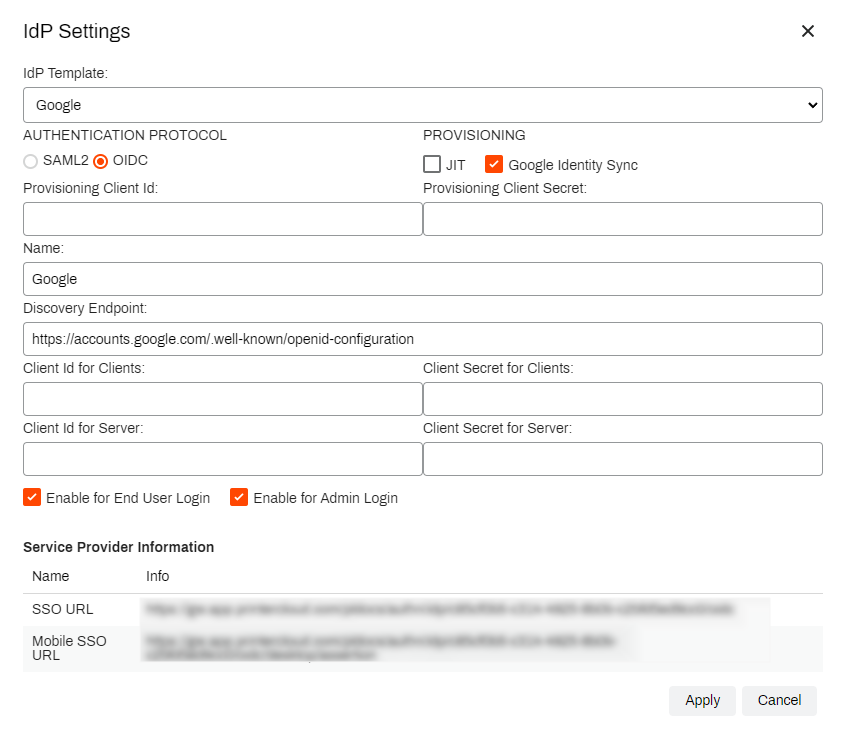
If the IdP Settings page does not look like the image shown below, you may not be using the latest version and should contact Product Support to upgrade your IdP settings.
- Log into the Vasion Print (formerly PrinterLogic) Admin Console.
- Select Tools
 Settings General.
 - Scroll down to Identity Provider Settings and select the IdP tab.
- Select Add.
- Under IdP Template select Google.
- Under AUTHENTICATION PROTOCOL select OIDC.
- Under PROVISIONING check the box for Google Identity Sync.
- Under Name enter a name you wish to use to identify the IdP (This name appears on the login button for end users).
-
Under Discovery Endpoint enter the following URL:
Copy Codehttps://accounts.google.com/.well-known/openid-configuration -
Check the boxes for Enable for End User Login and / or Enable for Admin Login as needed.
Leave this window open as it will be needed for later steps.
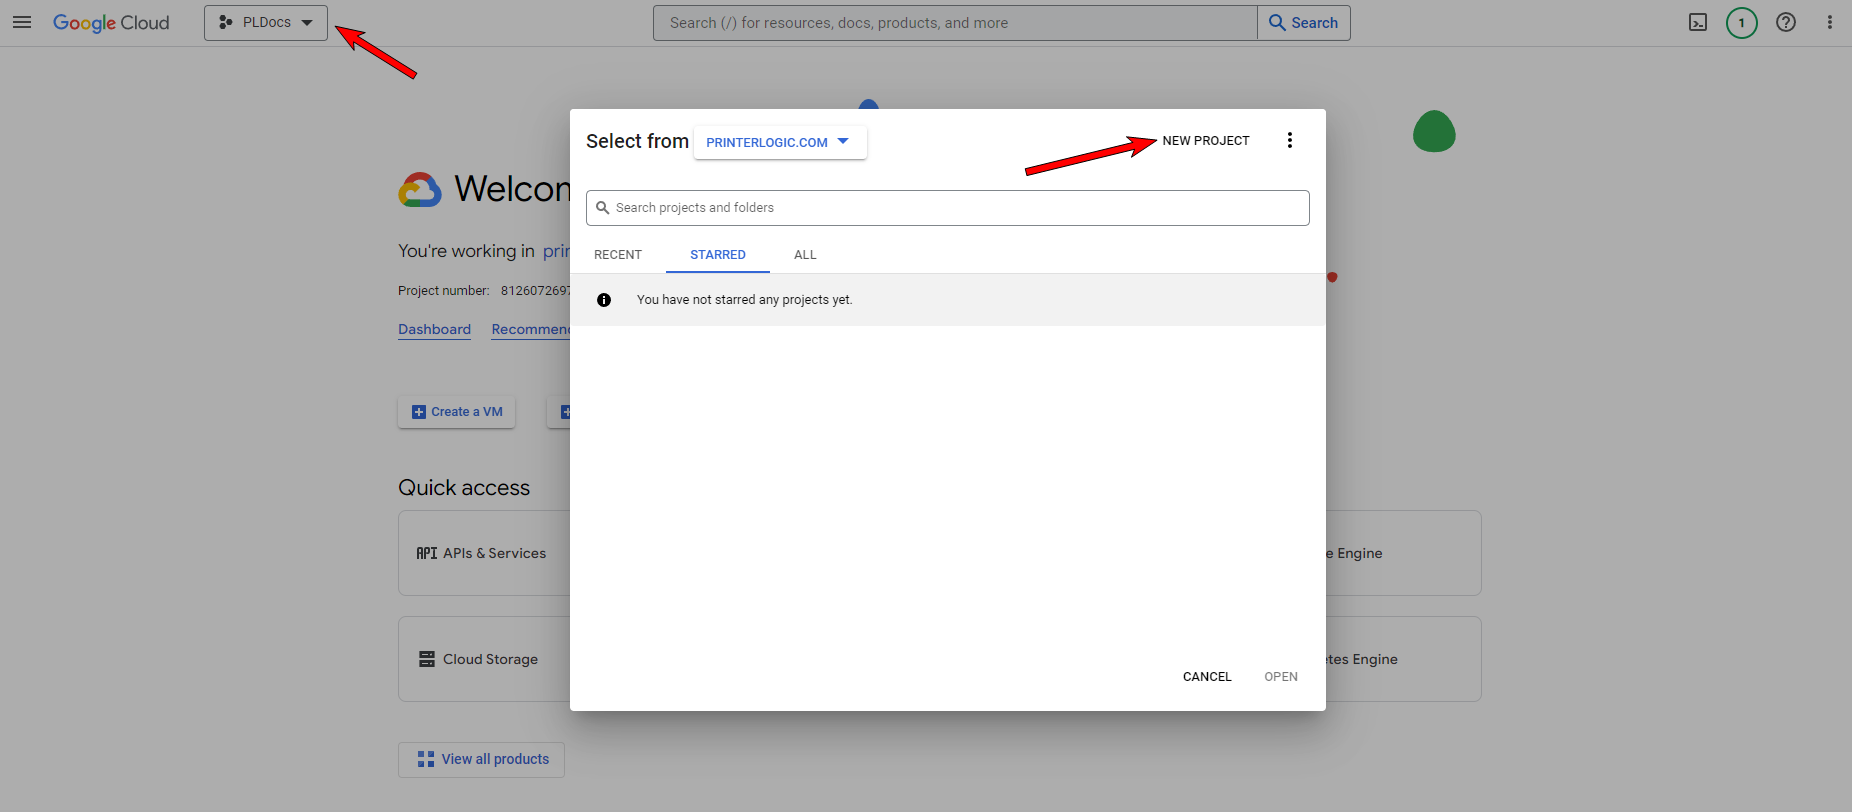
2. Create Authentication Project
- Open a separate browser tab or window and navigate to https://console.cloud.google.com.
- Log in using your Google Administrator account.
- Select the project drop-down from the top navigation bar.
- Select NEW PROJECT.
- Enter a Project name (e.g. Authentication), and ensure the Organization and Location are set correctly.
- Select Create.
-
Select SELECT PROJECT under the project notification, or select the new project from the Projects drop-down.


Configure OAuth Consent
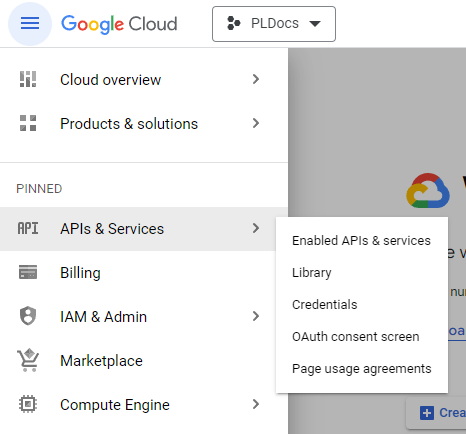
- In the left menu select APIs & Services, then select OAuth consent screen.
- Select Internal then select CREATE.
- Enter an App name (This name will appear on the end user's authentication screen).
- Enter a User support email (This email will be presented on the end user's authentication screen as the contact for consent questions).
- Scroll down to the Authorized domains section and select + ADD DOMAIN.
- Enter printercloud.com.
- Under Developer contact information enter the email addresses of the people that should receive notifications from Google regarding any changes to the project, then select SAVE AND CONTINUE.
- Configure any necessary scopes, if any, then select SAVE AND CONTINUE.
- Review the OAuth consent screen configurations, then select BACK TO DASHBOARD.
OAuth 2.0 Credentials - Desktop Client
- Select Credentials in the left-side menu.
- At the top of the page select +CREATE CREDENTIALS then select OAuth client ID.
- In the Application type drop-down menu select Desktop app.
- Enter a Name for the OAuth credentials (This name identifies the credentials in the Google API console and isn't displayed to end users).
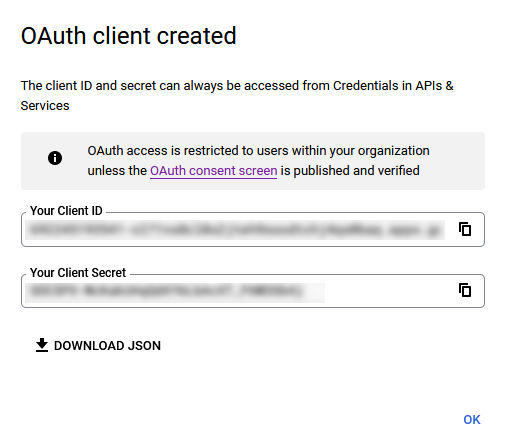
- Select CREATE.
- In the OAuth client created modal, copy the ID under Your Client ID and paste it into the Admin Console IdP Settings Client Id for Clients field.
- In the OAuth client created modal, copy the secret under Your Client Secret and paste it into the Admin Console IdP Settings Client Secret for Clients field.
- Return to the Google API console and select OK to close the OAuth client created modal.
OAuth 2.0 Credentials - Server
- At the top of the page select + CREATE CREDENTIALS then select OAuth client ID.
- In the Application type drop-down menu select Web application.
- Enter a Name for the OAuth credentials (This name identifies the credentials in the Google API console and isn't displayed to end users).
- In Google's Authorized redirect URIs section select + ADD URI.
- Copy the SSO URL from the Admin Console IdP Settings window and paste it into the Google URIs 1 field.
- In Google's Authorized redirect URIs section select + ADD URI.
- Copy the Mobile SSO URL from the Admin Console IdP Settings window and paste it into the Google URIs 2 field.
- In Google's Authorized redirect URIs section select + ADD URI.
-
Copy and paste the following into the URIs 3 field:
Copy Codehttps://llhfdhidddepenjnklbngmapjohlbekh.chromiumapp.org/ - Select CREATE.
- In the OAuth client created modal, copy the ID under Your Client ID and paste it into the Admin Console IdP Settings Client Id for Server field.
- In the OAuth client created modal, copy the secret under Your Client Secret and paste it into the Admin Console IdP Settings Client Secret for Server field.
- Return to the Google API console and select OK to close the OAuth client created modal.
3. Create Provisioning Project
- In the Google API console's top navigation bar select the project drop-down menu.
- Select NEW PROJECT.
- Enter a Project name (e.g. Provisioning), and ensure the Organization and Location are set correctly.
- Select Create.
-
Select SELECT PROJECT under the project notification, or select the new project from the Projects drop-down.
Enable Admin SDK API Service
- In the Google API console, ensure you have the provisioning project selected.
- In the left menu select Enabled APIs & Services.
- At the top of the page select + ENABLE APIS AND SERVICES.
- Search for Admin SDK API then select it.
- Select ENABLE.
OAuth Consent Screen - Provisioning
- In the left menu select OAuth consent screen.
- Select Internal then select CREATE.
- Enter an App name (This name appears on the end user's authentication screen).
- Enter a User support email (This email will be presented on the end user's authentication screen as the contact for consent questions).
- Scroll down to the Authorized domains section and select + ADD DOMAIN.
- Enter printercloud.com.
- Under Developer contact information enter the email addresses of the people that should receive notifications from Google regarding any changes to the project.
- Select SAVE AND CONTINUE.
- Configure any necessary scopes, if any, then select SAVE AND CONTINUE.
- Review the OAuth consent screen configurations, then select BACK TO DASHBOARD.

OAuth 2.0 Credentials - Provisioning
- On the left menu select Credentials.
- At the top of the page select +CREATE CREDENTIALS then select OAuth client ID.
- In the Application type drop-down menu select Desktop app.
- Enter a Name for the OAuth credentials (This name identifies the credentials in the Google API console and isn't displayed to end users).
- Select CREATE.
- In the OAuth client created modal, copy the ID under Your Client ID and paste it into the Admin Console IdP Settings Provisioning Client Id field.
- In the OAuth client created modal, copy the secret under Your Client Secret and paste it into the Admin Console IdP Settings Provisioning Client Secret field.
- Select Apply, then select Save in the Admin Console.
- Return to the Google API console and select OK to close the OAuth client created modal.
4. Enable Google Identity Sync Service
There are a few options for authorizing Vasion Print (formerly PrinterLogic) access to your Google directory. Recommended - Option A can be completed directly from a browser and Recommended - Option B requires starting a local server that can echo incoming requests. There is also an alternative option if the above options are not acceptable.
Option A (Recommended)
- In the Vasion Print (formerly PrinterLogic) Admin Console, select Back to tree view.
- Select the Service Client object in the tree, then select the Identity Sync tab.
- Check the box for Enable Google Identity Sync, then select Save.
- Select the Authorize button.
- Log in with your Google Administrator account and select Allow on the permission options.
-
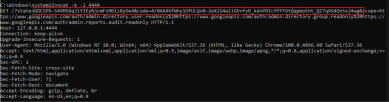
A browser page will load that says “This site can’t be reached”, or something similar depending on your browser. This is normal. In the URL bar on that page, copy the one-time use authorization code value found between “code=” and “&scope.”

- Return to the Admin Console, and paste this code in the Identity Sync's Authorization Code field.
- Select Save.

Option B (Use Local Server)
- Start a local server that can echo the incoming requests.
For Mac, run the following command in a terminal:
Copy Codenc -k -l 444The command uses the [NetCat] utility, which can be downloaded here: http://netcat.sourceforge.net/. However, you can use the utility of your choice.
- For Windows, run the following command in a Command Prompt:
Copy Codencat -k -l 4444
The command uses the [NCat Portable] utility, which can be downloaded here: https://github.com/cyberisltd/NcatPortable . However, you can use the utility of your choice.
- After running the above command, the local server will starting listening for incoming requests in the Terminal or Command Prompt.
- Return to the Admin Console, and select Back to tree view.
- Select the Service Client object in the tree, then select the Identity Sync tab.
- Check the box for Enable Google Identity Sync, then select Save.
- Select the Authorize button.
- Log in with your Google Administrator account.
- Select Allow on the permission options.
-
A response will be echoed in the Terminal (Mac) or Command Prompt (Windows). In the GET request, copy the one-time use authorization code between “code=” and “&scope.”
- Return to the Admin Console, and paste this code in the Identity Sync's Authorization Code field.
- Select Save.

Alternative Option (Windows)
This method should only be used if the Option A / B methods above are not feasible in your environment.
- In the Admin Console, select Back to tree view.
- Select the Service Client object in the tree, then select the Identity Sync tab.
- Check the box for Enable Google Identity Sync, then select Save.
- Now select the Authorize button.
- Navigate back to the open browser window for the Google API console, or log into the Google API console in a new browser window.
- Select the project that was created for provisioning.
- Select APIs & Services Credentials.
- Under OAuth 2.0 Client IDs, select the download icon to the far right of the credentials.
- Rename the downloaded JSON file to google_credentials.
- Move the google_credentials.json file to: C:\ProgramData\PrinterLogic\PrinterLogicServiceIdentitySync\credentials.
-
Verify that the service-identity-sync directory has been created in C:\Program Files (x86)\Printer Properties Pro\Printer Installer Client.
If the service-identity-sync directory does not exist, please verify that your Service Client service is running. This can be done by opening the Task Manager and verifying that the PrinterLogicServiceManager.exe service is running.
-
Return to the Admin Console on the Service Client
Identity Sync tab, uncheck Google Identity Sync to disable the service, then select Save.This step is important. We want to make sure that the identity-sync service is disabled BEFORE we authorize with Google so that users don’t start provisioning until we complete some later steps. -
Open a Command Prompt as Administrator, and enter the following command, then press Enter:
Copy Codecd C:\Program Files (x86)\Printer Properties Pro\Printer Installer Client\service-identity-sync\bin -
Still in the Command Prompt, enter the following command, then press Enter:
Copy CodePrinterLogicServiceIdentitySync.exe google-authorize - In the browser tab that opens, log in with your Google Administrator account.
- Select Allow.
- Return to C:\ProgramData\PrinterLogic\PrinterLogicServiceIdentitySync\credentials in the file explorer, and verify that a pickle file was created.
-
In the \credentials directory, create a new folder (if it doesn't already exist), and name it as the
<IdP Id/ GUID>that was assigned to the Google IdP in Tools Settings General (See the example image below). The directory path will be C:\ProgramData\PrinterLogic\PrinterLogicServiceIdentitySync\credentials\<your_GUID_here>.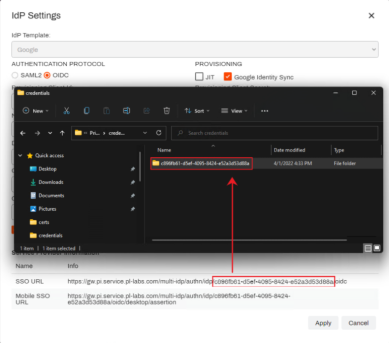
- Move the pickle file into the GUID directory.
- In the Admin Console, select the Service Client object.
- Select the Identity Sync tab.
- Check Enable Google Identity Sync.
- Select Save.
Alternative Option (Mac)
This method should only be used if the Option A / B methods above are not feasible in your environment.
- In the Admin Console, select the Service Client object in the tree structure.
- Select the Identity Sync tab.
- Check Enable Google Identity Sync box, then select Save.
- In a new browser tab, log into the Google API console.
- Select the project that was created for provisioning.
- Select APIs & Services Credentials.
- Under OAuth 2.0 Client IDs, select the download icon on the far right of the credentials.
- Rename the downloaded JSON file to google_credentials.
- Move the google_credentials.json file to: /Library/Application Support/PrinterLogicServiceIdentitySync/credentials
-
Verify that the identity-sync-service directory has been created in /opt/PrinterInstallerClient/service_interface
If the service-identity-sync directory does not exist, please verify that your Service Client service is running. This can be done by opening the Activity Monitor and verifying that the PrinterLogicServiceManager.exe service is running.
-
Return to the Admin Console on the Service Client
Identity Sync tab, uncheck Google Identity Sync to disable the service, then select Save.This step is important. We want to make sure that the identity-sync service is disabled BEFORE we authorize with Google so that users don’t start provisioning until we complete some later steps. -
Open a Terminal as Administrator, and enter the following command, then press Enter:
Copy Codecd ~/opt/PrinterInstallerClient/service_interface/service-identity-sync/bin -
Still in the Terminal, enter the following command, then press Enter:
Copy CodePrinterLogicServiceIdentitySync.exe google-authorize - In the browser tab that opens, log in with your Google Administrator account.
- Select Allow.
- Return to /Library/Application Support/PrinterLogicServiceIdentitySync/credentials and verify that a pickle file was created.
-
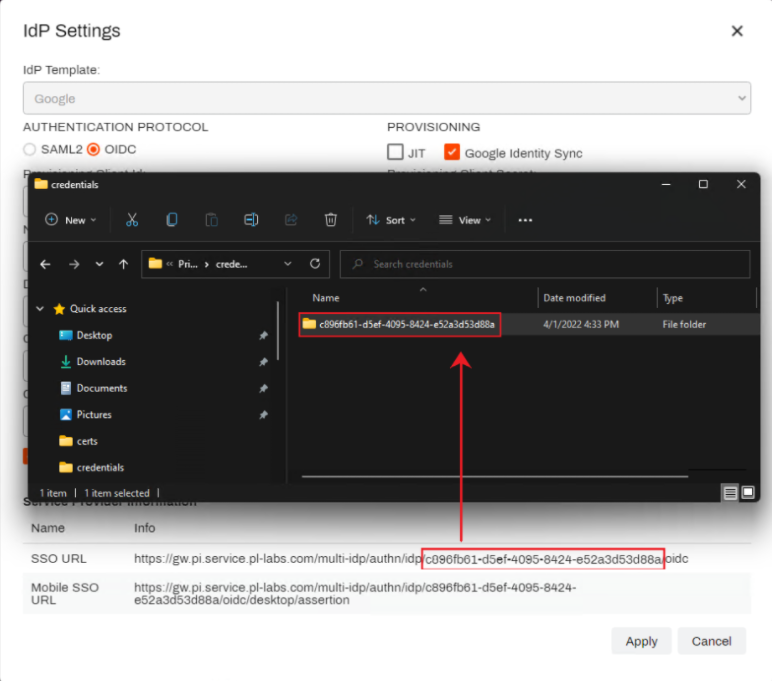
In the \credentials directory, create a new folder (if it doesn't already exist), and name it as the <IdP Id/ GUID> that was assigned to the Google IdP in Tools
Settings General (See the example image below). The directory path will be /Library/Application Support/PrinterLogicServiceIdentitySync/credentials/<your_GUID_here>.
- Move the pickle file into the GUID directory.
- In the Admin Console, select the Service Client object.
- Select the Identity Sync tab.
- Check Enable Google Identity Sync.
- Select Save.
5. Verify Provisioned Users
-
In the Admin Console select Tools
Identity Management.If the Multiple IdP feature is NOT enabled for your instance, the menu option will be Tools
Identities. -
Verify users have provisioned
Depending on how many users exist in the IdP directory, provisioning can take several minutes to several hours.
6. Add Vasion Print (formerly PrinterLogic) Admins
For steps on assigning users and roles to the Vasion Print (formerly PrinterLogic) Admin Console reference Admin Console Users.
-
Week Ending In Jan 4th, 2025
-
Released: Dec 27th, 2024
-
Released: Dec 23rd, 2024
-
Android/iOS: Dec 23rd, 2024
-
Released: Dec 9th, 2024