We've Moved!
We've unified our Vasion Print (formerly PrinterLogic) and Vasion Automate documentation into a single, streamlined resource to better serve you. Visit our new unified documentation site: docs.vasion.com
Note: This legacy site will not be updated after January 6, 2025, and will remain available for reference until May, after which all traffic will automatically redirect to docs.vasion.com/a/Get_Started/Automate.htm.

Last updated: December 11, 2024
Setup SNMP with Service Client
Here are the steps on how to set up SNMP status monitoring using a Service Client.
Requirements
- A Service Client already configured in your print environment.
If you do not have a machine set up as a Service Client, please review Service Client for complete details.
1. Enable the SNMP Service
- In the Admin Console, navigate to the Service Client's SNMP tab.
- Select the box for Enable SNMP Service.
- Select Save
- Access the physical device designated as the Service Client.
- Use the system tray icon or start menu to "Refresh Configurations".
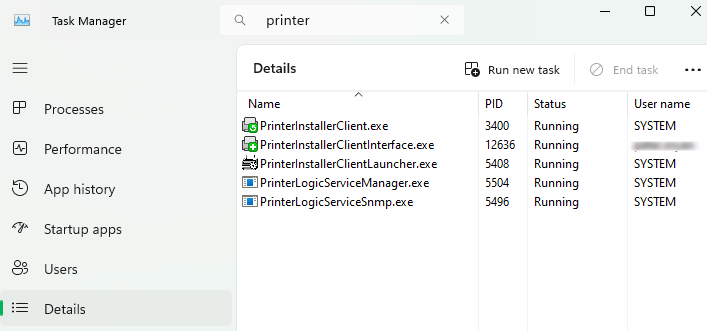
- Open Task Manager and select the Details tab.
- In the Search field type "printer" to locate the Client processes.
- Verify the following services.
- Client services (PrinterInstallerClient.exe, PrinterInstallerClientInterface.exe, PrinterInstallerClientLauncher.exe).
- PrinterLogicServiceManager.exe.
- PrinterLogicServiceSnmp.exe.
- Other enabled services on the Service Client will also show.
2. Configure the SNMP Settings
These default settings apply to each printer object in your instance. If you only wish to configure SNMP for specific printers or want to disable SNMP for specific printers, see the Printer-Specific SNMP Settings section below.
- In the Admin Console, select Tools
 Settings General.
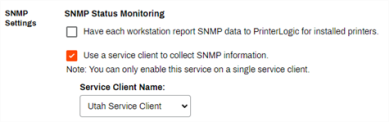
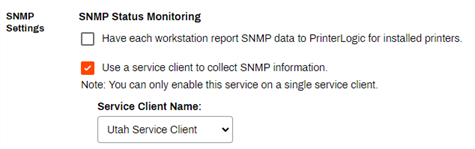
 - Scroll to the SNMP Settings section and enable Use a Service Client to collect SNMP information.
-
In the Service Client Name field, select the Service Client object used to collect SNMP data.
- Complete the following SNMP settings:
- By default, SNMP monitoring for each printer is — select On.
- Under normal conditions — enter a number in minutes if you want update the time interval when the service queries for data under normal conditions.
Under error conditions — enter a number in minutes if you want to update the time when the service queries for data under error conditions.

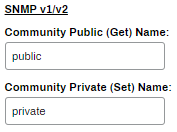
- If the printer uses SNMP v1 / v2 complete the following:
- Community Public (Get) Name — public is set by default.
Community Private (Set) Name — private is set by default.

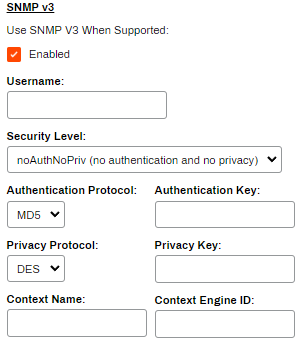
- If the printer uses SNMP v3 you have the option to complete the following:
- Enabled — check the box to enable SNMP v3.
- Username — if you want to enable authentication, enter the username you want to designate for authentication.
- Security Level — use the drop-down to select from one of the following options:
- noAuthNoPriv — use this option if you do not want to apply authentication or privacy settings.
- authNoPriv — use this option if you want to apply authentication settings, but not privacy.
- authPriv — use this option if you want to apply authentication and privacy settings.
- Authentication Protocol — use the drop-down to select the hashing algorithm you want to use to store your authentication key. Options include MD5 and SHA.
- Authentication Key — enter the key for the authentication protocol. Similar to a password.
- Privacy Protocol — use the drop-down to select the encryption algorithm you want to use to secure the communication between the added device and Vasion Print (formerly PrinterLogic). Options include DES and AES.
- Privacy Key — enter the key for the privacy protocol. Similar to a password.
- Context Name — enter a context name. The context name is an octet string, which has at least one management information
Context Engine ID — enter the context ID to uniquely identify the SNMP entity. Most of the SNMP v3 entities have the snmpEngineID as their contextID.
- Select Save on the top-right corner.


At this point you've enabled SNMP Status Monitoring for each printer.
Printer-Specific SNMP Settings
The Status tab of printer objects contains basic reporting data about the device and the option to configure printer-specific SNMP settings. In the Settings section printers using the default SNMP configuration have the Use Global option enabled by default.
The steps below guide you through configuring printer-specific SNMP settings for devices that do not use the default settings configured above.
- In the Admin Console, select the desired printer object's Status tab.
-
In the Settings section, select Use Printer-Specific.

-
Select Enable SNMP Status Monitoring.
To disable SNMP Status Monitoring on this printer object, leave Enable SNMP Status Monitoring unchecked and select Save.
- If the printer uses SNMP v1 / v2, complete the following:
- Community Public (Get) Name — public is set by default.
Community Private (Set) Name — private is set by default.
- If the printer uses SNMP v3, complete the following:
- Enabled — check the box to enable SNMP v3.
- Username — if you want to enable authentication, enter the username you want to designate for authentication.
- Security Level — use the drop-down to select from one of the following options:
- noAuthNoPriv — use this option if you do not want to apply authentication or privacy settings.
- authNoPriv — use this option if you want to apply authentication settings, but not privacy.
- authPriv — use this option if you want to apply authentication and privacy settings.
- Authentication Protocol — use the drop-down to select the hashing algorithm you want to use to store your authentication key. Options include MD5 and SHA.
- Authentication Key — enter the key for the authentication protocol. Similar to a password.
- Privacy Protocol — use the drop-down to select the encryption algorithm you want to use to secure the communication between the added device and Vasion Print (formerly PrinterLogic). Options include DES and AES.
- Privacy Key — enter the key for the privacy protocol. Similar to a password.
- Context Name — enter a context name. The context name is an octet string, which has at least one management information
Context Engine ID — enter the context ID to uniquely identify the SNMP entity. Most of the SNMP v3 entities have the snmpEngineID as their contextID.
- Select Save on the top-right corner.

-
Week Ending In Jan 4th, 2025
-
Released: Dec 27th, 2024
-
Released: Dec 23rd, 2024
-
Android/iOS: Dec 23rd, 2024
-
Released: Dec 9th, 2024