We've Moved!
We've unified our Vasion Print (formerly PrinterLogic) and Vasion Automate documentation into a single, streamlined resource to better serve you. Visit our new unified documentation site: docs.vasion.com
Note: This legacy site will not be updated after January 6, 2025, and will remain available for reference until May, after which all traffic will automatically redirect to docs.vasion.com/a/Get_Started/Automate.htm.

Last updated: January 07, 2025
Cache Manager
The Cache Manager is a feature that utilizes file sharing to localize driver and Client file downloads through cache locations on Windows devices. This solution improves printer installations in environments with low bandwidth or remote sites, as workstations collect driver and Client files from a local machine rather than the server that hosts the instance.
Cached files include:
- Driver installation files
- Driver Profile files
- Client installation and update files (PrinterInstallerClient.msi / PrinterInstallerClientUpdater.exe)
How It Works.
The device defined as the Cache Manager creates a copy of the driver, driver profile, and client installation files (C:\Program Files (x86)\Printer Properties Pro\Printer Installer Client\cache). Whenever an admin updates a driver or profile in the Admin Console, or a new Client version goes out, the copy on the Cache Manager updates.
Cache Locations are on-site Windows devices connected to the file share and defined in the Vasion Print (formerly PrinterLogic) application using an IP Address Range object. They sync with the Cache Manager, creating a local copy of the driver, profile, and Client version files available to devices within the IP Address Range. Whenever a device within the IP Address Range installs a printer or updates the client version, it uses the files from the Cache Location rather than reaching out to the server hosting the instance.
Supported Caching Devices
- File Shares
- Riverbed Appliance
- WAN Accelerator
1. Create File Share
Part of setting up caching is creating and configuring a file share. We recommended that you set up the file share before you set up the Cache Manager or Cache Location(s). Additionally, you should set up and test a single Cache Location before configuring additional locations. The steps below guide you through setting up the share folder and configuring the folder properties and security settings.
Create Share Folder
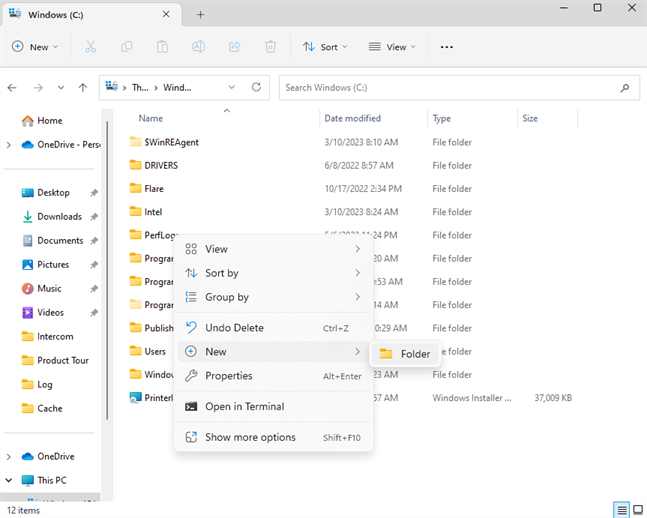
- Log in to the Windows device used for the share.
- Open Windows Explorer and select Local Disk (C:).
- Right-click in Windows Explorer and select New
 Folder.
 - Enter the name of the new folder.
Folder Share Properties
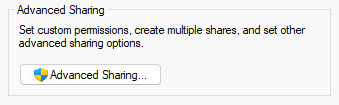
- Right-click the new folder and select Properties.
-
Select the Sharing tab, then select Advanced Sharing.

-
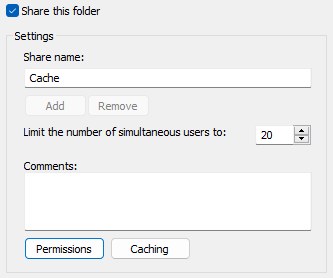
Check the Share this folder box.
- Optional: In the Share name field, type a name for the share. By default, the name of the folder displays as the name of the share.
-
Optional: Adjust the simultaneous users limit to fit your needs.

- Select the Permissions button.
- If the Everyone group has not been added by default, add the group and set the Read permission to Allow.
- To add the Cache Manager device, select Add.
-
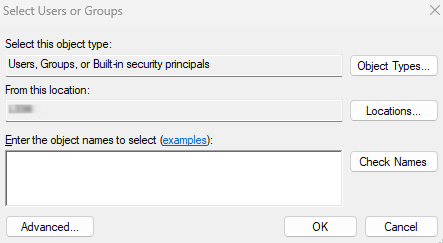
Select the Object Types button.

- Select the Computers box and select OK.
- Enter the Cache Manager computer name followed by a $ (computer$), then select OK.
- Select Apply in the modal.
- Select OK on the Share Permission tab, and on the Advanced Sharing tab.
Folder Security Properties
-
In the folder Properties window select the Security tab, then select Edit.
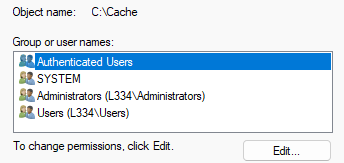
- Under the Group or user names section, select Add.
-
In Select Users or Groups select the Object Types button.
- Select the Computers box, then select OK.
-
In the Enter the object names to select field, type Everyone. If you do not want to include everyone, another object name you could enter is the user domain.
You can use the object name in the Security tab only, not in the Sharing tab. - Select OK in the modal.
- In the Permissions for
<Object Name>field, select Allow for the Full Control line item, then select Apply. - Select OK.
- Close the Properties window.

2. Enable Caching
The steps below guide you through configuring the Cache Manager on a Windows device with the Client installed.
- In the Admin Console, navigate to Tools
 Settings General.
 - In the Cache section, check the box for Enable end-user redirections to cache.
-
In the Cache Manager field, enter the FQDN of the desired Windows device.
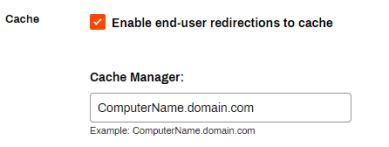
- Select Save in the upper-right.
- Log in to the specified Cache Manager device.
- Right-click the Client system tray icon, and select Refresh.
Once the Client refreshes, the device behaves as the Cache Manager. Driver, profile, and Client files copy to the C:\Program Files (x86)\Printer Properties Pro\Printer Installer Client\cache location. Allow time for all the files to get copied to the Cache Manager.
3. Set Cache Location(s)
The Cache Location is the device at the remote site that stores drivers, profiles, and Client files. The Cache Location value defined on the IP Address Range's General tab must be the UNC path to the file share.
- Navigate to the IP Address Range object in the Admin Console.
- On the General tab, enter the location path in the Cache Location field.
- Select Update cache files now.
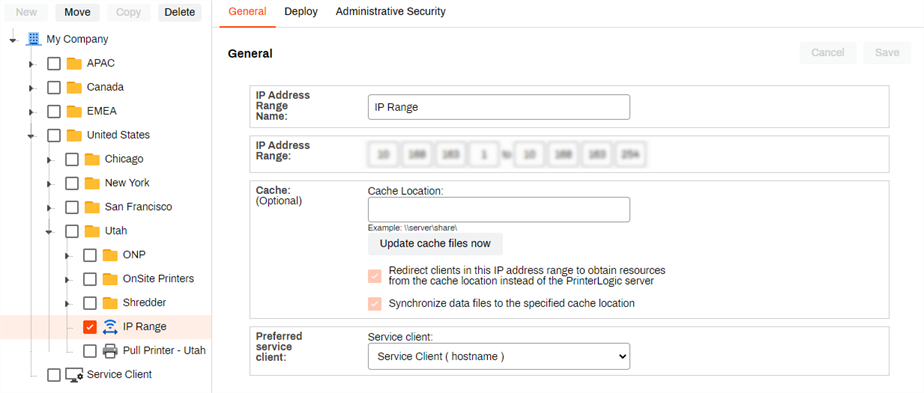
Allow time for the Cache Location to sync with the Cache Manager. Once complete, when a user within the IP Address Range installs a printer or the client updates, the server redirects the communication to the specified Cache Location, where it obtains the necessary files.
-
Week Ending In Jan 4th, 2025
-
Released: Dec 27th, 2024
-
Released: Dec 23rd, 2024
-
Android/iOS: Dec 23rd, 2024
-
Released: Dec 9th, 2024