We've Moved!
We've unified our Vasion Print (formerly PrinterLogic) and Vasion Automate documentation into a single, streamlined resource to better serve you. Visit our new unified documentation site: docs.vasion.com
Note: This legacy site will not be updated after January 6, 2025, and will remain available for reference until May, after which all traffic will automatically redirect to docs.vasion.com/a/Get_Started/Automate.htm.

Last updated: January 07, 2025
Configure Off-Network Cloud Print
Off-Network Cloud Print (ONCP) utilizes AWS-hosted regional external gateways and Vasion's ONCP app, installed on the printer, to reduce infrastructure costs and help users on other networks print successfully. This topic guides you through configuring ONCP in your environment.
Key Points
Here is some important information about ONCP.
- Currently supports Windows and mobile (iOS / Android) devices.
- Requires additional licensing. Please reach out to your Vasion representative for details and pricing.
- Exclusively uses RAW printing on PC platforms.
- Currently does not support Line Printer Remote (LPR).
Requirements
ONCP has two configuration options for the Internal Routing Service (IRS), depending on manufacturer support. The requirements differ slightly depending on which configuration you use. However, all configurations require the following:
- All devices, including Service Clients, printers, etc., must be allowed to access the Domain Name System (DNS) server to resolve names.
- Use a supported printer found on the Supported Printers List. Filter your results by selecting the Off-Network Cloud Printing option from the Feature drop-down.
- Ports required are: TCP Port 443 (Port 631 for IPPS) for printing, and TCP Port 9100 for routing. For details, see manufacturer ports and requirements information below.
Manufacturer Support
The following manufacturers support ONCP. Manufacturers supporting the ONCP app also work with an IRS Service Client.
ONCP App Installation
- Fujifilm
- Fuji Xerox
- HP
- Kyocera
- Lexmark
- Ricoh Multifunction Printer (MFP) devices
IRS Service Client
- Canon
- Konica Minolta
- Sharp
- Toshiba
- Xerox
- Epson
ONCP App Requirements
- A Service Client running the Printer Apps service. The ONCP app installs using the Printer Apps service. You may disable or delete the Service Client after installing the app if it isn't part of another configuration.
-
If your Service Client is using Windows OS, ensure Visual C++ Redistributable for Visual Studio 2015 (32-bit/64-bit) or newer is installed on the Service Client.
Both the x86 and x64 redistributable packages must be installed. These packages can be found in the Microsoft Download Center.
- Kyocera Multi-function Printers (MFP) must have an SD-Card to install third-party applications like the ONCP app. One will need to be added if it does not have one by default.
- The HP ONCP app requires the Workpath platform enabled on the printer.
- You must contact HP or your HP-certified reseller to add the Vasion HP ONCP app from the HP Command Center. They then need to:
- Claim and add their printers to the HP Command Center.
- Add the Vasion ONCP app as a solution.
- Add the app to the customer's account.
- Manage and deploy the ONCP application to printers.
- Open / enable the appropriate ports and services outlined below.
ONCP App Manufacturer Ports / Requirements
|
Manufacturer |
Ports & Requirements |
|---|---|
|
Fujifilm |
|
|
Fuji Xerox |
|
|
HP |
|
|
Kyocera |
|
|
Lexmark |
|
|
Ricoh |
|
IRS Service Client Requirements
- A Service Client running the Internal Routing Service. This replaces the installed app and routes print jobs from the External Gateway to the printer.
- The IRS Service Client must be able to reach the printers over the network. If printers are on multiple networks, configure additional IRS Service Clients as needed.
-
If your Service Client is using Windows OS, ensure Visual C++ Redistributable for Visual Studio 2015 (32-bit/64-bit) or newer is installed on the Service Client.
Both the x86 and x64 redistributable packages must be installed. These packages can be found in the Microsoft Download Center.
ONCP URLs
Ensure the following allow list URLs are open and adjusted to your region:
- Oncp-ofn.app.printercloud.com
-
Oncp-pgw.app.printercloud.com
The URL should match the regional code for your instance. Verify by checking your instance URL.
- US Region — printercloud.com
- EMEA Region — printercloud5.com
- APAC Region — printercloud10.com
- Canada Region — printercloud15.com
- APAC (Singapore) Region — printercloud20.com
Enable ONCP
- Navigate to the Off-Network Print section on Tools
 Settings General in the Admin Console.
 - Select the Allow Cloud Printing option.
- Select Save on the top-right corner.

Off-Network Priority
Off-Network Priority controls where the Vasion Print (formerly PrinterLogic)Client will try to send the job first, either directly to the printer or to the ONCP or ONP service.
- Off-Network Only
- Only sends the print jobs using the ONP / ONCP service and will not try to send the job directly to the printer. (Direct IP Printing).
- Direct IP Primary
- Attempts to send the print job directly to the printer (Direct IP Printing) first. If unsuccessful, the job attempts using the ONP / ONCP service.
- Off-Network Primary
-
Attempts to send the job using the ONP service first. If unsuccessful, the job attempts printing directly to the printer. (Direct IP Printing).
-
ONCP does not support the Off-Network Primary option.
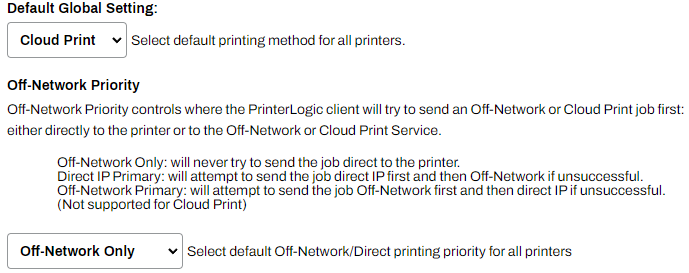
Enable as Default
The following steps guide you through configuring ONCP as the default for all printers. Enabling the global settings makes all printers Off-Network Cloud printers. Doing this will force all print jobs to follow the flow of ONCP, regardless of whether you are on the network or not. If you only want to enable ONCP for specific printers, see the Printer-Specific section further below.
- Select Cloud Print in the Default Global Settings dropdown.
- In the Off-Network Priority you can select the default print priority from one of the options:
- Off-Network Only
Direct IP Primary.
Off-Network Priority settings only apply to workstations, and not to mobile devices using ONP / ONCP.
- Select Save
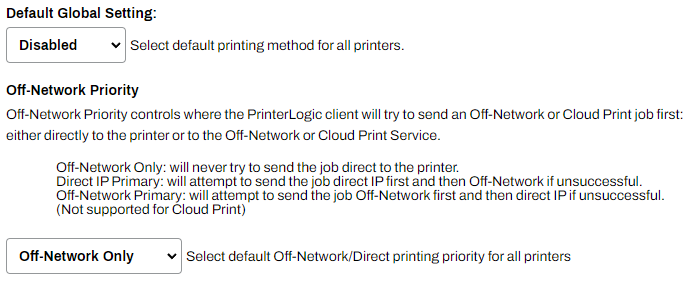
Enable for Printer-Specific
- Select Disabled in the Default Global Settings drop-down.
- In the Off-Network Priority you can select the default print priority from one of the options:.
- Off-Network Only
Direct IP Primary.
Off-Network Priority settings only apply to workstations, and not to mobile devices using ONP / ONCP.
- Select Save
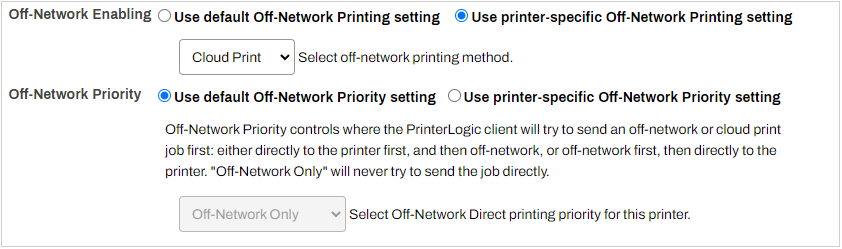
For the printer-specific configuration, you must complete the following steps on each printer object to enable ONCP.
- Navigate to the desired printer object's Off-Network tab.
- For the Off-Network Enabling setting, select Use printer-specific Off-Network Printing setting.
- Use the drop-down to select Cloud Print for the printer's Off-Network printing method.
- For Off-Network Priority, use the default setting or select Use printer-specific Off-Network Priority setting and select the appropriate option:
- Off-Network Only
Direct IP Primary.
- Select Save
- Repeat as needed for other printer objects.
ONCP App & IRS Service Client
The following sections guide you through both configuration options available. The app installation is recommended, but not all manufacturers support the ONCP app. Use the IRS Service Client method for unsupported manufacturers.
ONCP Printer App
When a user on another network sends a job to an ONCP-enabled printer, the encrypted job goes to the External Gateway. The ONCP app monitors the gateway, immediately pulls down the print job, and releases it at the printer. This section guides you through installing the ONCP app on your printers.
For supported HP devices, you must work with HP / HP certified reseller to complete the HP Required Steps section before installing the ONCP app.
HP Required Steps
Enable the HP Workpath Platform on the Printer
If HP Workpath is not already enabled on the printer, follow these steps to enable it:
- Open the printer's web page in a browser, or physically sign in on the printer, as an Administrator.
- On the Security tab, select General Security in the menu if it is not already selected.
- In HP Workpath platform, select Enable.
- Select Restart.
Add the Vasion ONCP App
The following steps outline the process that HP or an HP-certified reseller must complete to add the Vasion ONCP app to your printers.
- Open the printer's web interface in a browser, or go to the physical printer's control panel, and sign in as an administrator.
-
Select the HP Command Center application on the printer.

- Select Continue.
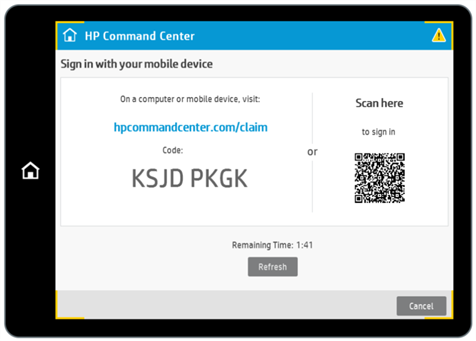
-
When the login information displays on the screen, copy / note the Code.

You may use a mobile device to scan the displayed QR code and follow the steps provided.
- Claim the printer by signing in to hpcommandcenter.com/claim and enter the printer code.
-
Next, navigate to the HP Command Center.
You can quickly do this by removing the subdirectory "claim" from the URL in the browser address bar from the previous step.
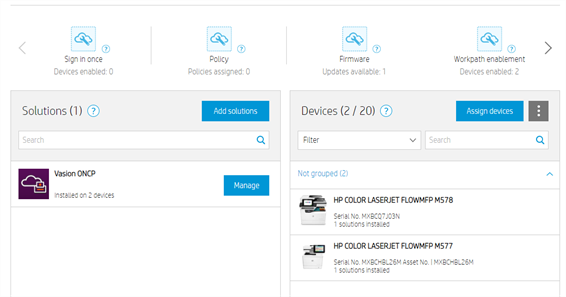
- Select Accounts and select the Demo Pool account.
-
In Solutions, search for and select Vasion ONCP, then select Manage.

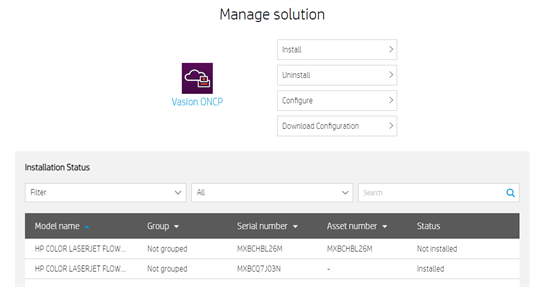
-
Select Install.
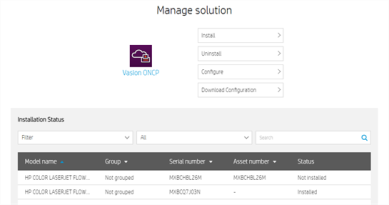
-
Select the printers you wish to install, then select Next, then Install.


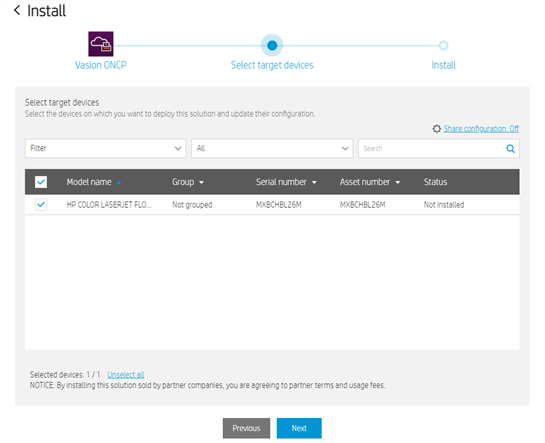
This pushes the ONCP app configuration to the HP printer(s). Use the steps in the following sections to install the app on the printer(s).
Install on Printer (Individual)
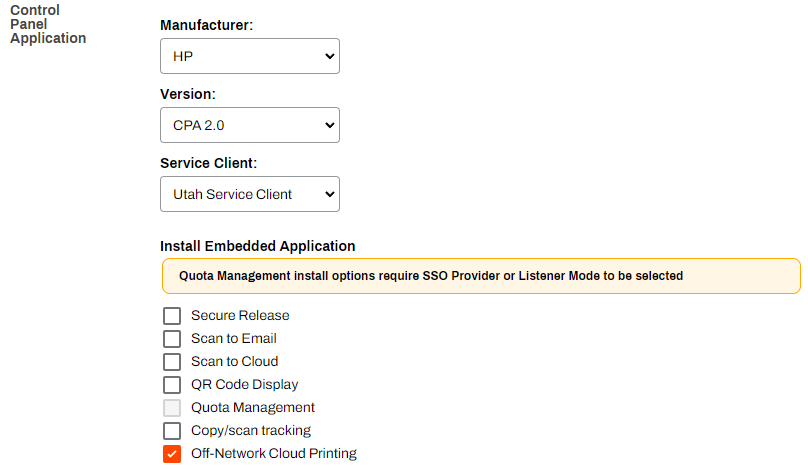
These are general steps for installing ONCP using the printer's Apps tab Admin Console. If you need to configure a Service Client to run the Printer Apps service, see CPA Manager.
- Select the desired printer object's Apps tab.
- Select the printer manufacturer.
- Select CPA 2.0 in the Version field.
-
In the Service Client field, select the Service Client running the Printer App service.
Cloud Print is not dependent on the CPA and can be installed as a stand-alone app or in conjunction with the CPA.
- Select the Off-Network Cloud Printing option.
- Select the option desired for credentials to use to install the ONCP app on the printer.
- These can be set at a default level configured in Tools Settings General in the Control Panel Application (CPA) section.
- Or at a Printer Specific level on the current screen. In either case, ensure that the correct user credentials are entered.
- These can be set at a default level configured in Tools
- Select Save
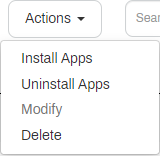
Install Using CPA Manager (Bulk)
These are general steps for installing ONCP using the CPA Manager. If you need to configure a Service Client to run the Printer Apps service, or add printers to the printer list, see CPA Manager.
- Navigate to the Service Client running the Printer Apps service, and select the Printer Apps tab.
-
Select the desired printers from the Printer List.
When working with multiple printers, they must all be from the same manufacturer.
-
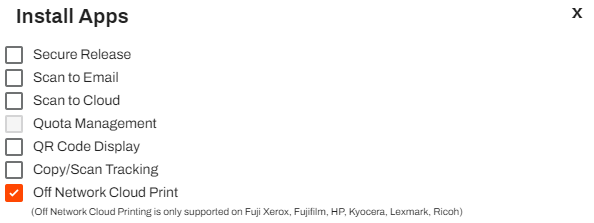
Select the Install Apps option from the Actions drop-down.
- Select the Off-Network Cloud Print option in the Install Apps modal.
- Select Save
- The Updating settings modal can be closed out. ONCP installation continues in the background.
- The Status column for the printer(s) shows if the installation was successful.

ONCP Using the Internal Routing Service
If your device does not currently support the ONCP app, here's an alternative method that uses the Service Client as the IRS. The IRS is a designated device on the printer network that acts similarly to the ONCP app. It monitors the external gateway, immediately pulls down print jobs, and routes them to the correct printer.
IRS Configuration
Enable the IRS
The IRS monitors the External Gateway, immediately downloads print jobs, and routes them directly to the printer. ONCP only requires you to add the IRS Service Client(s), the External Gateways automatically are assigned based on the instance region. In environments with multiple printer networks, each network requires an IRS on that network to reach the printers.
- Navigate to the Service Client object in the tree structure.
- Select the Internal Routing tab.
-
Select Enable Internal Routing Service.

- Select Save
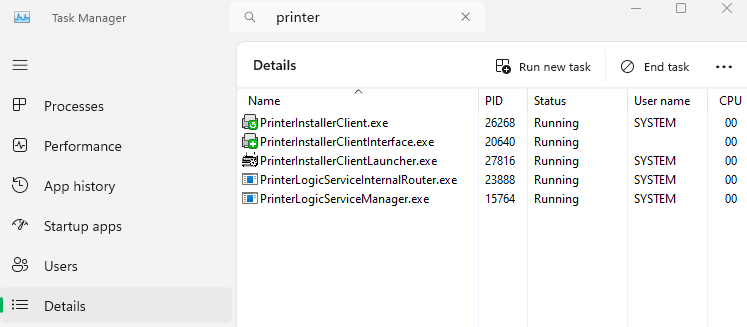
- Access the physical device designated as the IRS Service Client.
- Use the system tray icon or start menu to "Refresh Configurations".
- Open Task Manager and select the Details tab.
- In the Search field type "printer" to locate the Client processes.
- Verify the following services.
- Client services (PrinterInstallerClient.exe, PrinterInstallerClientInterface.exe, PrinterInstallerClientLauncher.exe).
- PrinterLogicServiceManager.exe.
- PrinterLogicServiceInternalRouter.exe.
- Other enabled services on the Service Client.

Assign the IRS
As you add the IRS Service Client to the root /folder / printer levels, you may notice options for adding Vasion-hosted Gateways. These are for the ONP configurations, not for ONCP. ONCP automatically assigns the regional External Gateway on the back end, depending on the region that hosts your instance.
The IRS Service Client provides high availability and built-in redundancy at the root, folder, and printer levels. Configuring all levels is optional but recommended during setup. The IRS Service Client must be on the same network and able to reach assigned printers. In environments with printers on multiple networks, it needs to reach printers in each network.
For most environments, it’s best to configure the assignment at the folder or printer level first, then at the root level. If all printers use the same assignment, add it to the root level. Folders and printers inherit higher-level assignments, but lower-level ones take priority.
If a printer or folder has a root assignment (A) and a folder or printer assignment (B), the service prioritizes (B) and uses (A) as a backup if needed. The priority order is shown in the folder’s Services tab and the printer’s Off-Network tab.
Configure the settings based on your organization’s needs.
Folder Level
To add an IRS assignment at the folder level:
- Select the desired folder in the tree structure.
- Select the Services tab.
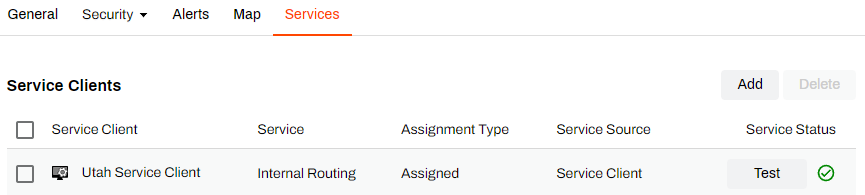
- Select the Add button on the right.
- In the Add Service modal select the desired Internal Routing Service Client.
- Select OK.
- Use the Test buttons in the Service Status column to verify connectivity.
Lower-level folders and printers inherit the IRS assignment, including any set at the root or higher-level folders.
Printer Level
To add an IRS assignment at the printer level:
- Select the desired printer object in the tree structure.
- Select the Off-Network tab.
- Select the Add button on the right.
- In the Add Service modal select the desired Internal Routing Service Client.
- Select OK.
- Use the Test buttons in the Service Status column to verify connectivity.
This sets the IRS assignment for the printer object, including any assignments set at the root or higher-level folder(s).

Root Level
To add an IRS assignment at the root level:
- Select the Organization
 icon at the top of the tree structure.
 - Select the Services tab.
- Select the Add button on the right.
- In the Add Service modal select the desired Internal Routing Service Client.
- Select OK.
- Use the Test buttons in the Service Status column to verify connectivity.
Lower-level folders and printers inherit the IRS assignment.
-
Week Ending In Jan 4th, 2025
-
Released: Dec 27th, 2024
-
Released: Dec 23rd, 2024
-
Android/iOS: Dec 23rd, 2024
-
Released: Dec 9th, 2024