Last updated: November 14, 2024
Manage Existing Printers
The Admin Console provides a setting enabling Virtual Appliance to start managing printers already installed on end user workstations. The value of this setting is that you do not have to uninstall and reinstall printers on workstations for Virtual Appliance to recognize and manage those printers. The following steps describe the process for configuring Virtual Appliance to start managing previously installed printers on the workstations.
TCP / IP Printer Settings
Here is a brief overview of the settings used to manage existing printers. To access the Client settings go to Tools ![]() Settings
Settings ![]() Client.
Client.
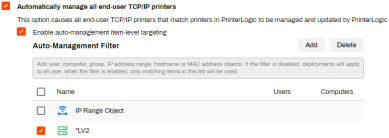
- Automatically manage all end-user TCP / IP printers
- Enable this option to use Virtual Appliance to manage previously installed printers on a workstation that match up with a printers in the Admin Console.
- Enable auto-management item level targeting
- Item level targeting allows you to designate specific users, groups, IP ranges, etc., impacted by the setting above. Click Show Filter to define targets. If you are rolling out Virtual Appliance to a new environment, item-level targeting lets you do so in segments rather than all at once.

Additional Settings
Control end user interactions with TCP / IP printers and printer ports.
- Allow non-administrators to modify / delete TCP / IP printers
- Enable this option to allow end users to alter the settings or delete TCP / IP printers managed by Virtual Appliance.
- Allow end-users to capture printer ports for legacy applications
- Enable this option to add an icon to the system tray menu so end users can capture printer ports (such as LPT1) and direct the output to a TCP / IP printer.

Item Level Targeting
You can restrict the auto-management functionality to a specific set of devices, sites, or users. A use case for this would be if you were doing a staged roll-out of Virtual Appliance. Rolling the Virtual Appliance Client out to one site, running tests, rolling the Client out to a second site, running more tests, and then pushing the Client to the rest of the organization. The following steps describe the process for restricting the Client from managing existing printers to specific devices, sites, or users.
- Log in to the Admin Console.
- Navigate to Tools
 Settings Client.
 - In the TCP / IP Printer Settings section, select Automatically manage all end-user TCP / IP Printer, if it is not already selected.
- Select Enable auto-management item-level targeting.
- Select Show Filter....
-
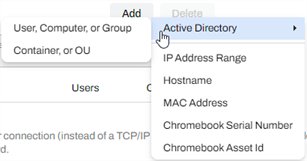
Select Add and select one of the options.
-
Object types include the options for Active Directory (user, computer, group), IP address range, hostname, MAC address, and by Chromebook serial number or asset ID. Each object type uses it's own setup wizard. Added object types appear in the Auto-Management Filter section.

-
- Select the type of object you want to use to filter the workstations.
- Select Save

-
Released: November 21st, 2024
Updated Application Version Included
-
New Mobile App Release
iOS: November 11th, 2024 -
Released: November 11th, 2024