Last updated: November 14, 2024
Identity Sync
Identity Sync is an authentication option for environments using an LDAP domain. With Identity Sync configured, users can authenticate to the Control Panel Application (CPA) using their LDAP username and password, badge, or PIN.
The Identity Sync service requires an LDAP connection and a Service Client, a designated device within your network running the service. This keeps identity queries behind your firewall. It is important to note that users' passwords are not stored or synced with your instance.
Identity Sync uses a "lazy load" function to help reduce the time it takes to sync users within groups. All users sync to the instance first, then groups, but not all group associations sync initially.
The "lazy-load" of group associations means that if the group has an assignment, such as printer deployment, Portal Security, or something explicitly assigned, then group associations sync with users. If the group does NOT have an assignment, the users and group object sync over, but the users are NOT associated with the group.
Once you create a group assignment, such as a printer deployment, the next time the Identity Sync service checks in (done in 5-minute intervals), the service applies the group association to the users.
Prerequisites
- Configure an LDAP Domain connection.
- Create a Service Client.
Enable Identity Sync
-
In the Admin Console tree structure, navigate to the Service Client object the Identity Sync service will run on.
- Select the Service Client's Identity Sync tab.
-
Check the box for Enable LDAP Identity Sync.
- Select Save Additional fields display after the page has refreshed.
- The LDAP Attribute to be used for Identity Linking defaults to sAMAccountName which is recommended. If this is not the linking attribute you wish to use, adjust the entry in the text field.
- Select Save
After saving, the Identity Sync service begins adding users to the Tools ![]() Identities or Tools
Identities or Tools ![]() Identity Management tab. The tab name differs depending on the bundle purchased.
Identity Management tab. The tab name differs depending on the bundle purchased.
If users aren't showing shortly after enabling the service:
- Confirm the PrinterLogicServiceIdentitySync.exe service is running on the Service Client.
-
Navigate back to the Service Client's Identity Sync tab and select the Force Full Sync button.
Delete Users / Groups
Sometimes, it becomes necessary to delete provisioned users or groups. The self-service delete function enables IT Admins to remove all provisioned users and groups. For legal reasons, Vasion Support cannot remove these for customers, which leaves this action at the discretion of the IT Admin. The steps below walk admins through the deletion confirmation process.
- In the Admin Console, navigate to Tools
 Settings
  General.
 - In the Identity Provider Settings section select the LDAP option.
-
In the LDAP Sync section, select the Delete Provisioned LDAP Data button.
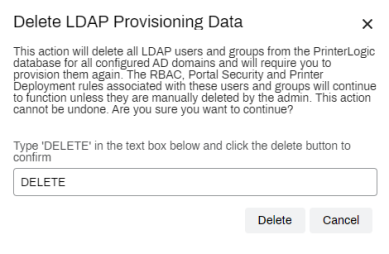
- In the Delete LDAP Provisioning Data pop-up, type DELETE.
-
Select the Delete button which becomes visible after entering the text.
This action will delete all LDAP users and groups from the database for all configured AD domains and will require you to provision them again. The RBAC, Portal Security, and Printer Deployment rules associated with these users and groups will continue to function unless they are manually deleted by the admin. This action cannot be undone. Are you sure you want to continue?
Allow a few minutes for large LDAP environments to be cleared.
-
New Mobile App Release
iOS: November 11th, 2024 -
Released: November 11th, 2024
-
Released: October 22nd, 2024
Updated Application Version Included


