Last updated: June 28, 2024
Profile Management
Driver profiles are pre-configured set of driver settings that are applied to the printer during installation. Printer profiles can include pre-defined settings such as color and Black & White, or user-customizable settings. Profiles can save time and effort by eliminating the need to manually change settings each time you print.
The driver and assigned driver profile get installed whenever you install the printer. A driver can have multiple profiles associated with it, but only one profile can be assigned to a printer object. This allows multiple printers to use the same driver but install it with different settings.
Key Points
Here are a few considerations when managing profiles.
- Profiles for Windows drivers can only be created on Windows devices.
- Profiles for Mac drivers can only be created on Mac devices.
- Driver profiles created in the Driver/Profile Repository still need to be assigned to the printer object's Drivers / Profiles tab.
Because we don't lock down profiles after printer installation, end users can manually adjust profile settings from the workstation if needed. Administrators have reprofiling options within the Admin Console to reapply profiles after each print job and during the client check-in. These options help keep printing uniform while allowing for adjustments.
Create a New Profile
You can create driver profiles from the printer object's Drivers / Profiles tab or from the Driver/Profile Repository.
The recommended practice is to use the printer object's Drivers / Profiles tab, which assigns the profile to the printer object when finished. If you use the Driver/Profile Repository, you still have to go to the Drivers / Profiles tab to assign the profile.
The steps below guide you through both approaches.
- Drivers / Profiles Tab
- Driver/Profile Repository
- In the Admin Console, select the printer object.
- Select the Drivers / Profiles tab.
-
Select the Add button in the Profile column.

- When the printer properties window opens, configure the settings you want to apply.
- When finished, apply and save the changes.
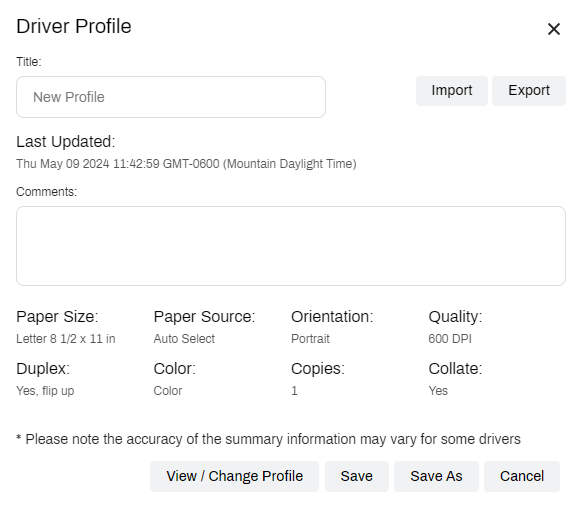
- On the Driver Profile modal, complete the following:
- Title — enter a name for the profile.
- Comments — enter any comments to describe the profile. This step is optional.
- Select Save

- In the Admin Console, navigate to Tools
 Driver/Profile Repository.
 - Select the desired driver.
-
Select Add Profile.

- When the printer properties window opens, configure the settings you want to apply.
- When finished, apply and save the changes.
- On the Driver Profile modal, complete the following:
- Title — enter a name for the profile.
- Comments — enter any comments to describe the profile. This step is optional.
- Select Save
- Go to the printer object(s) in the tree structure.
- Select the Drivers / Profiles tab.
-
In the Profile column next to the driver, select the profile from the drop-down.

- Select Save on the top-right corner.


Create a New Profile From Existing
For printers that require slightly different setting, like color instead of Black & White, you can copy an exiting profile so that you only have to make the needed adjustments. The steps below guide you from either the Drivers / Profiles tab or the Driver/Profile Repository approaches.
If you use the Driver/Profile Repository, you still have to go to the Drivers / Profiles tab to assign the profile.
- Drivers / Profiles Tab
- Driver/Profile Repository
- In the Admin Console, select the printer object, then the Drivers / Profiles tab.
-
Under the Profile column, select the Update button.
- On the Driver Profile modal, select View / Change Profile.
- When the printer properties window opens, configure the settings you want to apply.
- When finished, apply and save the changes.
- On the Driver Profile modal, complete the following:
- Title — change the name of the profile to a new name.
- Comments — update the profile description, if necessary.
- Select Save.
- Select Save on the top-right corner..
- In the Admin Console, navigate to Tools Driver/Profile Repository.
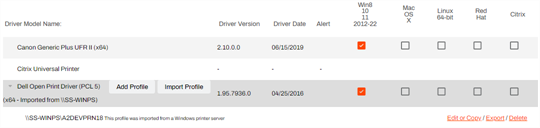
- Use the drop-down button
 before the driver name to view assigned driver profiles.
 -
Select Edit or Copy on the right side of the profile you want.

- On the Driver Profile modal, select View / Change Profile.
- On the printer properties window, make the desired changes, or leave as is.
- When finished, apply and save the changes.
- On the Driver Profile modal, complete the following:
- Comments — update the profile description, if necessary.
- Select Save As.
- Give the new profile a unique name, then select OK.

Modify Existing Profiles
You can modify profiles using the printer object's Drivers / Profiles tab or by going to the Driver/Profile Repository.
Here are the steps to modify a profile from the printer object's Drivers / Profiles tab.
- In the Admin Console, select the printer object, then the Drivers / Profiles tab.
-
Under the Profile column, select the Update button.
- On the Driver Profile modal, select View / Change Profile.
- When the printer properties window opens, configure the settings you want to apply.
- When finished, apply and save the changes.
- On the Driver Profile modal, select Save.
- Select Save on the top-right corner.
Import / Export Driver Profiles
You can import / export a driver profile file (.plp) from the Driver Profile modal, or from the Driver/Profile Repository.
The steps below guide you through both options from the Driver/Profile Repository.
Import a Driver Profile
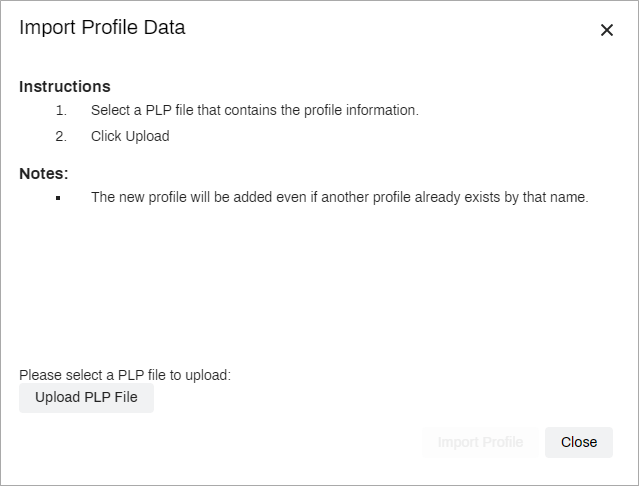
- In the Admin Console, navigate to Tools Driver/Profile Repository.
- Select the desired driver.
- In the Import Profile Data modal, select Upload PLP File.
- Navigate to the .plp file and select it.
- Once the imported profile displays beneath the driver, go to the printer object in the tree structure.
- Select the Drivers / Profiles tab.
-
In the Profile column next to the driver, use the drop-down to select the imported profile.
- Select Save on the top-right corner.
Export Driver Profiles
The new driver profile can be applied using the printer object's Drivers / Profiles tab.
- In the Admin Console, navigate to Tools Driver/Profile Repository.
- Use the drop-down button before the driver name to view assigned driver profiles.
-
Select Export on the right side of the profile you want.
The file is automatically downloaded to your default download location.

Delete Driver Profiles
You can only delete driver profiles from the Driver/Profile Repository. Be sure to remove the profile from any printer objects before deletion.
- In the Admin Console, navigate to Tools Driver/Profile Repository.
- Use the drop-down button before the driver name to view assigned driver profiles.
-
Select Delete on the right side of the profile you want.
If a printer object has the profile assigned, a message displays identifying the printer object(s). You can still delete the profile by selecting OK.
Profiling Options
To help keep driver profiles uniform for all the printer objects that have the same profile assigned, you can configure sync profile options at the global level. This is helpful in environments with strict print settings, such as only printing in Black & White or only printing to specific trays.
You can find the sync profile settings by going to Tools ![]() Settings
Settings ![]() Client in the Admin Console. Scroll down to the TCP / IP Printer Settings option. Here's an overview of the settings.
Client in the Admin Console. Scroll down to the TCP / IP Printer Settings option. Here's an overview of the settings.
- Sync Profiles
- Enable this option to automatically update the profile settings for all end users.
- Reaply profiles after every login or Client check-in
- Enable this option to reapply the profiles every time an end user signs in or when the worktation's Client checks in to the Virtual Appliance services.
- Reapply profiles after each print job
- Enable this option to reapply the profiles after a print job is completed.

You can configure printer-specific settings to override the global options. You can make the appropriate selection from one or both options.
- Select the printer object and select the Drivers / Profiles tab.
- In the Profiling Options section, select from the following:
- Not set — the printer object uses the global setting, and it displays whether the setting is enabled globally or not.
- Enabled — select this option to enable the appropriate profile sync option.
- Disabled — select this option if you want to disable the profile sync option.
- Select Save on the top-right corner.

-
Released: November 21st, 2024
Updated Application Version Included
-
New Mobile App Release
iOS: November 11th, 2024 -
Released: November 11th, 2024