Last updated: November 21, 2024
Client Refresh
The Client refresh is when the installed Client completes a check-in with the server hosting the Virtual Appliance instance. Here you can learn about some of the Client options that can be modified to suit your environment.
Client Options
To access the Client options go to Tools ![]() Settings
Settings ![]() Client.
Client.
Client Check-in
The client check-in is when the endpoint client communicates with the PrinterLogic instance to pull down any Admin Console changes, updates to installed printers and drivers, and installs / uninstalls deployed printers.
- Enable client check-in at startup and login
- This option is always enabled by default. The Client communicates with the web service when the workstation starts or a user signs in.
- Enable client check-in every
xminutes - You can adjust the frequency of the Client check-in by adjusting the number in the text box.
-
We recommend a minimum check-in interval of 240 minutes. Large environments with a short check-in interval could overwhelm the Virtual Appliance, causing it to crash or decrease in responsiveness.
Shortcut Options
Choose what options to display in the Self-service Portal, the Windows Start menu, and the Virtual Appliance icon in the system tray.
- Show client options in system tray
- With this option selected, Virtual Appliance options display from the system tray icon when a user right-clicks on the icon.
- Show client options on portal
- With this option selected, the Self-service Portal menu displays the options selected below when end users access the portal.
- Check the box next to the options you want the Self-service Portal menu to display for end users. When options are not selected, the menu only displays the Pull Printing and Email Printing options.
- Show PrinterLogic program folder in Start menu
- With this option selected, you can specify which options are accessible from the Windows Start menu by selecting from the list of options.
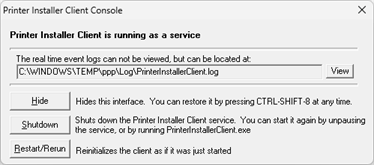
- Select a short-cut to open the client console on end-user machines
- By default the keyboard shortcut is CTRL+Shift+8, but you can select from the following:
- CTRL+Alt+8
- CTRL+Alt+P
- NONE
- The Printer Installer Client Console is a small modal that provides the following functionality:
- Displays the location of the Client log and the following buttons:
Adjust the Check-in Interval
To adjust the Client check-in interval:
- In the Admin Console, navigate to Tools
 Settings
  Client.
 - In the Client Check-in section, check the box for Enable client check-in every (x) minutes.
- Adjust the value in the box to the preferred interval.
- Select Save
We recommend a minimum check-in interval of 240 minutes. Large environments with a short check-in interval could overwhelm the Virtual Appliance, causing it to crash or decrease in responsiveness.
Manually Refresh the Client
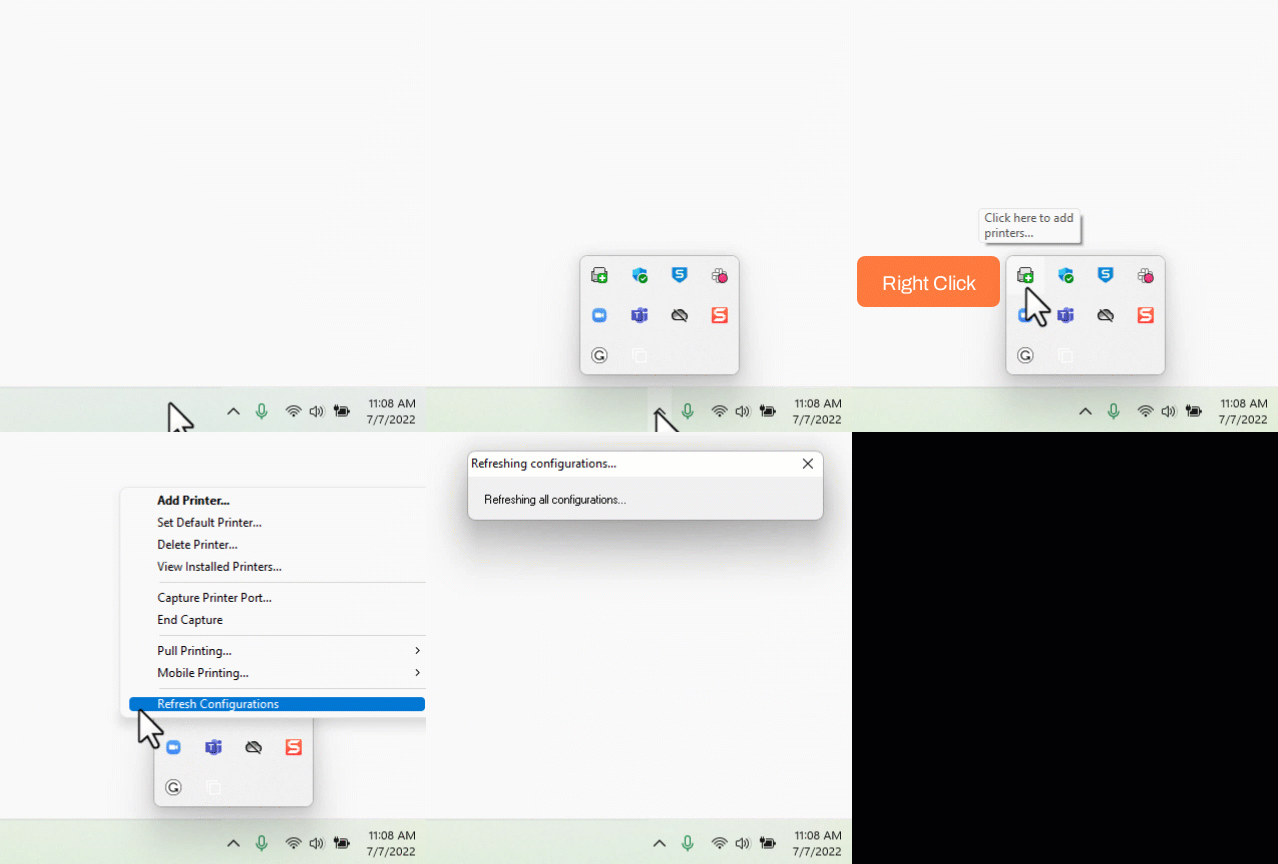
System Tray Icon
The Client offers a manual refresh option, which is useful during testing and if changes made in the Admin Console are needed immediately on a workstation.
To manually refresh the Client on a workstation:

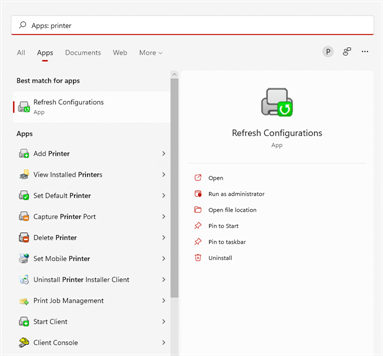
Operating System Menu
Another option to manually refresh the Client is through the operating system menu.
To manually refresh the Client on a workstation:
-
Released: November 21st, 2024
Updated Application Version Included
-
New Mobile App Release
iOS: November 11th, 2024 -
Released: November 11th, 2024


