Last updated: April 26, 2024
Users / Roles Tab
Navigate to Tools ![]() Users to add users and roles, adjust roles, and remove administrators' and non-administrator access to the Admin Console. Only add users needing access to the Admin Console.
Users to add users and roles, adjust roles, and remove administrators' and non-administrator access to the Admin Console. Only add users needing access to the Admin Console.
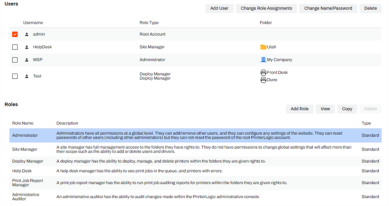
The Users tab divides into two sections allowing you to manage users and roles separately. The Users section displays current users along with the role type and folders they have permission for. The Roles section comes with standard (out-of-the-box) roles that cannot be modified or deleted. Use the roles section to create custom roles, which permit access to specific features of the Admin Console. Features not selected will not be available to the user assigned to the role.
Overview
The administrator role grants full access to view and change objects and settings within the instance, and Role Types are used for non-admin roles. Set or create roles on the Tools ![]() Users tab. PrinterLogic provides a list of predefined user roles ready to be applied and the option to create custom roles specific to the needs of your admin team. Restrict custom roles down to specific folders, printers, and settings, or create roles with broader access and permissions.
Users tab. PrinterLogic provides a list of predefined user roles ready to be applied and the option to create custom roles specific to the needs of your admin team. Restrict custom roles down to specific folders, printers, and settings, or create roles with broader access and permissions.
For example, the Help Desk role can see print jobs in the queue and access the printers in their assigned folder, allowing them to distribute the installation link. However, the Help Desk role does not have the permission to modify printers eliminating the risk of accidental changes made by users with that role. Role types can be applied per folder or printer object for the same user/group. A user/group may have Help Desk roles for the corporate office folder and the Site Manager role for a break room printer, permitting them to manage and update that printer's settings.
Manage Users
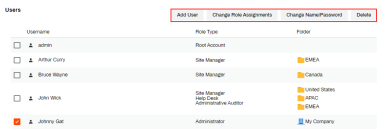
The user management options are located on the upper right of the tab. They include:
- Add User: Use this option to add new users.
- Change Role Assignments: Use this option to update the role for the selected user.
- This option allows for additional folders to be assigned to a non-admin user.
- Change Name/Password: Use this option to update username/password for the root account and PrinterLogic user accounts.
- IdP, AD, and LDAP users must update their username/password through the identity provider.
- Delete: Use this option to remove the selected user from the Users list.
Manage Roles
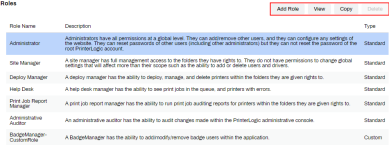
The role management options are located on the middle right of the tab. They include:
- Add Role: Use this option to add a new custom role to the Roles list.
- View: Use this option to view the standard roles PrinterLogic provides.
- This option only shows when a standard role is selected.
- Edit: Use this option to edit an existing custom role.
- This option only shows when a custom role is selected.
- Copy: Use this option to create an editable copy of an existing role.
- Give the copy a unique name in order to save it. There cannot be two roles with the same name.
- Delete: Use this option to remove custom roles.
- Standard roles cannot be removed.
Add a New User
- In the Admin Console, click Tools
 Users.
 - In the Users section, click Add User.
- Select the Identity Provider user type.
- AD Group/User
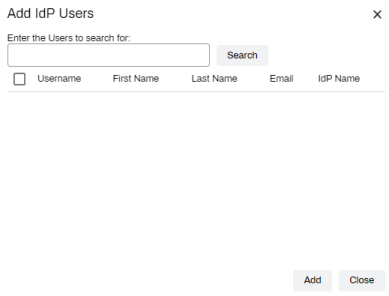
- IdP Group/User
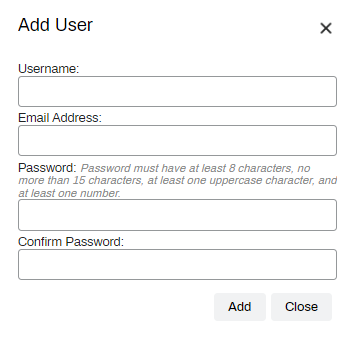
- PrinterLogic User
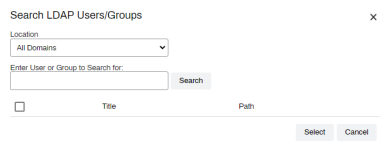
- LDAP Group/User
- The steps for each option are displayed below. Follow the steps for the Identity Provider type chosen in Step 3.
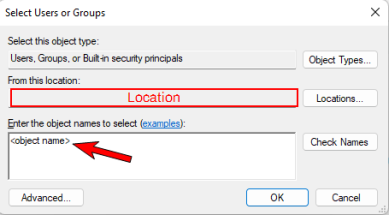
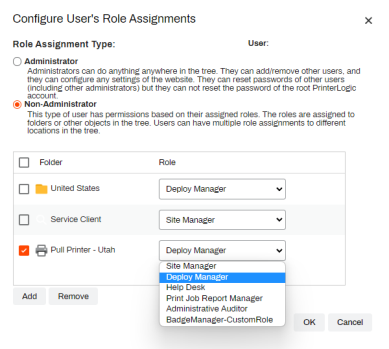
- After the user/group/object has been selected, the Configure User's Role Assignments pop-up will show.
- For the Administrator role, select the Administrator option.
- For the Non-Administrator role:
- Click OK.
The new user account appears in the Users section.
The LDAP Group/User option does not appear unless you have set up an LDAP domain in the Admin Console and the Enable advanced LDAP administrative authentication box checked on Tools ![]() Settings
Settings ![]() General. For more details, see LDAP Domain.
General. For more details, see LDAP Domain.
IdP users and groups are only searchable to add if the IdP has been configured and the users/groups have provisioned over. See Configuring an IdP.
Create User Roles
- Navigate to the Tools
 Users tab in the Admin Console.
 -
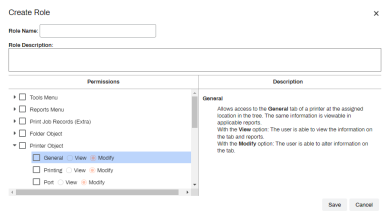
In the Roles section, click Add Role.
- In the Role Name field, type a name to replace the default name, Untitled Role.
- Recommended: In the Role Description field, type a summary to define the purpose of the new role.
-
In the Permissions column, select the boxes for the settings and objects you want the role to have permissions for. Some objects expand to provide View or Modify ability for those objects/tabs.
-
Additionally, selecting an option in the Permissions column displays a description in the column to the right.
-
- Click Save.
When you are finished creating the role, the role appears in the list of existing roles as a Custom role type.
Change User Roles
- In the Users section of the Admin Console, select the box next to the desired user/group.
- Click Change Role Assignments.
- The Configure User's Role Assignments pop-up will show.
- For the Administrator role, select the Administrator option.
- For the Non-Administrator role:
- Click OK.
-
New Mobile App Release
iOS: November 11th, 2024 -
Released: November 11th, 2024
-
Released: October 22nd, 2024
Updated Application Version Included
