Last updated: April 26, 2024
Setup CAC/PIV
Common Access Cards (CAC) or Personal Identity Verification cards (PIV) control access to secure information systems at the appropriate security level. Government agencies and medical facilities commonly use these cards to secure access to sensitive information. The PrinterLogic Virtual Appliance supports authenticating to the Admin Console with these cards.
How It Works
When the user clicks the CaC Login button to log in to the Admin Console, the browser will prompt the user to select a certificate. If the certificate is a smart card certificate, the browser will prompt the user to enter their PIN to unlock the private key and complete a TLS client challenge/response handshake. If successful, the certificate gets submitted to the Virtual Appliance. The Virtual Appliance then validates the certificate chain by verifying against the uploaded CA bundle. Next, the Virtual Appliance will perform an LDAP query to match the certificate to an Active Directory user account. Successful login only occurs if the certificate matches a single AD user. If the certificate matches multiple AD users, they must provide a username hint in the Username field. For example, enter the sAMAccountName of the user and click the CaC Login button.
Prerequisites
Some prerequisite items need to be configured for the successful configuration of CAC/PIV readers. They are as follows:
Environment Requirements
- A smart card reader is attached to the workstation, and appropriate drivers are installed.
- A CAC/PIV smart card is available, and appropriate drivers are installed.
- All CAC/PIV root CAs are installed in the workstation's Trusted Root Certification Authorities store.
- All CAC/PIV issuing CAs are installed in the workstation's Intermediate Certification Authorities store.
- The user can authenticate to Windows by inserting the CAC/PIV card into the reader and entering their required credentials.
PrinterLogic Requirements
- An SSL certificate must be installed on the Virtual Appliance, and the root CA and any intermediate CAs must be trusted by all Windows workstations (it is not required to be a publicly trusted certificate).
- An LDAP domain has been configured in Tools
 Settings
  General.
- A bind username/password is required.
- Have a PrinterLogic representative enable using CAC/PIV for your Virtual Appliance instance.
Configuration Steps
Configure DNS
If individual CNAME entries were configured for the different microservices in the Virtual Appliance as opposed to a wildcard CNAME entry, an additional CNAME entry will need to be defined:
pivcac.fqdn.of.va CNAME fqdn.of.vaPrepare CAC/PIV CA Bundle
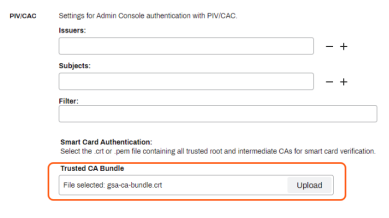
For the Virtual Appliance to validate a CAC/PIV certificate chain, a PEM certificate bundle containing all root CAs and issuing CAs must be created. This file must be named pivcac.crt.
Creating the PEM certificate bundle depends on the format of the root CA and intermediate CA certificates.
IF The agency has a PKCS7 bundle (.p7b) file containing all CA certificates
The following OpenSSL command can be used to convert a PKCS7 certificate bundle (dod_certs.p7b) to PEM format (pivcac.crt):
openssl pkcs7 -print_certs -in dod_certs.p7b -out pivcac.crtThe resulting pivcac.crt file will contain all CA certificates, but the subject and issuer will be printed before each certificate. These extra lines must be removed by editing pivcac.crt in a text editor. This file must only contain a concatenated list of certificates in PEM format, including the -----BEGIN CERTIFICATE----- headers and -----END CERTIFICATE----- footers.
IF The agency does not have a PKCS7 bundle containing all CA certificates
There may not be an easy way to create the pivcac.crt file other than manually exporting the root CAs and intermediate CAs, then concatenating these files to form a single pivcac.crt file. When exporting the CA certificates, ensure they are exported in X.509 base-64 encoded PEM format.
Upload CAC/PIV CA Bundle
In the PrinterLogic Admin Console, go to Tools ![]() Settings
Settings ![]() General. Scroll down to the CAC/PIV section near the bottom of the page.
General. Scroll down to the CAC/PIV section near the bottom of the page.
Reboot Virtual Appliance
The Virtual Appliance containers need to be restarted for the configuration changes to take effect. The easiest way to do this is to reboot the Virtual Appliance.
Troubleshooting
- Open developer tools in the browser and then click the CaC Login button.
- Watch for red entries, and investigate.
- If the page says "Unable to process CAC Login" look for an error on acquire.php. If you hover over that entry, it should tell you what happened.
- An ERR_NAME_NOT_RESOLVED means that the workstation could not resolve the pivcac CNAME entry.
Federal agencies often have to cycle their service account passwords. Ensure that the service account password is correct by going to Tools ![]() Settings
Settings ![]() General and testing the LDAP configuration.
General and testing the LDAP configuration.
- Examine the certificate being used to authenticate to the Admin Console.
- Verify that the certificate has not expired
- Verify that the certificate is trusted and that all CAs in the chain are installed in the respective trusted CA stores for the Local Machine
- Verify the way the certificates are mapped to users inside of Active Directory.
- Are CAC/PIV certificates mapped to multiple AD user accounts through Name Mappings in AD Users and Computers?
- Do the CAC/PIV certificates have a PrincipalName entry inside the subjectAlternativeName extension? Does this PrincipalName match the userPrincipalName for the user inside of AD?
-
New Mobile App Release
Android: October 28th, 2024 -
Released: October 22nd, 2024
Updated Application Version Included
-
Released: October 12th, 2024
