We've Moved!
We've unified our Vasion Print (formerly PrinterLogic) and Vasion Automate documentation into a single, streamlined resource to better serve you. Visit our new unified documentation site: docs.vasion.com
Note: This legacy site will not be updated after January 6, 2025, and will remain available for reference until May, after which all traffic will automatically redirect to docs.vasion.com/a/Get_Started/Automate.htm.

Last updated: January 07, 2025
Alerts
Alerts are a great way to stay on top of printer issues and maintenance, like running out of paper, paper jams, trays missing, low toner, etc. By configuring printer alerts, a designated admin user or group receives an email notification when printers experience an issue. The alert provides the necessary printer information to quickly find the affected printer.
Key Points
Here is some important information about SNMP alerts.
- Alerts are set up on a folder or printer object's Alerts tab in the Admin Console.
- Each trigger can only be applied once per printer. If there are multiple users / groups you want notified for a specific trigger, add them all to the same alert.
- If the alert is configured on a folder, it will apply to all printer objects within that folder and subfolder.
There are two Alert association types:
- Explicit
- The direct printer object or folder where the alert was added.
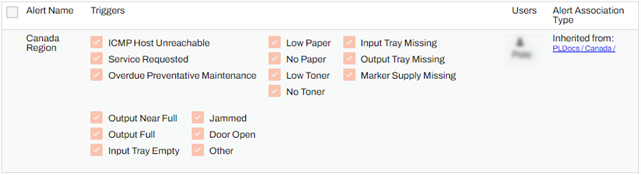
- Inherited
- Printers and subfolders where alerts are configured on a higher folder level. The path to the where the alert was configured displays and provides quick navigation to the folder where the association is Explicit
Requirements
- The printer object must exist in the Admin Console.
- SNMP Status Monitoring must be set up and enabled. For more details, see SNMP Status Monitoring. Without SNMP configured, a message displays at the top of the tab.
- Current user or group. For more details, see Admin Console Users.
Follow the steps below once the prerequisites are complete.
Configure Email Alerts
To configure email alerts you must enable SNMP alerts in Tools ![]() Settings
Settings ![]() General and configure the alert on the Alerts tab at the folder or printer object level.
General and configure the alert on the Alerts tab at the folder or printer object level.
Enable General Settings
- Navigate to Tools
 Settings General and scroll down to the SNMP Status Monitoring section.
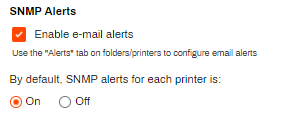
 - Under SNMP Alerts, check the box for Enable e-mail alerts.
- Select the desired option for By default SNMP alerts for each printer is:
- On: Enabled for all printer objects by default.
Off: Disabled for all printer objects by default.
- Select Save on the top-right corner.

Configure the Alerts Tab
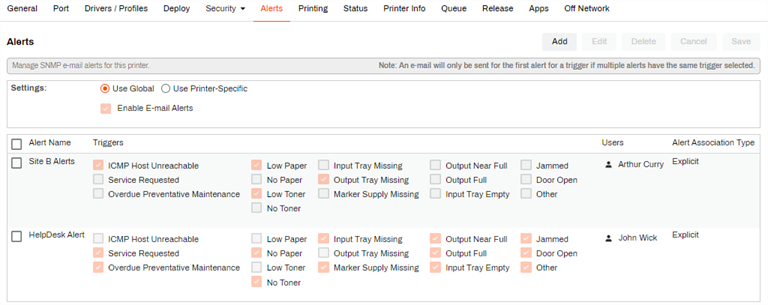
- Navigate to a folder or printer object's Alerts tab.
- In the Settings section, use the default setting or enable printer-specific to modify that printer object.
- Select Add on the top-right corner.
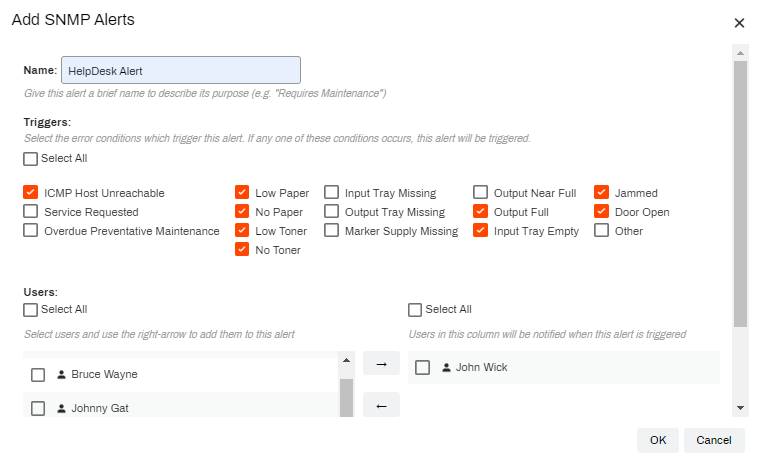
- On the Add SNMP Alerts modal complete the following:
- Name — enter a name for the alert.
- Check the Select All option, or
- Check the box next to the triggers you want to apply. We recommend to group related triggers together.
- In the Users section, select the users / groups you want to receiving the alert. You can select multiple users or groups.
- Use the arrow button to move them to the column on the right.
- Select OK.
The alert is added to the folder / printer object. Vasion Print (formerly PrinterLogic) immediately begins monitoring the printer(s) based on the Under normal conditions and Under error conditions of the SNMP Status Monitoring settings, and notifies the users / groups assigned to the alert via email when a trigger is reported to the SNMP service.
Manage Alerts
To edit or delete an alert, navigate to the folder or printer where it was originally added. If unsure, select the printer or folder object's Alerts tab and locate the Alert Association Type column on the right. If the value says Explicit, you can edit the alert there. The column provides a link to the parent location if the value is Inherited. Select the link to navigate to the correct location.
Edit
To edit an alert:
- Navigate to the parent level and select the object's Alerts tab.
-
Select the box next to the Alert Name.

-
Select the Edit button in the upper-right.

- Make the desired changes in the Edit SNMP Alerts modal, then select OK.


Delete
To delete an alert:
- Navigate to the parent level and select the object's Alerts tab.
-
Select the box next to the Alert Name.
-
Select the Delete button in the upper-right.
-
Select OK in the browser pop-up.

-
Week Ending In Jan 4th, 2025
-
Released: Dec 27th, 2024
-
Released: Dec 23rd, 2024
-
Android/iOS: Dec 23rd, 2024
-
Released: Dec 9th, 2024